


CLIP STUDIO TABMATE Settings
You can assign Clip Studio Paint functions to the Clip Studio Tabmate.
Assigning Clip Studio Paint operations allows you to use those operations simply by pressing buttons on the Clip Studio Tabmate.
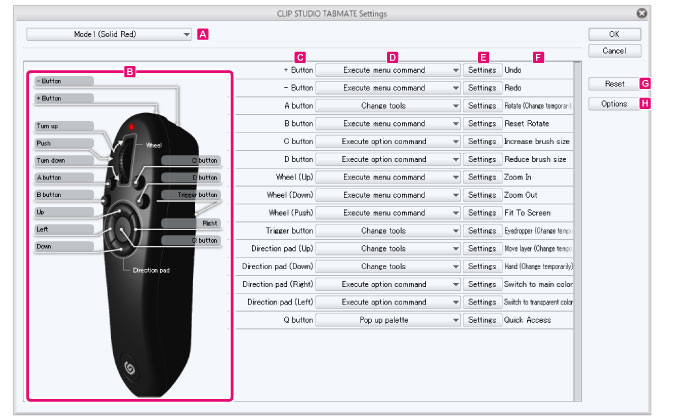
A.Mode
Select a mode to assign functions to the Clip Studio Tabmate. You can select from Mode 1 to Mode 4.
|
|
The Clip Studio Tabmate modes can be switched by pressing the Clip Studio Tabmate's [CLIP STUDIO] button. |
B.Preview
This shows the Clip Studio Tabmate modes and part names.
·Functions assigned to the selected mode in the [CLIP STUDIO TABMATE Settings] dialog box will be shown in this preview. When [Mode 1 (red lighting)] is selected, the LED preview will be red.
·When you press the Clip Studio Tabmate buttons, the corresponding button name will be highlighted.
C.Button names
These are the Clip Studio Tabmate buttons that can be assigned to Clip Studio Paint functions. Depending on the assigned function, button operations and numbers may show.
D.Assigned functions
Assigns Clip Studio Paint operations to the Clip Studio TABMATE.
Select the function you want assign to each button from the pull-down menu. Depending on the function, a pop-up dialog box corresponding to the selected function will appear.
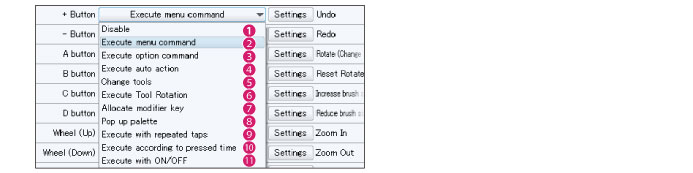
(1) Disable
This disables button functions. The Clip Studio Tabmate will not have any effect on Clip Studio Paint even if you press its buttons.
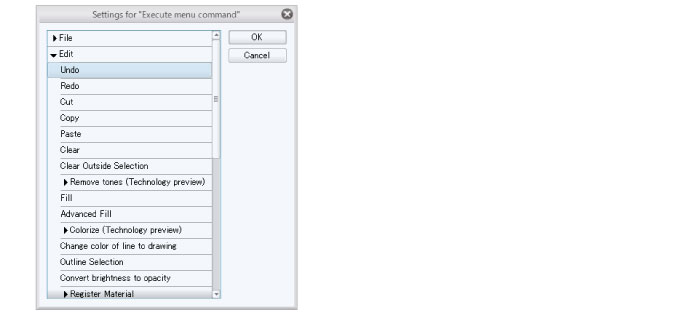
(2) Execute menu command
You can assign Clip Studio Paint main menu commands to the Clip Studio Tabmate buttons.
If you select this option, the [Settings for "Execute menu command"] dialog box will appear. Select a menu command from the dialog box and click [OK] to assign it.
|
|
You can also open the [Settings for "Execute menu command"] dialog by clicking [Settings]. |
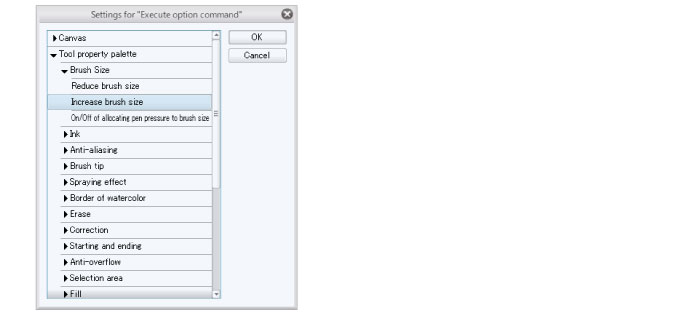
(3) Execute option command
The following auxiliary functions of Clip Studio Paint can be assigned to the Clip Studio Tabmate.
·Canvas
·Tool property palette
·Brush size palette
·Sub tool palette
·Layer property palette [PRO/EX]
·Quick access palette [PRO/EX]
·Drawing color
·Edit
·Confirm and Cancel
If you select this option, the [Settings for "Execute option command"] dialog box will appear. Select a menu command from the dialog box and click [OK] to assign it.
|
|
You can also open the [Settings for Execute option command] dialog by clicking [Settings]. |
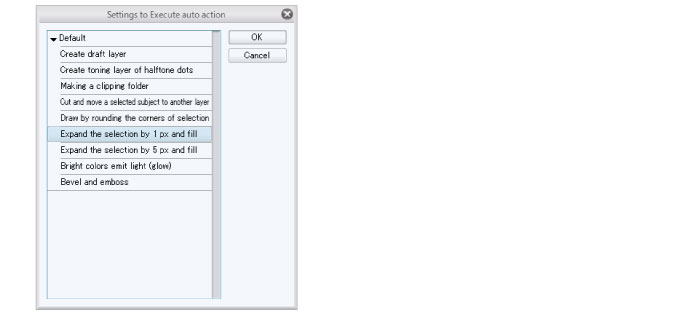
(4) Execute auto action [PRO/EX]
You can assign Clip Studio Paint auto actions to the Clip Studio Tabmate.
If you select this option, the [Settings to Execute auto action] dialog box will appear. Select a auto action from the dialog box and click [OK] to assign it.
|
|
You can also open the [Settings to Execute auto action] dialog by clicking [Settings]. |
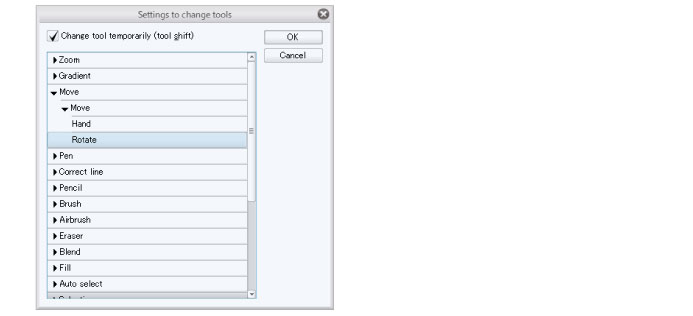
(5) Change tools
Tools and sub tools in Clip Studio Paint can be assigned to Clip Studio Tabmate buttons.
If you select this option, the [Settings to change tools] dialog box will appear. Select a tool or sub tool from the dialog box and click [OK] to assign it to a button.
|
|
·If you turn on [Switch tool temporarily (tool shift)] in the [Settings to change tools] dialog box, you can change to a different tool while holding down a button on the Clip Studio Tabmate. ·You can show the [Settings to change tools] dialog box by clicking [Settings]. |
(6) Using tool rotation
Tool rotation is a function that allows you to switch the Clip Studio Paint tools each time a Clip Studio Tabmate button is pressed.
Selecting this item shows the [Tool Rotation Settings] dialog box. To learn about these settings, see "When selecting to execute tool rotation".
|
|
To learn how to set tools in the [Tool Rotation Settings] dialog box, see "Tool Rotation Settings". |
(7) Assigning modifier keys
You can assign modifier keys (Ctrl, Shift, Alt, Space) to Clip Studio Tabmate buttons.
Select [Allocate modifier key] and click [Settings]. Shows the [Settings to allocate modifier keys] dialog box. Select a modifier key and click [OK] to assign it.
More than one modifier key can be selected from the [Settings to allocate modifier key] dialog box. In that case, it will be equivalent to multiple modifier keys being pressed.

|
|
The following items cannot be selected for [Allocate modifier key]. ·[Wheel (Up)] ·[Wheel (Down)] ·Items added when [Execute with repeated taps] is selected ·Items added when [Execute according to length of key press] is selected ·Items added by selecting [Execute with ON/OFF] |
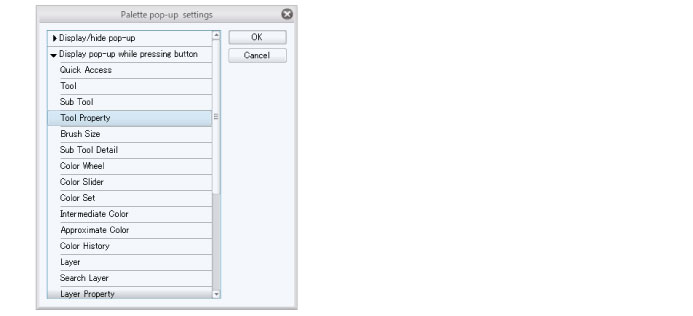
(8) Pop up palette
You can assign pop-up palettes in Clip Studio Paint to Clip Studio Tabmate buttons.
If you select this option, the [Palette pop-up settings] dialog box will appear. Select either [Display/hide pop-up] or [Display pop-up while pressing button]. Select a palette to pop up and click [OK] to assign the palette pop-up to a button.
|
Display/hide pop-up |
Each time the Clip Studio Tabmate button is pressed, the palette will show or hide. |
|
Press a button to show the pop-up. |
You can also set up the button so that the palette appears only while the button is pressed. |
|
|
[Palette Pop-up] is not available for the following items. ·[Wheel (Up)] ·[Wheel (Down)] ·Items added when [Execute with repeated taps] is selected ·Items added when [Execute according to length of key press] is selected ·Items added by selecting [Execute with ON/OFF] |
(9) Execute with repeated taps
Multiple functions of Clip Studio Paint can be assigned to a single button on the Clip Studio Tabmate. Different functions can be executed according to the number of times the button is pressed.
Unlike tool rotation, functions other than tools can also be selected. To learn about these settings, see "When the number of consecutive taps to execute is selected".
|
|
The following items are not available for [Execute with repeated taps]. ·[Wheel (Up)] ·[Wheel (Down)] ·Items added when [Execute with repeated taps] is selected ·Items added when [Execute according to length of key press] is selected ·Items added by selecting [Execute with ON/OFF] |
(10) Execute according to length of key press
Multiple functions of Clip Studio Paint can be assigned to a single button on the Clip Studio Tabmate. Different functions can be executed depending on the length of the button press.
To learn about these settings, see "When selecting Execute according to length of key press".
|
|
The following items cannot be selected for [Execute according to length of key press]. ·[Wheel (Up)] ·[Wheel (Down)] ·Items added when [Execute with repeated taps] is selected ·Items added when [Execute according to length of key press] is selected ·Items added by selecting [Execute with ON/OFF] |
(11) Execute with ON/OFF
Different functions can be turned on while pressing a Clip Studio Tabmate button and then turned off again upon release of the button.
To learn about these settings, see "When Execute with ON/OFF is selected".
|
|
The following items cannot be selected for [Execute with ON/OFF]. ·[Wheel (Up)] ·[Wheel (Down)] ·Items added when [Execute with repeated taps] is selected ·Items added when [Execute according to length of key press] is selected ·Items added by selecting [Execute with ON/OFF] |
E.Settings
When clicked, a dialog box corresponding to the assigned action will appear. You can set detailed operations in this dialog box.
For details on the dialog box, see the items under the [Assigned functions] options.
F.Information area
This indicates the action assigned to the button.
If the function has registered shortcut keys, you can assign those functions without selecting it from the [Assigning functions] drop-down menu.
Double-clicking this column shows [Input with shortcut]. Input the shortcut key and press Enter. Shows the action assigned to the button.
G.Reset
This resets the CLIP STUDIO TABMATE settings back to the default state.
H.Options
This shows the [TABMATE Options] dialog box. It is possible to set the interval registered for operations when tapping a button repeatedly as well as long press operations.
TABMATE Options Dialog box
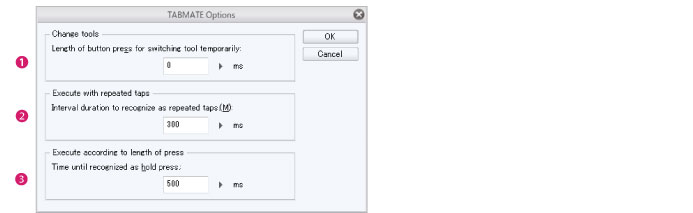
(1) Length of button press for switching tool temporarily
With this setting, you can choose the amount of time that the button needs to be pressed to switch the tool. This setting is used when [Change tools] is selected from the [Assigned functions] options in the [CLIP STUDIO TABMATE Settings] dialog box.
(2) Interval duration to recognize as repeated taps
Adjust the interval recognized as repeated taps by repeatedly pressing it. This setting is used when [Execute with repeated taps] is selected from the [Assigned functions] options in the [CLIP STUDIO TABMATE Settings] dialog box.
(3) Time until recognized as hold press
You can adjust the length of time recognized as a long press when pushing a button. This setting is used when [Execute according to length of key press] is selected from [Assignment] options in the [CLIP STUDIO TABMATE Settings] dialog box.