


Color Profile [PRO/EX]
Allows you to set the color profile, rendering intent and used library to preview on the canvas.
Preview Settings
Select the [View] menu > [Color profile] > [Preview Settings] to open the [Preview of color profile] dialog box.
In this dialog box, you can change settings for color conversion when using a color profile preview. You can also apply the set color profile when exporting an image using [Save Duplicate] or [Export (Single Layer)].
[Preview of color profile] Dialog Box
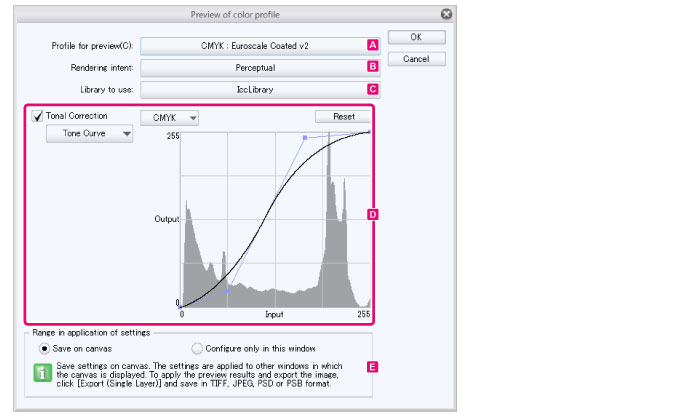
A.Profile for preview
Select the color profile for previewing the colors.
|
|
·CMYK is a color space for print using cyan, magenta, yellow and keytone (black). ·RGB is a color space for screen display on monitors and scanners. Colors are expressed in red, green and blue. |
B.Rendering intent
Set how to process the color conversion between color spaces with the color management system.
|
Perceptual |
Preserves the visual relationship between colors so that colors are perceived as natural even when color values are changed. |
|
Saturation |
Compares the maximum highlight in the source color space with the maximum highlight in the destination color space, and shifts the difference. |
|
RelativeColorimetric |
Tries to reproduce vivid colors, even at the expense of color accuracy. |
|
AbsoluteColorimetric |
Does not change colors that fall within the destination gamut, but changes out-of-gamut colors. |
C.Library to use [Windows]
Select whether to use the [Icclibrary] or [MicrosoftICM].
|
|
[Library to use] is not available on macOS. |
D.Tonal correction
Turn on this item to adjust contrast for the image. You can select from [Tone Curve] or [Level Correction].
|
|
[Tonal Correction] can be set only when the [Profile for preview] is CMYK. |
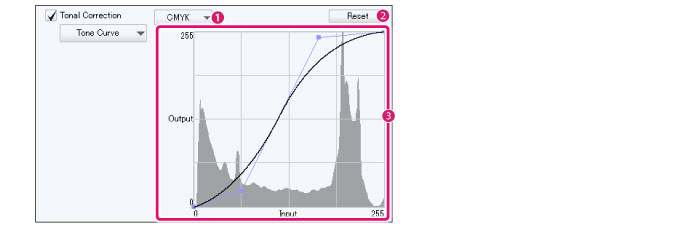
Tone Curve
Adjusts the contrast of an image using the tone curve.
|
(1) Channel |
Select a channel to adjust the brightness. The available channels depend on the selected color profile. |
|
(2) Reset |
Reset the image to the original state. |
|
(3) Tone curve |
A graph to adjust the contrast of the image. Drag the control points to adjust the curve. The horizontal axis of the graph is the "Input" value (original brightness) and the vertical axis is the "Output" value (brightness after adjustment). |
|
|
·To delete a control point, drag it outside the graph. ·The horizontal axis of the graph is the "Input" value (original brightness) and the vertical axis is the "Output" value (brightness after adjustment). ·This graph displays the volume of the dark areas (left side) and bright areas (right side) as mountain-like peaks. Adjust the tone curve while checking the balance of the original image in the histogram. |
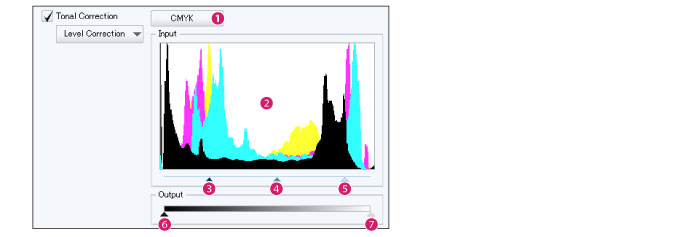
Level Correction
Adjusts the contrast of an image using the histogram.
|
(1) Channel |
Select the channel to adjust the levels. The available channels depend on the selected color profile. |
|
(2) Histogram |
This graph displays the volume of the dark areas (left side) and bright areas (right side) as mountain-like peaks. |
|
(3) Shadows |
This controls the darkest parts of the image. The [Shadows] control point is usually the furthest left under the histogram. |
|
(4) Midtones |
This controls the midtones of the image. |
|
(5) Highlights |
This controls the brightest parts of the image. The [Highlights] control point is usually the furthest right under the histogram. |
|
(6) Shadows output |
This controls the darkest parts of the image. |
|
(7) Highlights output |
This controls the brightest parts of the image. |
|
|
If either edge of the mountain in the histogram does not reach the range edge, move the control point to the edge of the peak on that side. To correct the entire image, adjust in such a way as to spread the peaks across the entire histogram range. |
E.Range in application of settings
Specify the scope of the settings configured in the dialog box.
You can also set whether or not to save the settings configured in the [Preview of color profile] dialog box when saving the file.
|
Save on canvas |
·Saves the settings configured in the [Preview of color profile] dialog box when saving the file. When you open the file again after saving it, the color profile settings will be retained. ·The settings configured in the dialog box will also apply to other windows. ·To apply the settings when exporting an image, export in TIFF format (extension: tif), JPEG format (extension: jpg), Adobe Photoshop Document (extension: psd) or Adobe Photoshop Big Document format (extension: psb). When exporting, do not forget to turn on [Embed ICC profile] in the [Export settings] dialog box. |
|
Set only in this window |
·Does not save the settings in the [Preview of color profile] dialog box when saving the file or exporting in a specified format. When you open the file again after saving, the color profile settings will be those set in the [Preferences] dialog box. ·The settings configured in this dialog box will not apply to other windows. |
Preview
Select the [View] menu > [Color profile] > [Preview] command to preview the settings set up in the [Preview of color profile] dialog box.
|
|
·The color profile preview settings are saved for the next time the application is started. For example, the application is closed with the preview on, the preview will automatically be used the next time the application is started. ·If you have not yet set options in the [Preview of color profile] dialog box, the dialog box will open when you select the [Preview] command. |