


Functions of the Navigator Palette
This section describes the functions and names of each part of the [Navigator] palette.
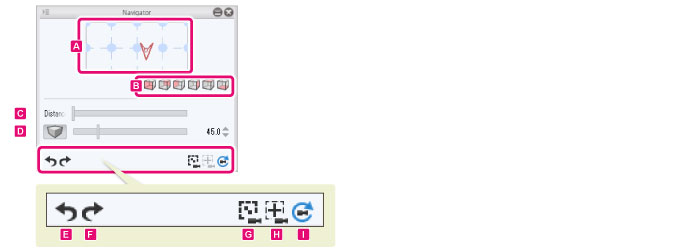
A.Navigator controls
The orientation of the camera can be changed by clicking the mouse buttons and dragging the rectangular area.
The orientation of the camera changes based on the direction in which the rectangular area is dragged and the combination of mouse buttons clicked.

Changing the x axis orientation of the camera
Left click and drag the rectangular area up or down to change the x axis orientation of the camera.
Changing the y axis orientation of the camera
Left click and drag the rectangular area left or right to change the y axis orientation of the camera.
Changing the z axis orientation of the camera
Right click and drag the rectangular area to change the z axis orientation of the camera.
|
|
Click the circle where the x axis (vertical line) and y axis (horizontal line) meet in [Navigator controls] to move the camera position. The center of the circle indicates the camera position. |
B.Change perspective
Clicking this icon changes the display in the [Document] window to orthographic projection.

|
(1) Front view |
Changes the camera perspective to a front view. |
|
(2) Back view |
Changes the camera perspective to a back view. |
|
(3) Left view |
Changes the camera perspective to a left view. |
|
(4) Right view |
Changes the camera perspective to a right view. |
|
(5) Top view |
Changes the camera perspective to a top view. |
|
(6) Bottom view |
Changes the camera perspective to a bottom view. |
C.Distance
Set the distance of the camera. Moving the slider to the right moves the camera further away.
D.Perspective projection/Parallel projection
Switch the display of the [Document] window between perspective projection and parallel projection.
·When off, parallel projection is used for the display in the [Document] window.
·When on, perspective projection is used for the display in the [Document] window. Switching to perspective projection makes it possible to adjust the viewing angle using the sliders to the right of the icon.
E.Undo point of view
Undoes changes to the perspective.
F.Redo point of view
Redoes undone changes to the perspective.
G.Show all 3D items
Adjusts the perspective so that all meshes and characters are displayed.
|
|
The camera orientation does not change. |
H.Set as center of camera
Adjusts the camera position so that the selected area is displayed at the center. If no area is selected, the camera position is adjusted to center all mesh objects.
I.Reset camera
Restores the settings of the camera to the default.