


Fill
Displayed items vary depending on the selected tool or sub tool.
→ "When the Fill Tool or Auto Select Tool Is Selected"
→ "When the Gradient layer or Fill in monochrome layer is selected [PRO/EX]"
When the Fill Tool or Auto Select Tool Is Selected
Allows you to configure the area to fill and the border of the selected area in detail.
|
|
The [Fill] tool and [Fill] category of the [Auto select] tool are the same function. However, the output results are different depending on the tool. The following describes each item using the creation of a selection as an example. |
(1) Apply to connected pixels only
Creates a selection by tracing pixels of the same color as that of the clicked point. When turned off, creates a selection that includes all pixels of the same color on the canvas. The following figure shows the selection in green.

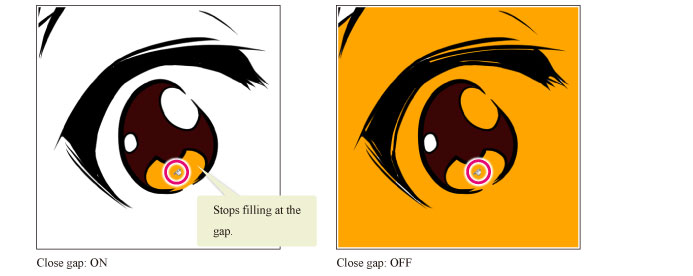
(2) Close gap
When gaps are present in the area to select, the selected area is created by closing gaps up to a specified number of pixels. Use the indicator or slider to specify the size of the gap. The figure below shows an example when fill is executed. The area to fill and the selection are the same.
|
|
Depending on your environment, configuring a large value for [Close gap] may take time to complete creating the selection. |
(3) Fill narrow areas
When a gap smaller than the value configured in [Close gap] is found, the gap is included in the selection if the continuation of the line is closed. This setting is available when [Close gap] is turned on.

(4) Color margin
Configures the tolerance in the difference of colors when creating a selection. The larger the value, the larger is the tolerance to include different colors than that of the clicked point in the selection area.
(5) Area scaling
When creating a selection, the selection to create is enlarged or reduced from the original by the specified pixels.
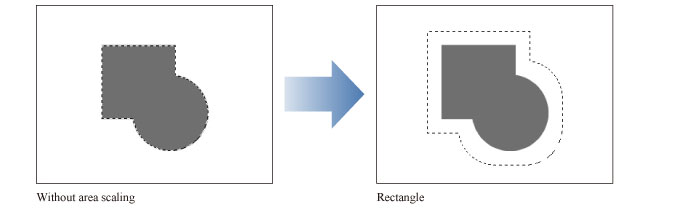
(6) Scaling mode
Configures the shape of corners of the scaled area when [Area scaling] is turned on.
Rectangle
Determines the area by placing a rectangle on each pixel on the outline of the area to enlarge or reduce.
The outline of the enlarged or reduced area often becomes rectangular.
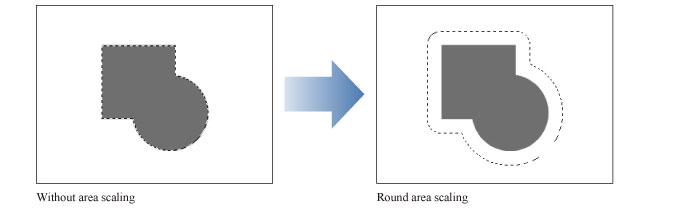
Round
Determines the area by placing a circle on each pixel on the outline of the area to enlarge or reduce.
The outline of the enlarged or reduced area becomes round as angles are rounded off.
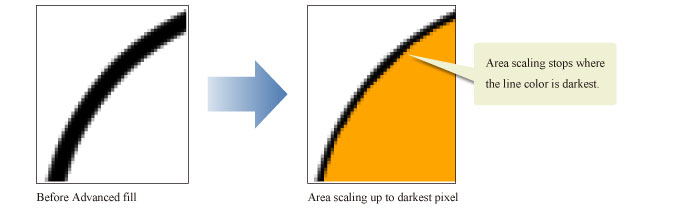
To darkest pixel
Recognizes the area with the darkest color (area with highest opacity) and extends the selection up to that area.
(7) Snap to symmetry ruler [PRO/EX]
When turned on, the [Fill] tool or [Auto select] tool snaps to the [Symmetrical ruler].
When the Gradient layer or Fill in monochrome layer is selected [PRO/EX]
Allows you to edit the [Gradient] layer or [Fill in monochrome] layer. It also allows you to switch the layer type.
(1) Fill settings
Configure how to fill. Settings displayed subsequently vary depending on the option selected for this item.
|
Gradient |
The selected layer is converted into a [Gradient] layer and filled with gradient. |
|
Fill |
The selected layer is converted into a [Fill in monochrome] layer and filled with one color. |
(2) Fill color
Configures the color in which to fill the Fill in monochrome layer. Clicking the color indicator displays the [Color settings] dialog box. You can also select a color from the color palettes.
|
|
For details on the [Color settings] dialog box, see "Advanced settings of color Dialog Box" . |
(3) Color bar
Previews the configured gradient. When clicked, displays the [Edit gradient] dialog box where you will be able to configure the gradient in detail. For the [Edit gradient] dialog box, see "Edit gradient Dialog Box" .
(4) Advanced settings
When clicked, displays the [Edit gradient] dialog box where you will be able to configure the gradient in detail. For the [Edit gradient] dialog box, see "Edit gradient Dialog Box" .
(5) Shape
Configure the shape for the gradient.
|
Straight line |
Draws a linear gradient in accordance with the dragged length. |
|
Circle |
Draws a gradient in accordance with the circular shape created by dragging the tool. |
|
Ellipse |
Draws a gradient in accordance with the elliptical shape created by dragging the tool. |
(6) Size
Re-configures the shape for the gradient.
(7) Angle
Re-configures the angle for the gradient. This setting is available when [Shape] is [Line] or [Ellipse].
(8) Thickness
Re-configures the thickness for the gradient. This setting is available when [Shape] is [Ellipse].
(9) Edge process
Configure the drawing outside the dragged area.
|
Do not repeat |
Draws gradient in the dragged area. Fills the area before the starting point in the starting color of the gradient, and the area after the ending point, in the end color of the gradient. |
|
Repetition |
Repeats the gradient in the same direction. |
|
Reverse |
Repeats the gradient by alternating the direction. |
|
Not draw |
Draws gradient in the dragged area. Does not draw anything in the areas before the starting point and after the ending point. |
(10) Dithering
When turned on, fine noise is added to gradient to obscure the color boundaries. This makes the gradient look smooth.