


T
Text
Allows you to configure the text direction, anti-aliasing and the like when using the [Text] sub tool, or when the [Text layer] is selected with the [Object] sub tool.
|
|
Some settings may not display depending on the selected tool or sub tool. |
(1) Text direction
Select text direction from [Vertical] and [Horizontal].
(2) Anti-aliasing
Configure anti-aliasing for text.
|
Canvas setting [PRO/EX] |
Configuring [Monochrome] for [Basic expression color] on the [New] dialog box automatically disables the anti-aliasing. This item does not display when the [Object] sub tool is selected. |
|
On |
Enables anti-aliasing. |
|
Off |
Disables anti-aliasing. |
|
|
The [New] dialog box displays when [File] menu → [New] is selected. |
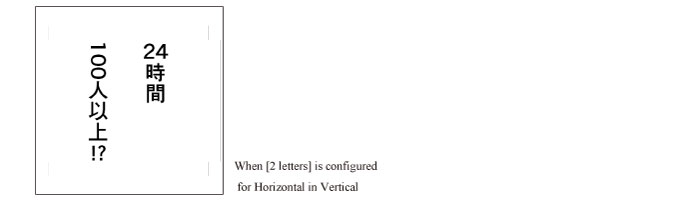
(3) Auto TateChuYoko (Horizontal in Vertical)
Displays half-width letters horizontally when text is input vertically. Select the number of letters to display horizontally from [None], [1 letter], [2 letters], [3 letters] and [4 letters].
For example, if [2 letters] is configured, 2 half-width letters are displayed horizontally but 3 or more half-width letters are displayed vertically.
(4) Use half-width punctuation marks
When turned on, blank spaces for punctuation marks such as two-byte punctuation marks or parentheses are automatically filled.
(5) Wrap text at frame
When turned on, text is wrapped so that it fits within the text frame. In this case, the font size of text is not changed even when the handle is dragged to change the text frame size.
|
|
If the text does not fit within the frame, text that falls outside the frame is not displayed in the canvas. Adjust the size of the frame in order to display the text. |
(6) Align frames
Specifies the position to which text within the text frame is aligned.
·You can select [Left], [Center] or [Right] for vertical text.
·You can select [Up], [Center] or [Bottom] for horizontal text.
(7) Edge
When turned on, this adds edges to text. A slider allows you to adjust the width of the edge.
|
|
[Edge] in the [Text] category is different to [Edge] in the [Layer Property] palette. [Edge] in the [Text] category adds an edge to the text itself, whereas [Edge] in the [Layer Property] palette adds an edge to the entire layer. |
(8) Edge color
Sets the color of text edges. Clicking the color indicator displays the [Color settings] dialog box where you can set the edge color.
|
|
For details on the [Color settings] dialog box, see "Advanced settings of color Dialog Box" . |
(9) Background color
When turned on, this enables you to set the background color in the text frame. Clicking the color indicator displays the [Color settings] dialog box where you can set the background color.
|
|
For details on the [Color settings] dialog box, see "Advanced settings of color Dialog Box" . |
(10) Opacity
Configures the opacity of the background color.