


Export fanzine printing data
Exports the work as data to be published at a fanzine printing vendor. Select this command to open the [Export fanzine printing data] dialog box. Configure the settings in the [Export fanzine printing data] dialog box and click [OK] to export the fanzine printing data. You can check the final product by viewing a 3D preview before exporting.
·When using Windows/macOS, Clip Studio will start up, and the exported fanzine printing data can be checked by clicking [Check exported data] once the export is complete.
·When using an iPad or iPhone, the Files app is displayed after the [Export fanzine printing data] dialog box is set. Select the save folder, then tap [Save]. Open the selected folder to check the exported fanzine printing data.
·When using an Android or Chromebook, follow the on-screen instructions after completing the settings in the [Export fanzine printing data] dialog box. In the [File operation/Share] dialog box, check that the correct data is being exported. To open the exported data, go to the [File operation/Share] dialog box, select [Export], and export the data to the device. For details, see "Exporting files saved in Clip Studio Paint to storage".
|
|
·If there are any issues with the data, an error message will appear, and it may not be possible to export the fanzine printing data. For information on how to solve these issues, see "If an error message appears". ·If [Export fanzine printing data] is performed twice or more for the same work, the first data will be overwritten with the second data. Also, if files unrelated to the exported data have been added to the export destination folder, these files may be deleted. |
|
|
·The data consists of an image file for each page (extension: psd) and a text file with the specifications for each page (extension: txt). ·If [Export fanzine printing data] is performed more than once for the same work, only the updated pages will be exported from the second time. This makes it quicker to export the fanzine printing data. ·The command is not available when [Webtoon] is selected from [New] > [Use of work]. Please select [Story] > [View] > [Page-by-page], and set [Binding point] and [Start page] before running the function. |
[Export fanzine printing data] dialog box
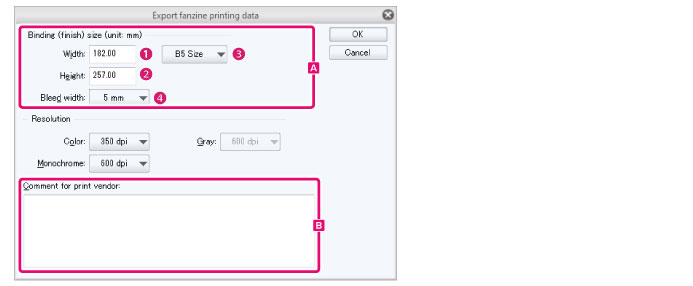
A.Binding (finish) size
Set the cropped border size for binding.
|
|
The fanzine printing data is output in the size set in [Binding (finish) size]. Changing the [Binding (finish) size] in this dialog scales the images of the printing data. |
(1) Width
Sets the book width.
(2) Height
Sets the book height.
(3) Book size
Select a width and height from default sizes.
(4) Bleed width
If a printing vendor is selected in the [New] dialog or the [Change basic work settings] dialog, the bleed width recommended by the selected company is displayed automatically. If [General-purpose settings] is selected, a standard bleed width is set.
|
|
·For details on the [New] dialog box, see "New dialog box (Printing of fanzine) [EX]". ·For details on the [Change basic work settings] dialog box, see "Change basic work settings". |
B.Resolution
You can set the resolution of the printing data. If a printing vendor is selected in the [New] dialog or the [Change basic work settings] dialog, you can select from resolutions recommended by the printing vendor.
|
|
·For details on the [New] dialog box, see "New dialog box (Printing of fanzine) [EX]". ·For details on the [Change basic work settings] dialog box, see "Change basic work settings". |
(1) Color
Select the resolution to be used on pages where the basic expression color is [Color].
(2) Gray
Select the resolution to be used on pages where the basic expression color is [Gray].
(3) Monochrome
Select the resolution to be used on pages where the basic expression color is [Monochrome].
C.Comment for printing vendor
If you have any instructions for the printing vendor, enter them here. The comment will be exported as a text file.
If an error message appears
If an error message appears when exporting fanzine printing data, try the following methods to resolve the issue.
|
|
·You may be able to confirm the page on which the error occurred by selecting the [Story] menu > [Binding process] > [Show binding list]. For details, see "Show binding list". ·You can apply the same settings to multiple pages by selecting the [Story] menu > [Change basic page settings]. For details, see "Change basic page settings". |
|
Message |
Solution |
|
Turn on the binding (finish) size and set the size for the cropped border. |
This data cannot be exported as fanzine printing data. Use the [File] menu > [Export multiple pages] > [Batch export]. For details, see "Batch export". |
|
The specified printing vendor recommends a bleed border of XX mm. |
This appears if the bleed width differs from that specified by the printing place. Click [Continue] and set the [Bleed width] specified by the printing vendor in the [Export fanzine printing data] dialog before exporting the data. If the bleed width is wider than specified, the edges of the bleed area may be printed. |
|
3.0 mm or 5.0 mm are generally used for bleed width. |
This message may appear if the bleed width differs from that generally used. Open to the applicable page, click [Continue] and set the bleed width to 3mm or 5mm in the [Export fanzine printing data] dialog box, then export the data. If the bleed width is wider than specified, the edges of the bleed area may be printed. |
|
Set the number of pages as an even number between XX and XX. |
This appears if the number of pages is below the minimum specified by the printing place, or if it is an odd number. Adjust the number of pages according to the specifications of the printing place. For information on adding or deleting pages, see "Add Page" and "Delete Page". |
|
Turn on folio or blind folio and set folio. |
This appears if a folio or blind folio is not set. Select the [Story] menu > [Change basic work settings] and turn on [Folio] or [Blind folio]. For details on these settings, see "Change basic work settings". |
|
Set the starting number of the folio to 1. |
This appears if a number other than "1" is set as the start number of the folio. Select the [Story] menu > [Change basic work settings] and set the start number of the folio to "1". For details on these settings, see "Change basic work settings". |
|
Turn on the setting of cover page and provide cover page. |
This appears if a cover page has not been added to the work. Select the [Story] menu > [Change basic work settings] and add a cover page. For details on these settings, see "Change basic work settings". |
|
The following binding (finish) size is recommended for the specified printing vendor. |
The binding (finish) size you have set may not be handled by the printing vendor. Click [Continue] and set the [Binding (finish) size] specified by the printing vendor in the [Export fanzine printing data] dialog before exporting the data. |
|
Either of the following is generally recommended for the binding (finish) size. |
The binding (finish) size differs from the size generally used for fanzines. Click [Continue] and set the [Binding (finish) size] specified by the printing vendor in the [Export fanzine printing data] dialog before exporting the data. |
|
A folio is generally required. Turn on the folio setting. |
This appears if a folio or blind folio is not set. Select the [Story] menu > [Change basic work settings] and turn on [Folio] or [Blind folio]. For details on these settings, see "Change basic work settings". |
|
Draft with the setting to be exported with color is included in main text. |
This appears when the basic expression color of the body pages is set to [Color] or [Grey]. To print a comic in black and white, set the basic expression color to [Monochrome]. Open to the applicable page and set the basic expression color to [Monochrome] in the [Story] menu > [Change basic page settings]. For details on how to set, see "Change basic page settings". |
|
Multiple resolutions are set for single basic expression color. It is scaled up and down when exported, so moire or something may occur in tone. |
This appears if different resolutions are set for different pages with the same basic expression color. To export the data in its original resolution, use the [File] menu > [Export multiple pages] > [Batch export]. For details, see "Batch export". |