


Change basic work settings Dialog Box (Printing of fanzine)
This is the [Change basic work settings] dialog box that appears when the [Use of work] is set to [Printing of fanzine].
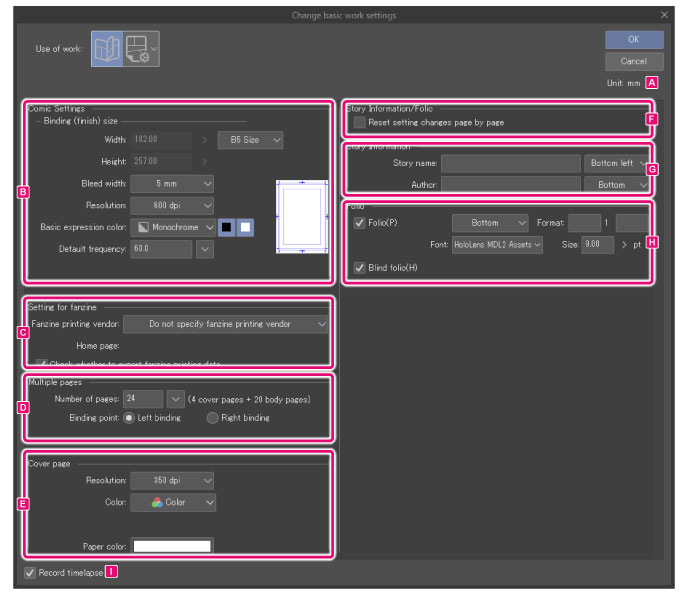
A.Unit
The unit for setting the width and height of the canvas. In this window, the unit is fixed as mm.
B.Manga draft settings > Binding (finish) size
Adjust the settings for creating the comic canvas.
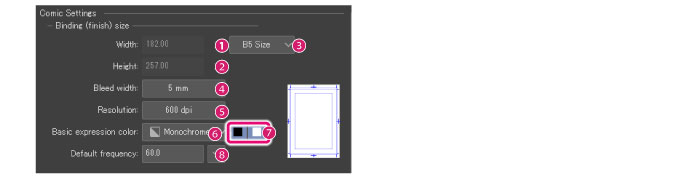
(1) Width
Horizontal length to print.
(2) Height
Vertical length to print.
(3) Default size (Cropped border)
Allows you to select a width and height for the finish size from default sizes.
(4) Bleed width
Sets the [Bleed width]. You can select from [5mm] or [3mm]. Selecting a printing place in [Fanzine printing vendor] automatically sets the [Bleed width] recommended by the printing place.
The bleed width is an extra margin to compensate for misaligned trimming of the edges of the pages. To print to the edge of the page, draw up to the bleed width area.
The area between the bleed border (the first border from the edge) and the finish border (the second border from the edge) is the bleed area.
(5) Resolution
Set the resolution of the page. If a printing place is selected in [Fanzine printing vendor], you can select from resolutions recommended by the printing vendor.
(6) Basic expression color
Sets the basic expression color. You can choose from [Color], [Gray], or [Monochrome].
(7) Drawing colors
Set the drawing colors when using [Gray] or [Monochrome] basic expression colors. You can set the drawing colors using the black and white square icons.
Gray
You can set drawing colors in the following ways with the black and white buttons.
|
Only black |
The drawing colors will be grayscale from black to transparency. |
|
Only white |
The drawing colors will be grayscale from white to transparency. |
|
Both black and white |
The drawing colors will be grayscale from black to white. |
Monochrome
You can set drawing colors in the following ways with the black and white buttons.
|
Only black |
The drawing colors will be black and transparency only. |
|
Only white |
The drawing colors will be white and transparency only. |
|
Both black and white |
The drawing colors will be black, white, and transparency only. |
|
|
For details on expression colors and drawing colors, see "Explanation: Expression Color and Drawing Color". |
(8) Default frequency
Specify the number of screentone lines per inch. Larger values result in smaller dots. This appears when the basic expression color is set to [Gray] or [Monochrome].
C.Setting for fanzine
Configures settings related to printing fanzines.

(1) Fanzine printing vendor
Select the name of the printing vendor from which to request printing. This option will be set as [General-purpose settings] if there are no applicable companies.
|
|
[Fanzine printing vendor] is a Japanese langauge only service. Fanzine printing vendor cannot be selected in other language versions of Clip Studio Paint. |
(2) Home Page
The URL of the website of the printing place selected in [Fanzine printing vendor]. Click the URL to launch your web browser and display the website of the printing vendor. This item is not displayed if [General-purpose settings] or [Do not specify fanzine printing place] is selected.
(3) Check whether to export fanzine printing data
Turn this on and click [OK] in the [Change basic work settings] dialog box to check whether your fanzine printing data can be exported. If the data cannot be exported as fanzine printing data, a message will appear when you click the [OK] button in the [New] dialog box.
D.Multiple pages
You can create a work consisting of multiple pages and configure settings such as the number of pages and binding direction.

(1) Number of pages
Sets the number of pages to create. Click the drop-down button next to it to select the amount.
If [Cover page] is turned on, include the cover page when setting the number of pages. The numbers of pages that can be selected differ depending on the settings.
|
|
You cannot set a lower number of pages than the current amount. |
(2) Binding point
Selects the direction in which to bind the book. Select either [Left binding] or [Right binding].
|
|
Generally, [Left binding] is used for Western-style comics, and [Right binding] is used for Japanese-style manga. |
E.Cover page
You can add a cover page and configure settings such as the drawing colors and resolution.

(1) Resolution
Set the resolution of the cover page. If a printing place is selected in [Fanzine printing vendor], you can select from resolutions recommended by the printing vendor.
(2) Basic expression color
Sets the basic expression color. You can choose from [Color], [Gray], or [Monochrome].
(3) Drawing colors
Set the drawing colors when using [Gray] or [Monochrome] basic expression colors. You can set the drawing colors using the black and white square icons.
Gray
You can set drawing colors in the following ways with the black and white buttons.
|
Only black |
The drawing colors will be grayscale from black to transparency. |
|
Only white |
The drawing colors will be grayscale from white to transparency. |
|
Both black and white |
The drawing colors will be grayscale from black to white. |
Monochrome
You can set drawing colors in the following ways with the black and white buttons.
|
Only black |
The drawing colors will be black and transparency only. |
|
Only white |
The drawing colors will be white and transparency only. |
|
Both black and white |
The drawing colors will be black, white, and transparency only. |
|
|
For details on expression colors and drawing colors, see "Explanation: Expression Color and Drawing Color". |
(4) Default frequency
Specify the number of screentone lines per inch. Larger values result in smaller dots. This appears when the basic expression color is set to [Gray] or [Monochrome].
(5) Paper color
You can set a color for the Paper layer. Click the color indicator to open the [Color settings] dialog box. Specify a color to change the color of the Paper layer. This option is available when the basic expression color is set to [Color].
|
|
·The Paper layer is a single-color layer at the bottom of the layer palette. When the paper layer is hidden, transparent areas of the canvas will be shown in a checkered pattern. ·The Paper layer color can be changed afterwards. You can double-click the Paper layer in the [Layer] palette to display the [Color settings] dialog box and change the color of the Paper layer. ·For details on the [Color settings] dialog box, see "Advanced settings of color Dialog Box". |
F.Story Information/Folio
Set the scope of application of the story information and folio.
(1) Reset setting changes page by page
When turned on, the position, size, edge settings and the like for the [Story information] and pagination for all pages adjusted individually with tools and palettes are disabled and changed to the values set on the [Change basic work settings] dialog box.
G.Story information
Input information such as the story name and author name. This information is displayed outside the bleed border, in the non-printable area. These are optional settings, so you can skip items that aren’t relevant.

(1) Story name
Enter a title for the work. The pull down menu shows options for where to place the story name.
(2) Author
Enter the name of the author or author group. The pull down menu shows options for where to place the author name.
H.Folio
Adjust settings for the page numbers that are shown when the pages are bound.

(1) Folio
Turn this on to show the page numbers on the printed pages. The pull down menu shows options for where to place the page numbers.
(2) Format
Set the text to be added before and/or after the page number, if any. Input the text in the fields on the left and right, respectively.
(3) Font
Select the font to use for the page numbers.
(4) Size
Set the font size for the page numbers.
(5) Blind folio
When turned on, hidden page numbers are indicated at the bottom of the gutter (the side where the book is bound). Settings such as font and size cannot be set for [Blind folio].
I.Record timelapse *
When enabled, you can start recording a timelapse. If you save the file in Clip Studio format (extension: .clip), the timelapse will be saved with the file. For more detail on timelapses, see Clip Studio TIPS.