


Overview of Saturated Lines
The following is an overview of saturated lines.
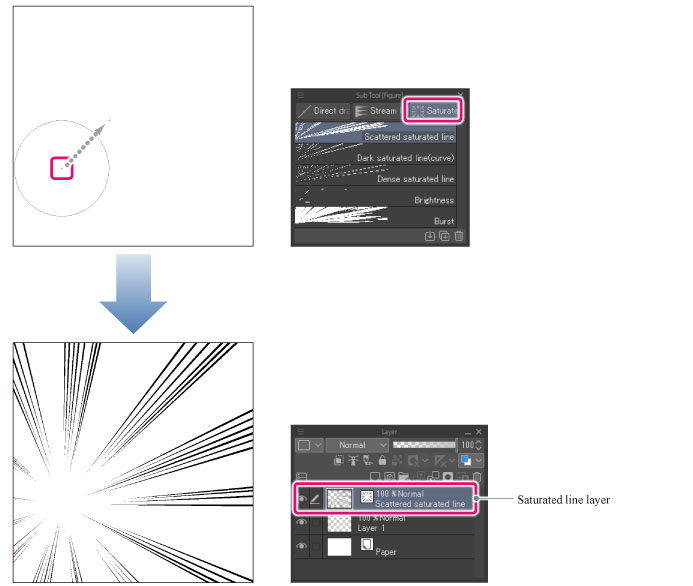
Drawing a Saturated Line
Saturated lines can be drawn using the following sub tools:
·[Saturated line] sub tool of the [Figure] tool
·[Flash] sub tool of the [Balloon] tool
|
|
The initial configuration of the sub tools has been changed from Ver.1.6.2. For those who are used to a previous version of Clip Studio Paint, this operation is now performed by selecting the [Text] tool and then selecting [Flash] on the Sub Tool palette. |
Drawing a saturated line creates a [Saturated line] layer.
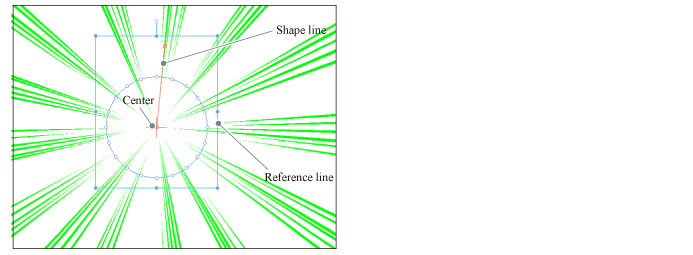
Reference Line, Shape Line, and Center Point
Selecting the [Saturated line] layer and changing the tool to [Object] sub tool displays a [Reference line] (blue line), a [Shape line] (red line) and the [Center point] (red +).
In Clip Studio Paint, saturated lines are drawn by lining up lines of the same shape as the [Shape line] along the [Reference line], with one of the ends converging on the [Center point].
|
Reference line |
A line that determines the position of the saturated line. It is displayed in blue. Lines with the same shape as [Shape line] line up along this line. |
|
Shape line |
A line that determines the shape of each of the lines that comprise the saturated line. It is displayed in red. |
|
Center point |
A point that determines the point of convergence. It is displayed with a red "+" sign. |
Editing a Saturated Line
Selecting the [Saturated line] layer and changing the tool to [Object] sub tool allows you to adjust the saturated line drawing.
·You can adjust the saturated line when correcting position and shape of the [Reference line] and [Shape line]. Furthermore, you can move the [Center point] and set the point of convergence of saturated lines.
·The color, size and space between each line can be adjusted with the Tool Property palette.
The [Reference line] can be added or redrawn even after the saturated line is drawn, with the saturated line settings (color, size, space between each line, and the like), as well as the [Shape line] and [Center point] kept as they are. For details, see "Adding and Redrawing the Reference Line".