


Timeline
You can create and manage multiple animation timelines on a single canvas in Clip Studio Paint.
The [Timeline] menu item includes commands for managing timelines, such as creating or switching timelines.
Enable timeline
Enables or disables the timeline for the canvas.
When the timeline is enabled, you can edit the [Timeline] palette. The canvas only displays cels and layers specified for selected frames on the [Timeline] palette.
When the timeline is disabled, the [Timeline] palette cannot be edited, but all cels in the animation folder are displayed on the canvas. Cels can be edited regardless of whether they are specified on the Timeline.
|
|
·When the timeline is enabled, cels in the animation folder that are not specified to the Timeline palette cannot be displayed or edited on the canvas. Specify these cels for frames on the Timeline or disable the timeline to display these cels on the canvas and enable editing. ·If the timeline is disabled, the settings for the keyframes set for layers and tracks respectively is also disabled. If the timeline is enabled again, the keyframes will be shown in the state when the timeline was disabled. |
New timeline
Select this item to open the [New timeline] dialog box. This can be used to create a new timeline on the canvas.
If the canvas does not have a timeline, you can add a timeline to create an animation.
[New timeline] Dialog Box
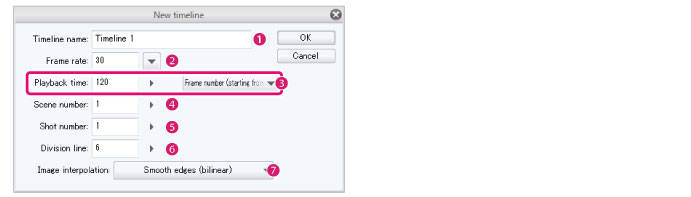
(1) Timeline name
Enter a name for the timeline.
(2) Frame rate
Enter a frame rate for the timeline.
|
|
The frame rate (fps) is the number of images that can be displayed in one second to run the animation. For example, if a frame rate of 30 is set, up to 30 images (cels) can be shown each second. |
(3) Playback time
Enter the playback time. The content that can be edited differs depending on the settings configured in the [New] dialog.
When making the first timeline, use the pull-down menu to select how to display frames on the [Timeline] palette. The box for inputting the playback time will change depending on the selected option.
|
Frame number (starting from 1), Frame number (starting from 0) |
Set the number of frames for the entire timeline. For example, if the frame rate is 30 fps and you would like to make a 4-second animation, enter "120" (30 frames x 4 seconds). The difference between [Frame number (starting from 1)] and [Frame number starting from 0)] is the start number of the frames. |
|
Seconds + frame |
Set the playback time in seconds. To add frames after the specified number of seconds, enter the number of frames to be added. |
|
Time code |
Set the playback time in minutes and seconds. To add frames after the set number of seconds, set the number of frames to be added. |
(4) Scene number
Enter the scene number.
(5) Cut number
Enter the cut number.
(6) Division line
Set up the lines that divide the Timeline. Division lines will be shown at the specified frame interval (for example, after every five frames).
(7) Image interpolation
You can select the method for interpolating the colors of pixels when transforming a cel or image material using keyframes.
|
Smooth edges (bilinear) |
This method blends the colors of neighboring pixels to create smooth outlines (boundaries between colors). However, outlines may become blurred depending on the image. |
|
Hard edges (nearest neighbor) |
When interpolating the image, the pixels in the image are duplicated. Since the colors are not affected by neighboring pixels, outlines (boundaries between colors) remain sharp. However, outlines may become jagged depending on the image. |
|
Clear edges (bicubic) |
This method blends the colors of neighboring pixels to create smooth outlines (boundaries between colors). This method results in stronger outlines compared to the [Smooth outline (bilinear method)] setting. However, white noise may appear around outlines depending on the image. |
|
High accuracy (average colors) |
The average colors of the original pixels are strictly calculated and contained for each pixel after the transformation. Scaling up makes the lines sharper and scaling down makes the lines smoother. Even detailed lines can be preserved when scaling the image down. However, this method can result in blurred outlines and can take a long time to process depending on the image. |
Go to previous timeline
Switches to the previous timeline if there are multiple timelines.
|
|
The display order of the timelines can be changed in the [Animation] menu > [Timeline] > [Manage timeline] dialog box. For details on the [Manage timeline] dialog box, see "Manage timeline". |
Go to next timeline
Switches to the next timeline if there are multiple timelines.
|
|
The display order of the timelines can be changed in the [Animation] menu > [Timeline] > [Manage timeline] dialog box. For details on the [Manage timeline] dialog box, see "Manage timeline". |
Change settings
Change settings for the current timeline.
In the dialog box that appears, edit the settings and click [OK] to change the timeline settings.
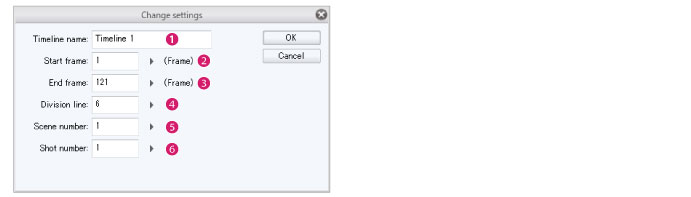
[Change settings] Dialog Box
|
|
The values that can be entered for [Start frame] and [End frame] differ depending on the [Playback time] set in the [New] dialog box or the [New timeline] dialog box. For details, see "[New timeline] Dialog Box". |
(1) Timeline name
Enter a name for the timeline.
(2) Start frame
Input the start frame.
(3) End frame
Input the end frame.
(4) Division line
Set up the lines that divide the Timeline. Division lines will be shown at the specified frame interval (for example, after every five frames).
(5) Scene number
Enter the scene number.
(6) Cut number
Enter the cut number.
Change frame rate
Select this item to open the [Change frame rate] dialog box.
This allows you to change the frame rate (number of frames per second) set when creating the canvas.
[Change frame rate] Dialog Box

(1) Frame rate
Change the frame rate.
(2) Change total number of frames [EX]
When this is turned on, the number of frames on the timeline will change to fit the playback time that was originally specified. The position of specified cels also changes.
|
|
The playback time of movie tracks, audio tracks, or dialog tracks cannot be changed according to the frame rates. This means that the clip position and length may not match those of the other tracks. |
Manage timeline
Manage timelines in the file.
In the [Manage timeline] dialog box, you can add, delete or duplicate timelines.
[Manage timeline] Dialog Box
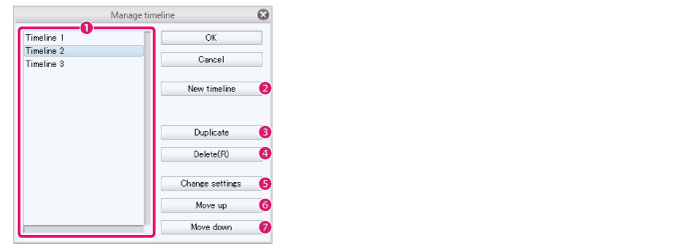
(1) Timeline list
A list of timelines in the file. Select a timeline to change the settings.
(2) New timeline
Clicking the item shows the [New timeline] dialog box. This can be used to create a new timeline on the canvas.
If the canvas does not have a timeline, you can add a timeline to create an animation.
|
|
For details on the [New timeline] dialog box, see "New timeline". |
(3) Duplicate
Duplicates the timeline selected in the timeline list.
This opens the [Duplicate timeline] dialog box, where you can enter the timeline name, scene number, and cut number.
[Duplicate timeline] Dialog Box

(4) Delete
Deletes the timeline selected in the timeline list.
(5) Change settings
Changes the settings of the timeline selected in the [Timeline list]. Clicking the menu item shows the [Change settings] dialog box.
|
|
For details on the [Change settings] dialog box, see "Change settings". |
(6) Move up
Moves the timeline selected in the [Timeline list] one place up.
(7) Move down
Moves the timeline selected in the [Timeline list] one place down.
Insert frame
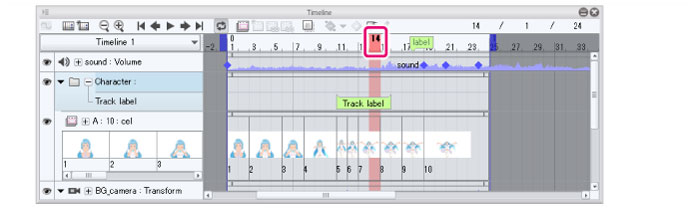
You can also insert frames using the [Timeline] palette.
1Select the frame in the [Timeline] palette.

2Select [Insert frame] from the [Animation] menu > [Timeline].
3Adjust the settings in the [Insert frame] dialog box and click [OK].

Inserts the number of frames set in the [Insert frame] dialog box from the selected frame.
·Inserting a frame causes the frame’s clip and Area Label to become longer. However, movie and audio tracks will not go any longer than the original movie or audio file length.
·Clips, specified cels, labels, and keyframes after the selected frame, will move behind the inserted frame segment. The end position of the timeline will also move backward.
|
|
·If you are using DEBUT or PRO, you can use up to 24 frames. If exceeded, frames cannot be inserted. ·However, if [Split clip] in the [Insert frame] dialog box is turned on, the keyframe will be hidden outside of the clip. For details, see "Insert frame". |
Insert frame

(1) Number of frames
Enter the number of frames to insert.
(2) Show selected layer only
Inserts a frame only on the selected track (layer). Frames will not be inserted into other tracks. The timeline’s end position will not change.
(3) Split clip
Inserts the selected frame into a new frame and splits the clip into before and after sections. Clips will not be placed on inserted frames.
(4) Preview
Shows a preview of the [Insert frame] dialog box’s settings on the [Timeline] palette and the canvas.
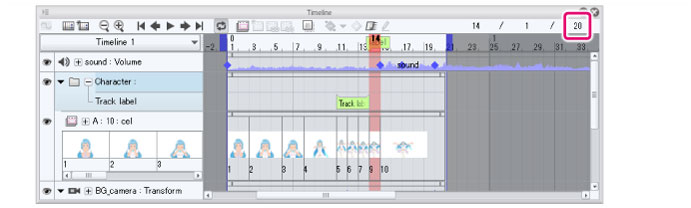
Delete frame
Deletes the selected frame from the [Timeline] palette.
1Select the frame in the [Timeline] palette.
2Select [Delete frame] from the [Animation] menu > [Timeline].
3Configure the settings in the [Delete frame] dialog box and click [OK].

Deletes the number of frames set in the [Delete frame] dialog box from the selected frame.
·Deleting a frame causes the frame’s clip and Area Label to become shorter.
·A clip inside a deleted frame is also deleted.
·A specified cel inside a deleted frame is combined into one.
·A keyframe inside a deleted frame is combined into one. However, if [Split clip] in the [Delete frame] dialog box is turned on, the keyframe will be hidden outside of the clip.
·Clips, specified cels, labels, and keyframes after the selected frame, will move forward ahead of the deleted frame segment. The end position of the timeline will also move forward.
|
|
If [Show selected layer only] and [Split clip] in the [Delete frame] dialog box is turned on, the ressult changes. For details, see "[Delete frame] dialog box". |
[Delete frame] dialog box

(1) Number of frames
Sets the number of frames you want to delete.
(2) Show selected layer only
Deletes frame from the selected track (layer) only. This frame will not be deleted from other tracks. The end position of the timeline will not change.
(3) Split clip
Deleting a frame separates the clip into two clips.
(4) Preview
Shows a preview of the [Delete frame] dialog box′s settings on the [Timeline] palette and the canvas.
Apply Toei Animation Digital Exposure Sheet information to current exposure sheet [EX] [Windows/iPad]
You can open the Toei Animation Digital Exposure Sheet and use the vertical exposure sheet to edit the contents of the [Timeline] palette.
To display a Toei Animation Digital Exposure Sheet select [Animation] menu > [Timeline] > [Apply Toei Animation Digital Exposure Sheet information to current exposure sheet]. At the same time, you will be able to edit the exposure sheet with the contents of the [Timeline] palette applied to it.
In the Toei Animation Digital Exposure Sheet, you can edit the total number of frames, the timing of cels being displayed, and the camera instructions.
|
|
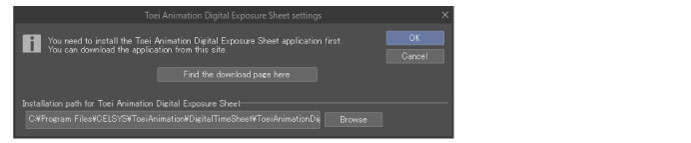
·To use [Apply Toei Animation Digital Exposure Sheet information to current exposure sheet], the Toei Animation Digital Exposure Sheet must be installed on the same device. Please install the Toei Animation Digital Exposure Sheet before using this command. ·When using Windows, the installation location for the Toei Animation Digital Exposure Sheet is changed, the [Toei Animation Digital Exposure Sheet settings] dialog will open when the command is run. Click [Browse] and set the installation folder for the Toei Animation Digital Exposure Sheet. ·If you are using an iPad, you may get the message "Set path directory." Adjust these settings by following the on-screen instructions. For details, see "Toei Animation Digital Exposure Sheet Path [EX][iPad]". |
Load changes to Toei Animation Digital Exposure Sheet [EX] [Windows]
Load the changes made to the Toei Animation Digital Exposure Sheet to Clip Studio Paint.
Select [Animation] menu > [Timeline] > [Load changes to Toei Animation Digital Exposure Sheet] to apply the settings to the Toei Animation Digital Exposure Sheet in Clip Studio Paint’s [Timeline] palette.
·If a canvas that is already connected to a Toei Animation Digital Exposure Sheet is open, the settings will be applied to that canvas. The same is true when you have multiple canvases open at the same time.
·If there is no canvas linked to a Toei Animation Digital Exposure Sheet, the setting will be applied to the current canvas.
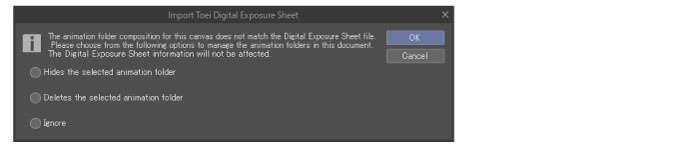
If there is an animation folder in the Timeline palette of Clip Studio Paint that is not in the Toei Animation Digital Exposure Sheet, the [Import Toei Digital Exposure Sheet] dialog will appear.
You can set up the method of processing animation folders in Clip Studio Paint when loading the file.
|
|
·If an animation folder on the [Timeline] palette is locked, the exposure sheet information will not be updated. ·If you are using an iPad, you may get the message "Set path directory." Adjust these settings by following the on-screen instructions. For details, see "Toei Animation Digital Exposure Sheet Path [EX][iPad]". |
Toei Animation Digital Exposure Sheet settings [EX] [Windows]
It is possible to link Toei Animation Digital Exposure Sheet settings with Clip Studio Paint.
Select [Animation] menu > [Timeline] > [Toei Animation Digital Exposure Sheet settings] to display the [Toei Animation Digital Exposure Sheet settings] dialog. Click [Browse] to specify the installation location for the Toei Animation Digital Exposure Sheet.
Toei Animation Digital Exposure Sheet Path [EX][iPad]
It is possible to link Toei Animation Digital Exposure Sheet settings with Clip Studio Paint.
Selecting [Animation] menu > [Timeline] > [Toei Animation Digital Exposure Sheet path], displays a message. Confirm its content, and click OK.
When the File App appears, tap [This iPad] > [ToeiAnimationDigitalTimeSheet] > [Xdts] and then, tap [Done].