


Show animation cels
Set animation cel display settings.
Show edited cel only
Turn this on to show only the cel selected for editing from the animation folder.
|
|
This item cannot be set when [Enable onion skin] is turned on. |
Enable onion skin
Onion skin is a function in which specified cels surrounding the selected cel are displayed on the canvas in addition to the selected cel.
Turn this on to display the onion skin on the canvas.
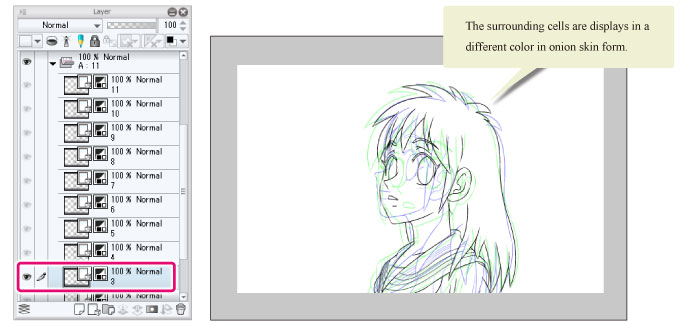
The onion skin shown depends on the timeline settings.
|
When the timeline is enabled |
The cels before and after the selected cel on the Timeline palette are displayed as onion skin. |
|
When the timeline is disabled |
The cels above and below the selected cel on the [Layer] palette are displayed as onion skin. |
|
|
·Onion skin settings such as the display color and number of displayed cels can be set in the [Animation] menu > [Show animation cels] > [Onion skin settings]. For details, see "Onion skin settings". ·To modify a cel with the onion skin as a reference, select the [Animation] menu > [Light table] > [Register onion skin images]. Onion skin cels corresponding to that cel are registered in the [Light table specific to cel] on the [Animation cels] palette. ·The onion skin display color will not apply to cels that have their layer folder’s blending mode set to [Through]. |
Onion skin settings
Select this item to open the [Onion skin settings] dialog. This allows you to configure onion skin settings such as the number of displayed cels and the display color.
[Onion skin settings] Dialog Box
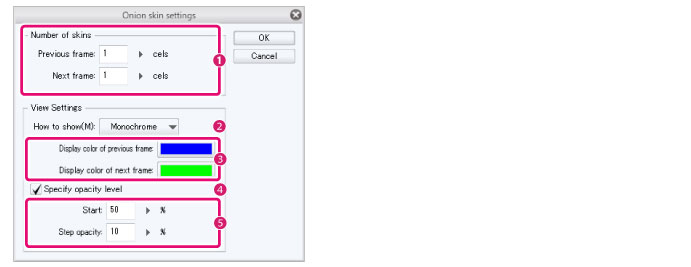
(1) Number of views
Set the number of cels to be displayed as onion skin. The number of preceding cels can be different from the number of following cels.
(2) Color mode
You can set the color mode for onion skins.

|
Color |
The cels displayed as onion skins are shown in the original colors. |
|
Half color |
The colors set for [Display color of previous frame] and [Display color of next frame] are combined while maintaining the colors of the cels displayed as onion skins. |
|
Monochrome |
The colors of the cels displayed as onion skins will be changed to grayscale and shown in the colors set as [Display color of previous frame] and [Display color of next frame]. |
(3) Display color
The display colors of the onion skins can be changed by setting the color mode to [Half color] or [Monochrome]. The display color of the previous frame is shown in [Display color of previous frame], and that of the next frame is shown in [Display color of next frame]. Clicking each color indicator shows the [Color settings] dialog box. Here, a color can be set.
(4) Set Opacity
Turning this on sets the opacity of the onion skins.
(5) Opacity
The opacity of the onion skins can be set in [Start]. If multiple skins are set for [Number of skins], specify a value for [Step opacity] to show the skins with the opacity reduced by the specified value for each skin.
Check cel motion by key input
Allows you to check cel movement with key operations. When the [Check cel motion by key input] dialog appears, you can switch between cels using the numeric keys or cursor keys. Click [Close] in the dialog box to end switching between cels by key operation.
The cel view is switched in the order of the layers in the animation folder on the [Layer] palette.
|
|
·If the light table is disabled, this item cannot be selected. However, if an animation folder containing multiple cels is selected, it can be selected. ·If multiple cels are selected on the [Layer] palette, the key operations are applied only to the selected cels. ·If the light table is enabled and multiple light table layers are registered to the [Animation cels] palette, the key operations are applied to the light table layers on the [Animation cels] palette. For details on how to enable the light table layer, see "Enable light table". For details on the [Animation cels] palette and light table layers, see "Functions of Animation Cels Palette". ·Key operations may differ if shortcut keys are used. Follow the instructions in the message shown. ·When using a Tablet/Smartphone, key operation can be performed by connecting a keyboard to the Tablet/Smartphone. This can also be performed with the edge keyboard. |
The cel display method differs depending on the key.
Numerical keys
Press 1 to show the bottom cel in the selected animation folder. Show other cels by pressing the 2 and 3 key. The keys correspond to cel order.
Function keys
Press F1 to show the bottom cel in the selected animation folder. The other cels can be shown by pressing keys such as F2 and F3. The keys correspond to cel order.
Cursor keys
Press the cursor keys to move through the cels in the selected animation folder.
|
The ↑ key |
Shows the cels in order from bottom to top. Releasing the key shows the selected cel on the [Layer] palette. |
|
The ↓ key |
Shows the cels in order from top to bottom. Releasing the key shows the selected cel on the [Layer] palette. |
|
The → key |
Shows the cels in order from bottom to top. Releasing the key shows the cel that was indicated at the time the key was released. |
|
The ← key |
Shows the cels in order from top to bottom. Releasing the key shows the cel that was indicated at the time the key was released. |
Edge keyboard [Tablet/Smartphone]
Press T1 to show the bottom cel in the selected animation folder. The other cels can be shown by pressing keys such as T2 and T3. The keys correspond to cel order. For how to use the edge keyboard, see "Using the edge keyboard"
[Check cel motion by key input] Dialog Box
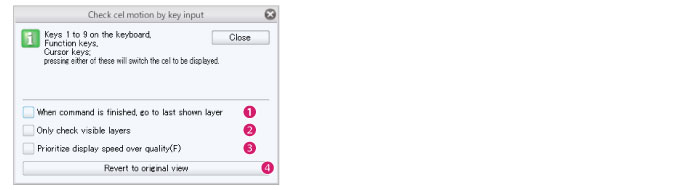
(1) When command is finished, go to the last shown layer
When active, even after clicking [Close] for the [Check cel motion by key input] dialog box, the selected cel still shows.
(2) Only check visible layers
When active, this only shows cels that can be switched. Even when operating keys, cels set to be hidden are not shown.
(3) Prioritize display speed over quality
When active, this improves the speed at which cels are switched during key operation. However, the display quality of the image on the canvas will be lower.
(4) Revert to original view
Click to return to the cel (the currently selected cel) that was shownfirst.
Check surrounding cels by key input
Allows you to check cel motion with key operations. When the [Check cel motion by key input] dialog appears, you can switch between cels using the numeric keys or cursor keys. Click [Close] in the dialog box to end switching between cels by key operation.
The cel view is switched in the order of the layers in the animation folder on the [Layer] palette.
|
|
·If light table is disabled, this command cannot be selected. However, if an animation folder containing multiple cels is selected, it can be selected. ·If multiple cels are selected on the [Layer] palette, the key operations are applied only to the selected cels. ·If the light table is enabled and multiple light table layers are registered to the [Animation cels] palette, the key operations are applied to the light table layers on the [Animation cels] palette. For details on how to enable the light table layer, see "Enable timeline". For details on the [Animation cels] palette and light table layers, see "Functions of Animation Cels Palette". ·Key operations may differ if shortcut keys are used. Follow the instructions in the message shown. ·When using a Tablet/Smartphone, key operation can be performed by connecting a keyboard to the Tablet/Smartphone. You can also use key operations with the edge keyboard. |
The cel display method differs depending on the key.
Numerical keys
Pressing the numerical keys allows you to see 4 cels on either side of the selected cel on the [Layer] Palette.
|
The 5 key |
Shows the cel selected on the [Layer] palette. |
|
The 4 key to the 1 key |
Shows the cels below the selected cel on the [Layer] palette. |
|
The 6 key to the 9 key |
Shows the cels above the selected cel on the [Layer] palette. |
Function keys
Pressing action keys allows you to see 4 cels on either side of the selected cel on the [Layer] Palette.
|
F5 |
Shows the cel selected on the [Layer] palette. |
|
The F4 key to the F1 key |
Shows the cels below the cel selected on the [Layer] palette. |
|
The F6 key to the F9 key |
Shows the cels above the cel selected on the [Layer] palette. |
Cursor keys
Press the cursor keys to move through the cels in the selected animation folder.
|
The ↑ key |
Shows the cels in order from bottom to top. Releasing the key shows the selected cel on the [Layer] palette. |
|
The ↓ key |
Shows the cels in order from top to bottom. Releasing the key shows the selected cel on the [Layer] palette. |
|
The → key |
Shows the cels in order from bottom to top. Releasing the key shows the cel that was indicated at the time the key was released. |
|
The ← key |
Shows the cels in order from top to bottom. Releasing the key shows the cel that was indicated at the time the key was released. |
Edge keyboard [Tablet/Smartphone]
Pressing the edge keyboard allows you to see 4 cels on either side of the selected cel on the [Layer] Palette. Please refer to "Using the edge keyboard" for information on the edge keyboard.
|
The T5 key |
Shows the cel selected on the [Layer] palette. |
|
The T4 key to the T1 key |
Shows the cels below the cel selected on the [Layer] palette. |
|
The T6 key to the T15 key |
Shows the cels above the cel selected on the [Layer] palette. |
[Check surrounding cels by key input] Dialog Box
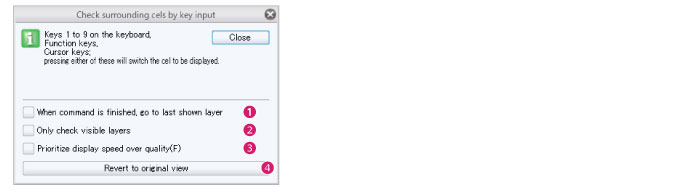
(1) When command is finished, go to the last shown layer
When active, even after clicking [Close] for the [Check surrounding cels by key input] dialog box, the selected cel still shows.
(2) Only check visible layers
When active, this only shows cels that can be switched. Even when operating keys, cels set to be hidden are not shown.
(3) Prioritize display speed over quality
When active, this improves the speed at which cels are switched during key operation. However, the display quality of the image on the canvas will be lower.
(4) Revert to original view
Click to return to the cel (the currently selected cel) that was shown first.