


Colorize (Technology preview)
This function automatically colorizes line art using AI technology.
|
|
·This function is a technology preview. You can try it out before its official release. ·When you use this feature, the image data is uploaded to the server, where the AI interprets the data and colors the image. You need to be connected to the Internet to use this feature. For information on the image uploaded to the server and the generated data, see "About AI features". |
|
|
If you use Colorize after creating a selection area, the effect will only be applied to the selected area. |
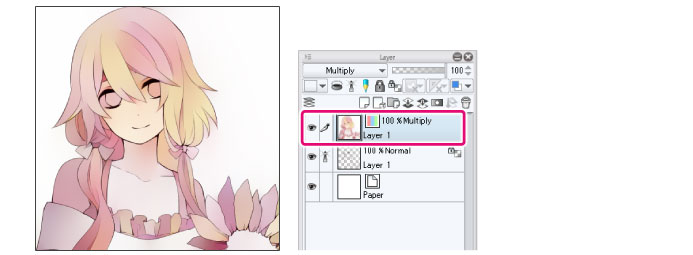
Colorize all
The image is automatically colorized based on what is drawn on the layer
1Select the line art that you want to colorize.
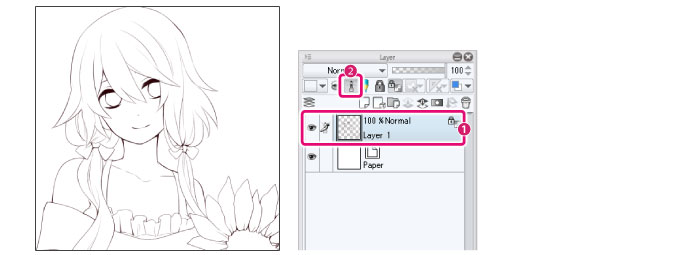
(1) Select the layer with the line drawing in the [Layer] palette.
(2) Click [Set as Reference Layer] in the [Layer] palette to specify it as the reference layer.
|
|
Please only use one line drawing layer. |
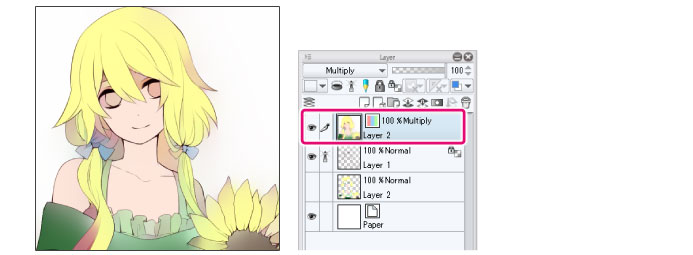
2Select the [Edit] menu > [Colorize (Technology preview)] > [Colorize all]. A new raster layer with colors will be created above the selected layer.
Use hint image and colorize
In addition to the outlines, you can also create a hint layer to specify the colors before using Colorize.
1Set the line art you want to colorize as the reference layer.

(1) Select the layer with the line drawing in the [Layer] palette.
(2) Click [Set as Reference Layer] in the [Layer] palette to specify it as the reference layer.
|
|
Please only use one line drawing layer. |
2Create a layer to specify colors as a hint for the colorization.
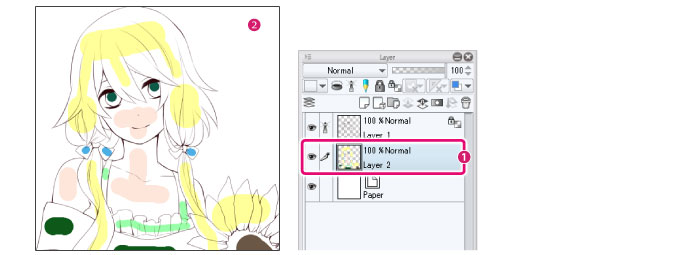
(1) Click [New Raster layer] to create a new layer.
(2) Draw the colors to use as hints for automatically colorizing the image on the created layer.
|
|
Please use a single hint layer. |
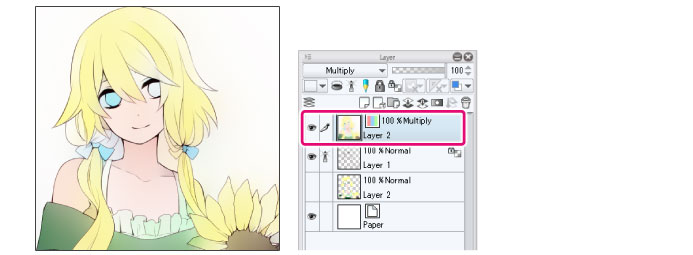
3Select the hint layer and choose [Edit] menu > [Colorize (Technology preview)] > [Use hint image and colorize].
A new raster layer with colors will be created above the line art layer. The hint layer is hidden.
Use more advanced settings
In addition to the outlines, you can also create a hint layer to specify the colors before using Colorize. Before confirming the [Colorize] function, use the [Colorize] dialog box to adjust the coloring.
1Set the line art you want to colorize as the reference layer.

(1) Select the layer with the line drawing in the [Layer] palette.
(2) Click [Set as Reference Layer] in the [Layer] palette to specify it as the reference layer.
|
|
Please only use one line drawing layer. |
2Create a layer to specify colors as a hint for the colorization.

(1) Click [New Raster layer] to create a new layer.
(2) Draw the colors to use as hints for automatically colorizing the image on the created layer.
|
|
·Please use a single hint layer. ·It is recommended to use a maximum of 10 hint colors. The more colors are used, the more time it takes to process and perform Colorize. |
3Select the hint layer and choose the [Edit] menu > [Colorize (Technology preview)] > [Use more advanced settings].
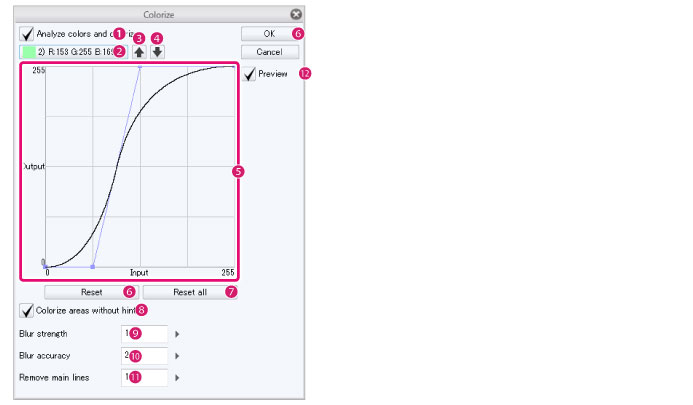
4When the [Colorize] dialog box appears, choose the colorize method.
A preview of the Colorize results will be shown on the canvas, so you can adjust the settings while checking the results.
(1) Activate [Analyze colors and colorize].
(2) Select the color to adjust for the output.
(3) Adjust the output of each color by modifying the graph.
(4) Repeat steps 2 and 3 for each color.
(5) Use [Colorize areas without hints].
(6) Click [OK].
|
|
For details on the [Colorize] dialog box, see "Colorize dialog box". |
5A new raster layer with colors will be created above the line art layer. The hint layer will be hidden.
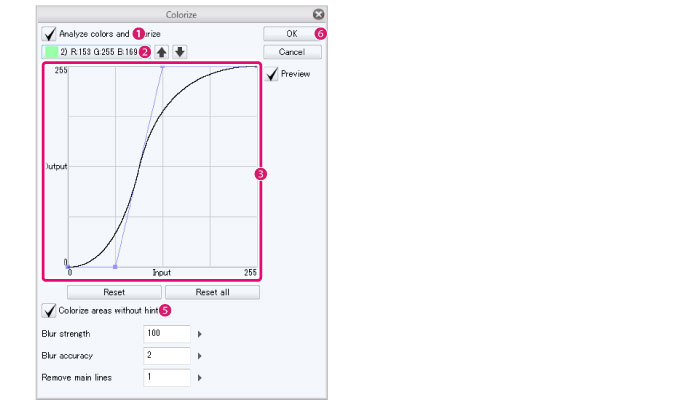
Colorize dialog box
(1) Analyze colors and colorize
When active, automatic coloring is performed for each color on the hint layer. The color output can be adjusted with a [Tone Curve].
(2) Select color
Select the color to adjust with the [Tone Curve]. The display order of the pull-down menu reflects the processing performed for overlapping colors.
|
|
The hint color is displayed under [Select color]. If there are more than 10 hint colors, the 10 colors with the largest areas are extracted. |
(3) Up
Moves the color selected under [Select color] one step up.
(4) Down
Moves the color selected under [Select color] one step down.
(5) Tone Curve
Adjust the output of the color selected under [Select color]. Drag the control point to adjust.
(6) Reset
Resets the tone curve currently being edited.
(7) Reset all
Resets the content being edited for tone curves of all colors.
(8) Colorize areas without hints
When active, the same coloring result as when executing [Colorize all] is synthesized.
(9) Blurring intensity
Sets the intensity of blurring the coloring results for lines and line boundaries. The larger the number, the more blurred the colors are.
(10) Blurring precision
Specifies the number of times to calculate the blur. The larger the number, the smoother the blur effect will be.
(11) Remove main lines
By expanding the bright areas of an image, the main lines become less visible. The larger the value, the wider the bright areas become.
(12) Preview
Turn this on to preview the results on the canvas.