


Preferences [Windows]
Opens the [Preferences] dialog box.
Here you can set Clip Studio Paint preferences for layers, tools, tablet settings, performance and more.
Tool
Configures settings related to tools.
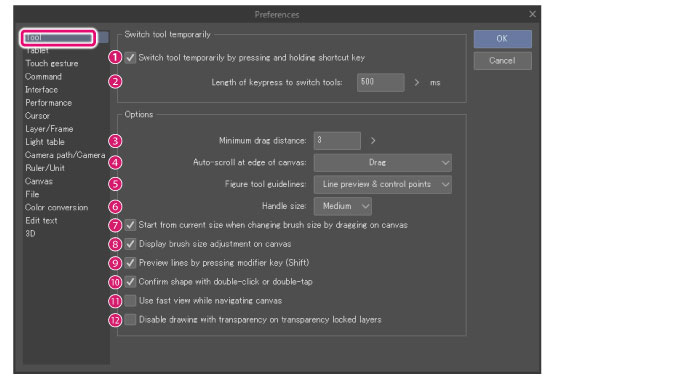
Switch tool temporarily (Tool shift)
(1) Switch tool temporarily by pressing and holding shortcut key
When turned on, you can hold down a shortcut key assigned to a tool on the [Tool] palette to switch to that tool while the key is held down.
(2) Length of keypress to switch tools
Specify the time in milliseconds to switch the tool from the time the shortcut key is pressed.
Options
(3) Minimum drag distance
This option allows you to change the distance that the cursor needs to be dragged before it is recognized as a drag action. This is useful for tools where clicks and drags have different outputs, such as the [Object] tool or the [Move layer] tool. The smaller the value, the smaller the distance the pen or mouse has to move to be interpreted as dragging.
(4) Auto scroll at edge of canvas
Sets how the mouse cursor behaves when it leaves the canvas.
|
None |
Clicking and dragging outside the canvas does not change the position of the canvas. |
|
Drag |
Dragging outside the canvas scrolls it into the direction of the mouse cursor. |
|
Drag with mouse (Windows/macOS) |
In addition to dragging, moving the mouse cursor outside the canvas also scrolls it according to the position of the mouse cursor. |
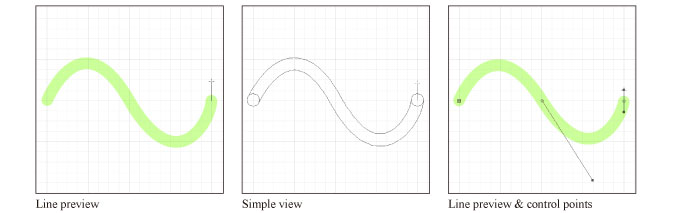
(5) Figure tool guidelines
Turn this on to see a simplified preview of lines being created with the sub tools in the [Figure] tool > [Direct draw] sub tool group. You can select from [Line preview], [Simple view], [Line preview & control points] or [Simple view & control points].
|
|
·If [Line preview] and [Simple view] are set to not show control points, even if [Add/delete control points while drawing] is turned on in the [Sub Tool Detail] palette, you will not be able to insert or delete control points by clicking the line or a control point. ·Even if you set [Line preview] and [Line preview & control points] and show the line preview, this will not reflect in the [Starting and ending] setting. |
(6) Handle size
Sets the display size of control points.
When [Simple view & control points] and [Line preview & control points] are set in [Figure tool guidelines], the size of the control points will change when drawing.
In addition, the control points displayed when editing lines drawn on vector layers, frame border folders, balloon layers, and rulers are also changed to the size set here.
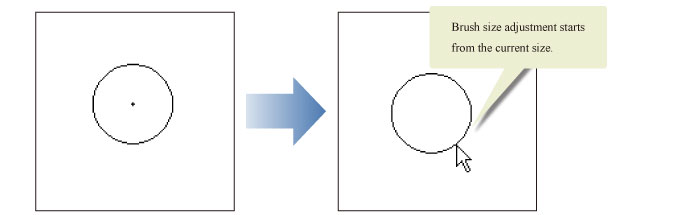
(7) Start from current size when changing brush size by dragging on canvas
When the brush size is adjusted by dragging the mouse while holding down Ctrl + Alt, the brush size adjustment will start from the current size.
(8) Display brush size adjustment on canvas
Turn this option on to preview the brush size with a circle in the center of the canvas when changing the brush size.
(9) Preview lines by pressing modifier key (Shift) [Windows/macOS/iPadAndroid/Chromebook]
Previews the line that will be created when drawing a straight line by holding the Shift key and clicking with a drawing tool.
You can also view the lines when using a mouse on iPad devices/Androids/Chromebooks.
(10) Confirm shape with double-click or double-tap
When this is turned on, double-clicking allows you to confirm your lines when using a sub tool that creates continuous curves or polygonal lines, such as [Continuous curve] and [Bezier curve].
(11) Use fast view while navigating canvas
Puts the canvas in fast view mode when dragged with viewing tools such as the [Zoom] tool and [Move] tool. This reduces the required processing capacity when using a viewing tool.
(12) Use white instead of transparency when drawing on layers with locked transparent pixels
On layers with locked transparent pixels, white will be used instead of transparency when using an Eraser tool or a drawing tool set to transparent color.