


LT conversion of layer [EX]
Allows you to separate a selected layer into lines and tones created on separate layers.
[LT conversion of layer] can be used on the following layers.
|
Applicable layers |
Raster layer Vector layer Balloon layer Text layer Image material layer 3D layer Saturated line layer Stream line layer |
|
|
For layers with [Enable keyframes on this layer] active, [LT conversion of layer] will be run on the image shown as the currently selected frame on the Timeline. After converting, the keyframes included in the track (layer) will be deleted and a clip is created from the start to the end frame. |
|
|
You can also convert a layer to lines and tones by selecting the [Layer Property] palette > [Extract line] > [Execution of LT conversion of layer]. For details on how to convert to lines and tones with the [Layer Property] palette, see "Extract line [EX]". |
1Select the layer you want to separate into lines and tones.
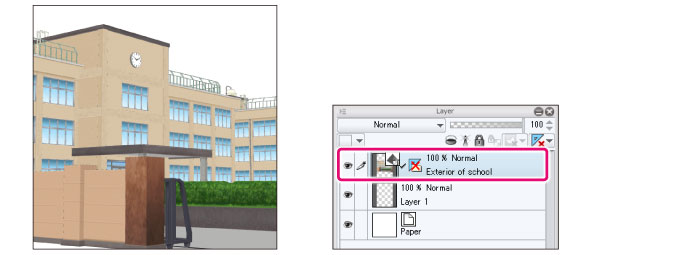
|
|
·When selecting a 3D layer, be sure to check the layout and camera angle of the 3D material before converting. To learn about these settings, see "Explanation: 3D Materials". ·When converting a 3D material for ComicStudio, such as an LWO-format material without texture, turn on [Light Source] in the [Tool Property] palette. |
2Select [Layer] menu > [LT conversion of layer] to open the dialog box.
3Then, adjust the settings for the conversion to lines and tones.
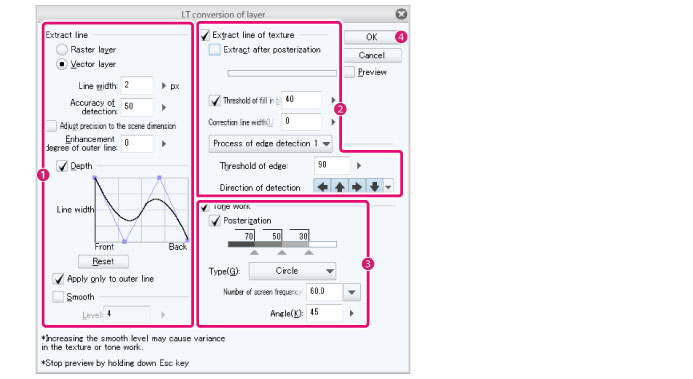
(1) Set the method for extracting the lines, layers for the extracted lines, depth of the lines, and so on.
(2) Select the method for extracting the texture of the lines.
(3) Set posterization and the tone pattern.
(4) Click [OK].
|
|
·Turn on [Preview] to preview the settings on the canvas. ·Please note the turning on [Preview] may slow down your computer. Hold Esc to stop the preview. ·The settings in the dialog box differ if the layer to be converted is a 3D layer. ·For details on setting the [LT conversion of layer] dialog box, see "[LT conversion of layer] Dialog Box (3D Layer)" and "[LT conversion of layer] Dialog Box (Not 3D Layer)". |
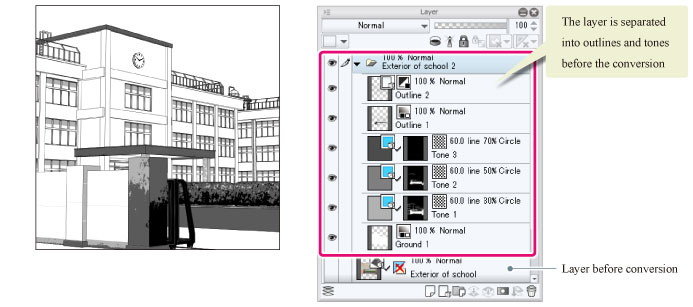
4The layer will be converted into lines and tones, and a layer folder will be created with the new layers.
The created line and tone layers are stored in the new layer folder separate from the original layer. The original layer is kept but hidden.
|
|
·The conversion will create a tone layer for each gradient level specified under [Posterization] in the [LT conversion of layer] dialog box. ·When converting from a 3D layer, two types of outline layers will be created: one extracted from the 3D material shape, and another from the texture. |
[LT conversion of layer] Dialog Box (3D Layer)
When converting from a 3D layer, the following settings will appear.
|
|
If the selected layer is not a 3D layer, see "[LT conversion of layer] Dialog Box (Not 3D Layer)". |
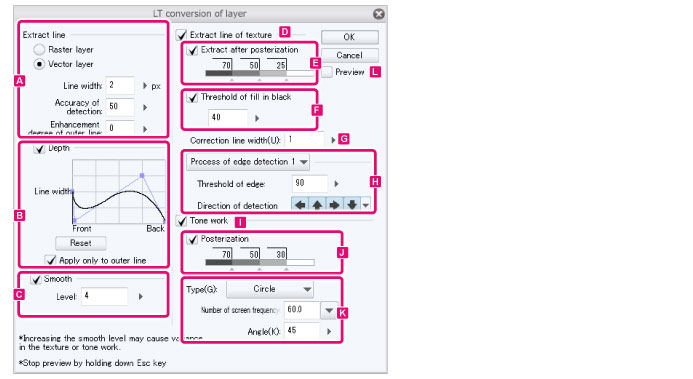
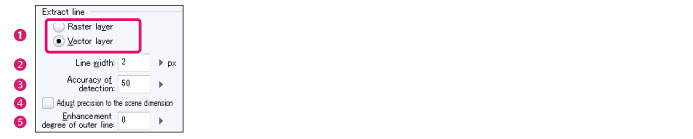
A.Extract line
Adjust settings for extracting the lines from the 3D layer.
(1) Output layer
Choose whether to extract the lines to a raster layer or a vector layer. You can select from [Raster layer] and [Vector layer].
(2) Line width
Set the width of the outlines.
(3) Accuracy of detection
Adjust the accuracy with which to detect the lines.
(4) Adjust precision to the scene dimension
Turning this on allows the precision with which outlines are detected to be automatically adjusted according to the size of 3D materials.
|
|
[Adjust precision to the scene dimension] cannot be set when a 3D layer compatible with Version 1.5 is selected. |
(5) Enhancement degree of outer line
Allows you to set the degree by which the outer lines will be enhanced.
B.Depth
Turn on this option to give depth to the outlines. You cannot set [Depth] when [Process of edge detection 2] is set for [Process of edge detection].
(1) Line width
You can adjust line width by operating the graph. The larger the difference between the upper limit and lower limit of the [Front] and [Back], the larger the line depth will be.
|
|
You can set a finer line width by editing the control points of the graph. Below are instructions on editing graphs. ·Drag a control point to change its position. ·Click on the curve to add a control point. ·To delete a control point, drag it outside the graph. |
(2) Reset
Resets the [Depth] settings to default.
(3) Apply only to outer line
When turned on, the [Depth] settings apply only to the outermost lines.
C.Smooth
Turn this on to smooth the outlines of 3D layers. A larger [Level] value makes the outline smoother.
|
|
Increasing the [Level] value for smoothing may create gaps between the outline and lines extracted from tone or from texture in 3D materials. |
D.Extract line of texture
When turned on, the texture of the 3D layer is also a target of the conversion.
|
|
If [Extract line] on the [Layer property] palette is turned on, you can inherit the settings for [Extract line] to these following items: [Extract line of texture], [Posterize before extracting lines], [Threshold of fill in black], [Correction line width], and [Method of detecting edge]. |
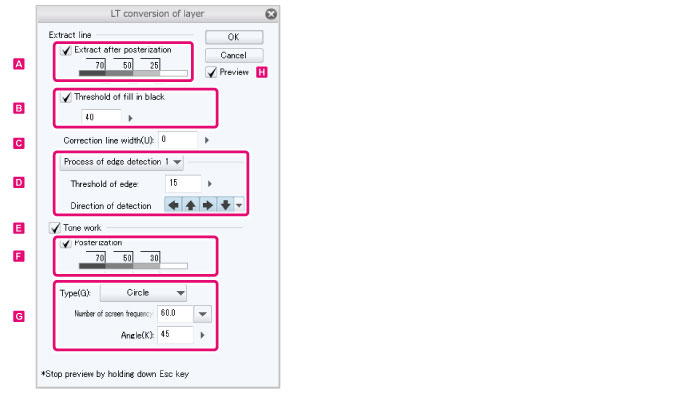
E.Extract after posterization
When turned on, the texture is posterized before the outline is extracted. The gradient can be adjusted using [Posterization control].
Posterization control
Adjust the grayscale gradient to extract as outline.

(1) Density
Shows the grayscale value. Clicking the numeric value allows you to change it directly.
(2) Preview
Previews the posterization.
(3) Node
This is a controller that adjusts the grayscale gradient. Dragging the node horizontally allows you to adjust the density of the gradient. Drag a node out of [Posterization control] deletes it. Clicking on a blank area allows you to add a node.
F.Black fill threshold
Allows you to set up an area to be filled in black. You can set the threshold using the slider.
G.Correction line width
Allows you to adjust the width of the texture outline using a slider.
H.Process of edge detection
Allows you to select the method for extracting texture. The items to set will vary depending on the method selected.
|
Process of edge detection 1 |
The outline is extracted based on [Threshold of edge] and [Direction of detection]. |
|
Process of edge detection 2 |
The outline is extracted based on [Threshold of edge height] and [Threshold of gradient variation]. This method is suitable when a more delicate expression is required. |

(1) Threshold of edge
Set the gray density threshold to extract as outline. The smaller the value, the more lines will be detected making the line art wider.
(2) Direction of detection
Specify the direction in which to detect the outline. If turned off, outline detection is weaker.
(3) Threshold of edge height
Allows you to adjust the height of the edge detected as an outline. The smaller the value, the weaker the edge, making even small changes detected as a line.
(4) Threshold of gradient variation
Adjusts the continuity of the detected line art based on the variation in the the line’s thickness. The larger the value, the more likely it is to have short segments.
I.Tone work
When turned on, you can set the tone.
|
|
If [Tone] on the [Layer Property] palette is turned on, you can inherit the settings for [Tone]. |
J.Posterization
When turned on, you to adjust the density of the tone using [Posterization control].
Posterization control
Adjusts the density of the tones.

(1) Density
Shows the density of the tone numerically. Clicking the numeric value allows you to change it directly.
(2) Preview
Previews the posterization.
(3) Node
A controller to adjust the gradient of the tone density.
·Dragging the node horizontally allows you to adjust the gradient range reflecting the density of the tone.
·Dragging a node out of the [Posterization control] allows you to remove it.
·Clicking on a blank area allows you to add a node.
K.Type
Allows you to select a tone type and set it. The available settings depend on the selected tone type.

|
|
The [Type] setting cannot be previewed on the canvas. |
(1) Type
Select the pattern for the screentone. You can choose from: Circle, Square, Lozenge, Line, Cross, Ellipse, Noise, Sugar plum, Asterisk, Star, Carrot, Cherry (round), Cherry (mid), Cherry (thin), Flower (round), Flower (mid), Flower (thin), Clover (round), Clover (thin), Ninja star, Diamond, Heart, Clubs, and Spades.
(2) Frequency
Specify the number of screentone lines per inch.
(3) Angle
Set the angle of the tones.
(4) Size
Set the size of the noise. This setting is only available when [Noise] is selected under [Type].
(5) Factor
Specify the noise factor. This setting is only available when [Noise] is selected under [Type].
L.Preview
Turn this on to preview the results on the canvas.
|
|
·The [Type] setting cannot be previewed on the canvas. ·Turning on [Preview] may slow down your computer. To exit the preview, long press Esc. |
[LT conversion of layer] Dialog Box (Not 3D Layer)
Set the following items to a selected layer (Except 3D Layers)
|
|
·If the selected layer is a 3D layer, see "[LT conversion of layer] Dialog Box (3D Layer)". ·If [Extract line] on the [Layer Property] palette is turned on, you can inherit the [Extract line] settings to each of the following items: [Posterize before extracting lines], [Threshold of fill in black], [Correction line width], and [Method of detecting edge]. |
A.Posterize before extracting lines
When turned on, the original layer is posterized before outline extraction. The gradient can be adjusted using [Posterization control].
Posterization control
Adjust the grayscale gradient to extract as outline.

(1) Density
Shows the grayscale value. Clicking the numeric value allows you to change it directly.
(2) Preview
Previews the posterization.
(3) Node
This is a controller that adjusts the grayscale gradient.
·Dragging the node horizontally allows you to adjust the gradient range reflecting the density.
·Dragging a node out of the [Posterization control] allows you to remove it.
·Clicking on a blank area allows you to add a node.
B.Black fill threshold
Allows you to set up an area to be filled in black. You can set the threshold using the slider.
C.Correction line width
Allows you to adjust the width of the outline using the slider.
D.Method of detecting edge
Allows you to select the method for extracting the outline. The items to set will vary depending on the method selected.
|
Process of edge detection 1 |
The outline is extracted based on [Threshold of edge] and [Direction of detection]. |
|
Process of edge detection 2 |
The outline is extracted based on [Threshold of edge height] and [Threshold of gradient variation]. This method is suitable when a more delicate expression is required. |

(1) Threshold of edge
Set the gray density threshold to extract as outline. The smaller the value, the more lines will be detected making the outline wider.
(2) Direction of detection
Specify the direction in which to detect the outline. If turned off, outline detection is weaker.
(3) Threshold of edge height
Allows you to adjust the height of the edge and detect it as an outline. The smaller the value, the weaker the edge, making even small changes detected as a line.
(4) Threshold of gradient variation
Adjusts the continuity of the detected outline based on variation in thickness. The larger the value, the more likely it is to have short segments.
E.Tone work
When turned on, you can set the tone.
|
|
·If [Tone] on the [Layer Property] palette is turned on, you can inherit the settings for [Tone]. |
F.Posterization
When turned on, you to adjust the density of the tone using [Posterization control].
Posterization control
Adjusts the density of the tones.

(1) Density
Shows the density of the tone numerically. Clicking the numeric value allows you to change it directly.
(2) Preview
Previews the posterization.
(3) Node
A controller to adjust the gradient of the tone density.
·Dragging the node horizontally allows you to adjust the gradient range reflecting the density of the tone.
·Dragging a node out of the [Posterization control] allows you to remove it.
·Clicking on a blank area allows you to add a node.
G.Type
Allows you to select a tone type and set it. The available settings depend on the selected tone type.

|
|
The [Type] setting cannot be previewed on the canvas. |
(1) Type
Select the pattern for the screentone. You can choose from: Circle, Square, Lozenge, Line, Cross, Ellipse, Noise, Sugar plum, Asterisk, Star, Carrot, Cherry (round), Cherry (mid), Cherry (thin), Flower (round), Flower (mid), Flower (thin), Clover (round), Clover (thin), Ninja star, Diamond, Heart, Clubs, and Spades.
(2) Frequency
Specify the number of screentone lines per inch.
(3) Angle
Set the angle of the tone pattern.
(4) Size
Set the size of the noise. This setting is only available when [Noise] is selected under [Type].
(5) Factor
Specify the noise factor. This setting is only available when [Noise] is selected under [Type].
H.Preview
Turn this on to preview the results on the canvas.
|
|
·The [Type] setting cannot be previewed on the canvas. ·Turning on [Preview] may slow down your computer. To exit the preview, long press Esc. |