


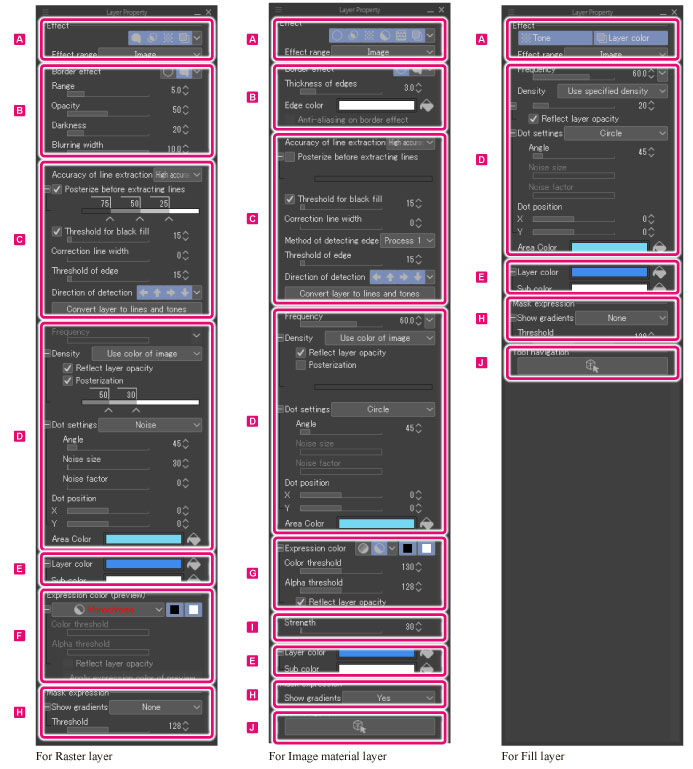
Functions of Layer Property Palette (Default)
This section describes the functions of the standard [Layer Property] palette.
|
|
Displayed items may vary depending on the selected layer. Furthermore, displayed items may also vary depending on the configured settings. |
|
|
Dragging vertically while pressing the Space bar allows you to scroll through the [Layer Property] palette. |
A.Effect
Configures the type of effect to apply to the layer and the area where the effect applies.

(1) Effect
Clicking each of the buttons toggles on and off the effects of [Border effect], [Extract line], [Tone], [Display decrease color], [Overlay texture] and [Layer color].
When turned on, the related items display on the [Layer Property] palette. In [Effect], you may select multiple items simultaneously.

|
|
When a cel on the light table is selected from the [Animation cels] palette, items other than [Layer color] cannot be selected, regardless of the layer type. |
|
Border effect |
Allows you to configure effects to be applied to the drawings and border (perimeter) of materials on the layer. Two types of effects are available: [Edge] and [Watercolor edge]. This item is not displayed when [Gradient] layer or [Fill in monochrome] layer is selected. |
|
Extract line [EX] |
An effect that extracts line drawings from a layer to display. This item does not display when a [Gradient] layer, [Fill in monochrome] layer, or [Layer folder] is selected. |
|
Tone |
An effect that displays images on a layer with black and white halftone dots (toning). |
|
Display decrease color |
Reduces the colors of a layer to [Monochrome] or [Gray]. This item displays only when a [Image material] layer or [3D] layer is selected. When turned off, the original expression color(s) is (are) restored. |
|
Overlay texture |
Displays when an [Image material] layer other than [Vector image material] layer is selected. This is an effect where images on an [Image material] layer are displayed as texture. |
|
Layer color |
The color of the drawing on the layer can be changed arbitrarily. For layers whose [Expression color] is [Monochrome] or [Gray], the black [Drawing color] becomes [Main color] and the white [Drawing color] becomes [Sub color] for display. For layers whose [Expression color] is [Color], the colors are first converted into grayscale by the application and then changed to alternative colors. |
(2) Effect range
For layers that has a [layer mask], configure the area where the effect applies.
This item displays when [Border effect], [Extract line] or [Tone] is selected for [Effect] and the selected layer has [layer mask].
|
Image |
Applies the effect to all images inside the selected layer. |
|
Mask image |
Applies the effect to images on the selected layer after masking. |
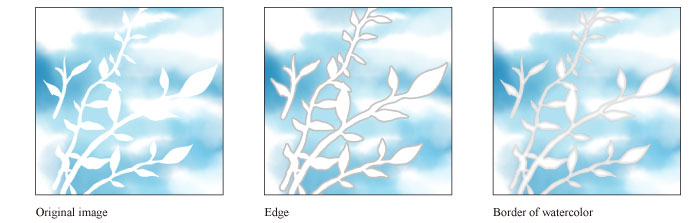
B.Border effect
Turning on [Border effect] for [Effect] displays the items below.

|
|
[Border effect] does not display when a [Gradient] layer or [Fill in monochrome] layer is selected. |
(1) Border effect
Select the effect to apply to the drawings and border (perimeter) of materials on the layer. [Border effect] settings to configure vary depending on the selected item.
|
Edge |
Allows you to configure a monochrome edge for the outer side of drawings and border of materials. |
|
Watercolor edge |
Allows you to configure a pale, subtle edge, as drawn with watercolor, for the outer side of drawings and border of materials. |
In the case of Edge
Configure the following items in the case of selecting [Edge].
(2) Thickness of edges
Configure the thickness of the edges with the slider.
(3) Edge color
Configure the color of the edges. Clicking the color indicator displays the [Color settings] dialog box where you can set the color. Click [Fill] to set the selected drawing color.
|
|
For details on the [Color settings] dialog box, see "Advanced settings of color Dialog Box". |
(4) Edge Anti-aliasing
You can set anti-aliasing to apply to edges. Turn this on when you want to apply anti-aliasing to edges.
In the case of Watercolor edge
Configure the following items in the case of selecting [Watercolor edge].
(5) Area
Configure the area where you want to apply edge to the border of drawings. The larger the value, the wider will be displayed the border edge.
(6) Opacity
Configure the opacity of the border area. The larger the value, the more opaque will be displayed the border area.
(7) Darkness
Configure how dark to make the border area. The larger the value the darker will be displayed the border area.
(8) Blurring width
Configure how blurred to make the border area. The larger the value, the more blurred will be displayed the border area.
C.Extract line [EX]
Selecting [Extract line] for [Effect] displays the items below.
|
|
·[Extract line] does not display when a [Gradient] layer, [Fill in monochrome] layer, or [Layer folder] is selected. ·Some of the items may not display depending on the selected layer. |
(1) Accuracy of line extraction
Configure the accuracy with which to extract the line drawing. Select one from: [Fast], [High accuracy] and [Highest accuracy]. The higher the accuracy, the better will be the quality of the displayed line drawing.
(2) Posterize before extracting lines
When turned on, the original layer is posterized before the line drawing is extracted. The gradient can be adjusted using [Posterization control].
Posterization control
Adjust the grayscale gradient to extract as line drawing.

|
(1) Density |
Shows the grayscale value. Clicking the numeric value allows you to change it directly. |
|
(2)Preview |
Previews the posterization. |
|
(3) Node |
This is a controller that adjusts the grayscale gradient. ·Dragging the node horizontally allows you to adjust the gradient range reflecting the density. ·Dragging a node out of the [Posterization control] allows you to remove it. ·Clicking on a blank area allows you to add a node. |
(3) Threshold of fill in black
Allows you to configure the area to be filled in black. You can set the threshold using the slider.
(4) Correction of line width
Allows you to adjust the width of the line drawing using a slider.
(5) Threshold of edge
Configure the grayscale threshold to extract as line drawing. The smaller the value, the more lines will be detected making the line art wider.
(6) Direction of detection
Specify the direction in which to detect the line drawing. The capability to detect line drawings becomes poorer in the opposite direction.
(7) Convert layer to lines and tones
Displays the [LT conversion of layer] dialog box.
Allows you to convert the selected layer by separating it into outline (line drawing) and tone layers, while inheriting the [Extract line] and [Tone] settings of the [Layer Property] palette.
|
|
Items displayed on the [LT conversion of layer] dialog box vary depending on whether the selected layer is a 3D layer or not. For details on the [LT conversion of layer], see the following: |
When the Selected Layer Is an Image Material Layer
The following additional items are displayed when the selected layer is an [Image material] layer:
(8) Method of detecting edge
Allows you to select the method for detecting line drawings from the [Image material layer] . The items to set will vary depending on the method selected.
|
Process 1 |
Configure settings in the same way as for other layers. |
|
Process 1 |
Settings to be configured differ from those for other layers. Select this method to extract more delicate line drawings than with [Process 1]. |
(9) Threshold of edge height
Allows you to adjust the height of the edge detected as line art. The smaller the value, the weaker the edge, making even small changes detected as a line.
(10) Threshold of gradient variation
Adjusts the continuity of the detected line art based on the variation in the thickness of the image. The larger the value, the more likely it is to have short segments.
D.Tone
Turning on [Tone] for [Effect] displays the following items.

(1) Frequency
Specify the number of screentone lines per inch. The larger the value, the smaller will be the halftone dot.
(2) Density
Configure the method for specifying the tone density.
|
Use color of image |
Configures the tone density based on the image color. |
|
Use brightness of image |
Configures the tone density based on the image brightness. |
(3) Reflect layer opacity
When turned on, the opacity of the layer is reflected in the size of the halftone dots at toning.
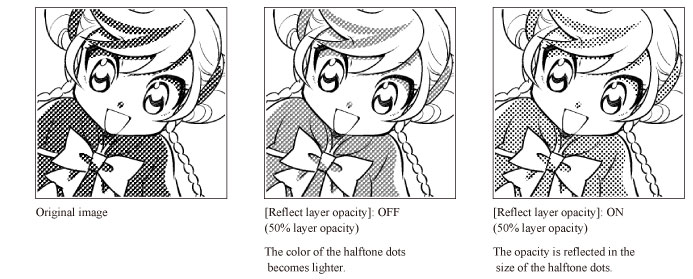
|
|
When [Reflect layer opacity] is turned on, the density of the halftone dots does not change even if the layer opacity is changed, which will allow you to avoid moire from occurring when outputting in black and white, for example. |
(4) Posterization
When turned on, you to adjust the density of the tone using [Posterization control].
|
|
This item does not display when a [Fill in monochrome] layer is selected. |
Posterization control
Adjusts the density of the tones.

|
(1) Density |
Shows the density of the tone numerically. Clicking the numeric value allows you to change it directly. |
|
(2)Preview |
Previews the posterization. |
|
(3) Node |
A controller to adjust the gradient of the tone density. ·Dragging the node horizontally allows you to adjust the gradient range reflecting the density of the tone. ·Dragging a node out of the [Posterization control] allows you to remove it. ·Clicking on a blank area allows you to add a node. |
(5) Dot settings
Select the shape of the tone from [Circle], [Square], [Lozenge], [Line], [Cross], [Ellipse], [Noise], [Sugar plum], [Asterisk], [Star], [Carrot], [Cherry (round)], [Cherry (mid)], [Cherry (thin)], [Flower (round)], [Flower (mid)], [Flower (thin)], [Clover (round)], [Clover (thin)], [Ninja star], [Diamond], [Heart], [Clubs], and [Spades].
(6) Angle
Configure the angle of the tone (halftone dot).
(7) Noise size
Configure the noise size. You can configure this item when Noise is selected for [Dot settings].
(8) Noise factor
Configure the noise factor. You can configure this item when Noise is selected for [Dot settings].
(9) Dot position (X)
Moves the tone (halftone dot) pattern in the horizontal direction.
(10) Dot position (Y)
Moves the tone (halftone dot) pattern in the vertical direction.
(11) Area Color
If [Show Tone Area] is enabled, you can configure the expression colors of the areas with tone attached and areas with image materials attached. Clicking the color indicator displays the [Color settings] dialog box where you can set the color. Click [Fill] to set the selected drawing color. Configuring a color changes the color of the toned areas to the configured color.
|
|
·[Area Color] is displayed if any of the items in the [Display] menu > [Show Tone Area] are turned on. For details on [Show Tone Area], see "Show Tone Area [PRO/EX]". ·For details on the [Color settings] dialog box, see "Advanced settings of color Dialog Box". |
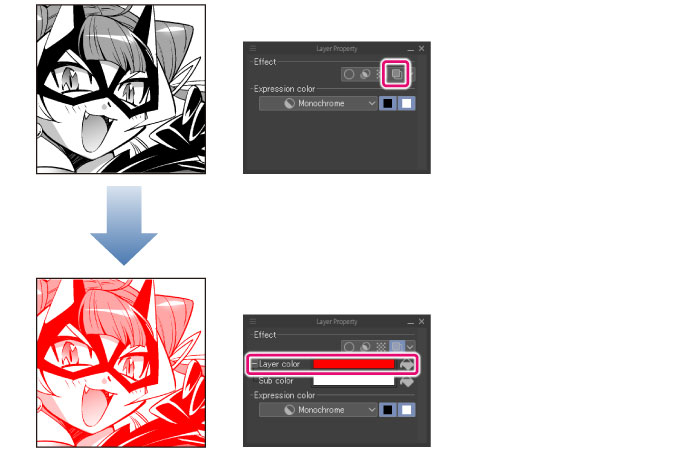
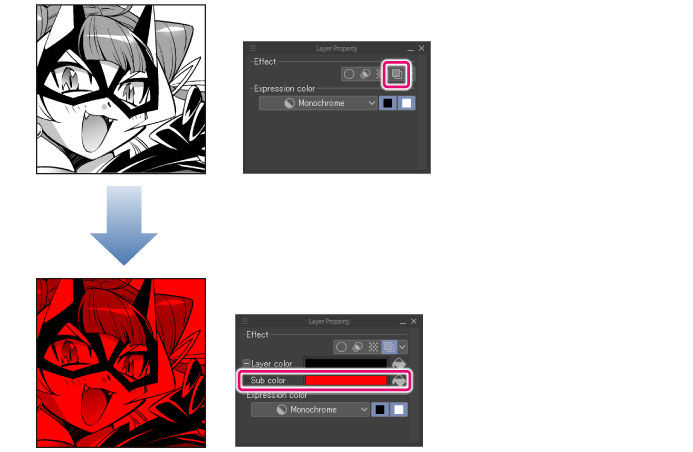
E.Layer color
Turning on [Layer color] for [Effect] displays the following items.

(1) Layer color
Allows you to specify an alternative color to black. Clicking the color indicator displays the [Color settings] dialog box where you can set the color. Click [Fill] to set the selected drawing color. Configuring a color changes black to the configured color.
|
|
For details on the [Color settings] dialog box, see "Advanced settings of color Dialog Box". |
(2) Sub color
Allows you to specify an alternative color to white. Clicking the color indicator displays the [Color settings] dialog box where you can set the color. Click [Fill] to set the selected drawing color. Configuring a color changes white to the configured color. This item does not display when the selected layer is monochrome.
|
|
For details on the [Color settings] dialog box, see "Advanced settings of color Dialog Box". |
F.Expression color
Allows you to configure [Expression color] for the layer by previewing it. This item displays when a [Raster] layer, [Vector] layer, [Balloon] layer or [Text] layer is selected. Clicking [Apply expression color of preview] commits the [Expression color] for the layer.
Displayed items vary depending on the selected layer and configured [Expression color].

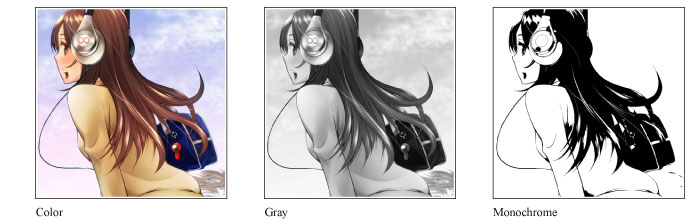
(1) Expression color
Changes the expression color of the selected layer. Select from [Color], [Gray] and [Monochrome].
When reducing colors degrades the image quality, the view changes to [Expression color (preview)], where the image is displayed in reduced colors but in the original expression color.
|
|
For details on [Expression color], see "Explanation: Expression Color and Drawing Color". |
(2) Drawing color
Configures the drawing color for [Gray] and [Monochrome]. Configure the color with the [Black] and [White] buttons.
|
|
[Drawing color] displays when [Expression color] is [Gray] or [Monochrome]. |
Gray
The drawing color is configured as follows with the [Black] and [White] buttons.
|
Only black button ON |
The drawing color is configured as a 256-step gradient from black to transparent. |
|
Only white button ON |
The drawing color is configured as a 256-step gradient from white to transparent. |
|
Both black and white buttons ON |
The drawing color is configured as a 256-step gradient from black to white. When drawn in transparent, the drawn portion is erased. |
Monochrome
The drawing color is configured as follows with the [Black] and [White] buttons.
|
Only black button ON |
The drawing color is configured as black or transparent. |
|
Only white button ON |
The drawing color is configured as white or transparent. |
|
Both black and white buttons ON |
The drawing color is configured as black, white or transparent. |
(3) Color threshold
The color threshold configured with the slider becomes the border between black and white.
This item displays when a [Raster] layer meeting the following conditions is selected, and [Monochrome] is configured for [Expression color] on the [Layer Property] palette.
·[Expression color] is [Color]
·[Expression color] is [Gray] and the [Drawing color] is [Black] and [White]
|
|
This item does not display if drawings on the layer are monochrome, even if the [Expression color] of the [Raster] layer is [Color] or [Gray]. |
(4) Alpha threshold
The alpha threshold for opacity configured with the slider becomes the border between black and white and transparent. This item displays when a [Raster] layer is selected, and [Monochrome] is configured for [Expression color] on the [Layer Property] palette.
(5) Reflect layer opacity
Reflects the layer opacity in the density. This item displays when a [Raster] layer is selected, and [Monochrome] is configured for [Expression color] on the [Layer Property] palette.
|
On |
Divides the [Drawing color] into black and white and transparent based on the drawing color with layer opacity applied. |
|
Off |
Applies opacity to a layer whose [Expression color] has been changed to monochrome. |
|
|
This item does not display if drawings on the layer are monochrome, even if the [Expression color] of the [Raster] layer is [Color] or [Gray]. |
(6) Apply expression color of preview
Clicking the button converts the layer into the [Expression color] and [Drawing color] configured on the [Layer Property] palette. At the same time, the [Expression color] and [Drawing color] settings prior to configuring them on the [Layer Property] palette are discarded.
For example, if [Monochrome] is configured for [Expression color] on the layer property palette for a [Raster] layer whose [Expression color] is [Color] and the [Apply expression color of preview] button clicked, the [Raster] layer is converted to a layer whose [Expression color] is [Monochrome].
G.Display decrease color
Turning on [Display decrease color] for [Effect] displays the following items.

|
|
·[Display decrease color] displays when a [Image material] layer or [3D] layer is selected. ·If items for [Display decrease color] are configured, the preview is displayed in [Gray] or [Monochrome], without changing the original expression color. |
(1) Expression color
Configures the [Expression color] applicable when [Display decrease color] is turned on for the selected layer. Select from [Gray] and [Monochrome].
(2) Drawing color
Configures the drawing color applicable when [Expression color] is [Gray] or [Monochrome] for [Display decrease color. Configure the color with the [Black] and [White] buttons.
(3) Color threshold
The color threshold configured with the slider becomes the border between black and white.
This item displays when the configured [Expression color] is [Monochrome] for [Display decrease color] and
·The [Expression color] is [Color] for the layer when [Display decrease color] is turned off, or
·The [Expression color] is [Gray] and [Drawing color] is [Black] and [White] for the layer when [Display decrease color] is turned off
(4) Alpha threshold
The alpha threshold for opacity configured with the slider becomes the border between black and white and transparent. This item displays when the configured [Expression color] is [Monochrome] for [Display decrease color].
(5) Reflect layer opacity
Reflects the layer opacity in the density. This item displays when the [Expression color] for [Display decrease color] is changed to [Monochrome].
|
On |
Divides the [Drawing color] into black and white and transparent based on the drawing color with layer opacity applied. |
|
Off |
Applies opacity to a layer whose [Expression color] has been changed to monochrome. |
H.Mask expression
This item displays when a layer including a mask is selected, and [Monochrome] is configured for [Expression color] on the [Layer Property] palette. Allows you to configure a gradient for the mask.

(1) Posterization
Select posterization for the mask from [Yes] and [No]. Selecting [Yes] keeps the existing gradient. Selecting [No] binarizes the mask gradient.
(2) Threshold
This item displays when [No] is configured for [Posterization]. The color threshold configured with the slider becomes the border to divide the layer mask colors into [Black] and [Transparent].
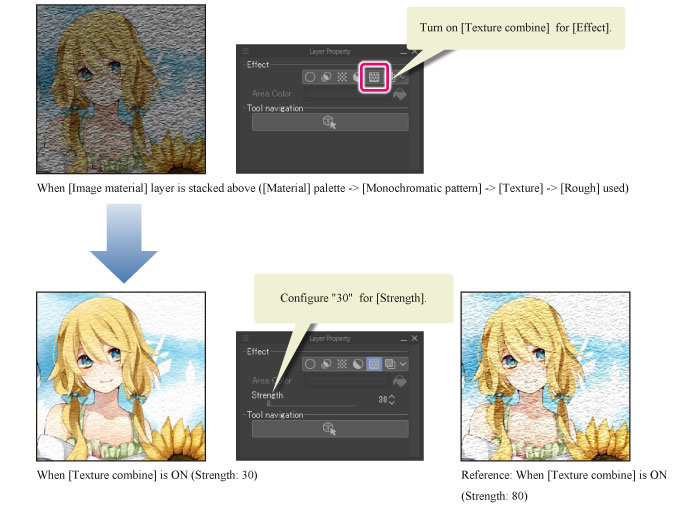
I.Overlay texture
Turning on [Overlay texture] for [Effect] displays the following items.

|
|
[Overlay texture] displays when an [Image material] layer other than vector is selected. |
(1) Strength
Allows you to configure the strength of the texture. The larger the value, the stronger will be the effect of the texture.
J.Tool navigation
[Tool navigation] displays tools and sub tools that can be used for editing the selected layer.
Placing the mouse cursor over a tool icon on the [Tool navigation] displays the tool name. Clicking the tool icon switches the tool/sub tool.
The [Tool navigation] does not display when a layer including a raster layer and a layer mask is selected.
