


OpenToonz Scene File [Windows/macOS] [EX]
You can export the current animation as an file for OpenToonz.
|
|
·OpenToonz must be installed on the same device as Clip Studio Paint in order to use the [OpenToonz Scene File] command. Please install OpenToonz before using this command. ·If the installation location of OpenToonz has changed, the [Specify OpenToonz Installation Path] dialog box will appear when the command is executed. Click [Browse] and specify the OpenToonz installation location. ·The animation folder cannot be imported into OpenToonz if the folder name contains the following symbols: \ / : * ? " < > | |
|
|
Settings in 2D camera folders will not be exported to the OpenToonz file. |
You can export the following information:
|
Clip Studio Paint |
OpenToonz |
|
Cel images in animation folders |
·Toonz raster level file (extension: tlv) ·Palette file (extension: tpl) |
|
[Timeline] palette information |
Scene file (extension: tnz) |
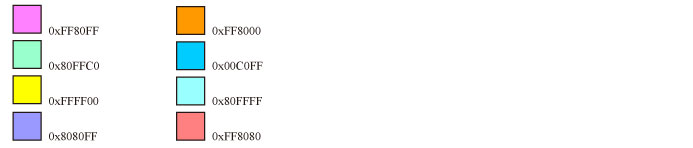
When exporting as an OpenToonz Scene File, draw the lines or color traces using the following five colors so that coloring is available in OpenToonz.

|
|
·Anything drawn in white (0xFFFFFF) will become transparent. ·If other colors have been used in the image, the colors will be reduced to the above colors. However some lines may not be appear correctly |
If fill color on draft layers indicates shadow specifications, use the following colors.
[OpenToonz Scene File Export Settings] Dialog Box
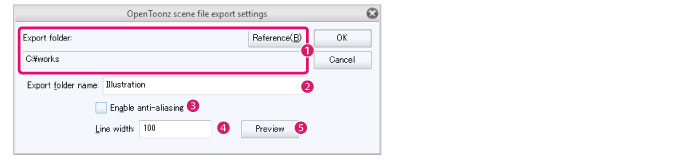
(1) Export folder
Click [Browse] to specify the destination folder.
(2) Export folder name
Enter a name for the file export folder.
(3) Enable anti-aliasing
Enables you to export to OpenToonz with anti-aliasing enabled on the drawing lines.
|
|
When anti-aliasing is enabled, the image is exported with only high opacity colors remaining to prevent colors from mixing. |
(4) Line width
You can adjust the line width for importing in OpenToonz. [Line width] cannot be set when [Enable anti-aliasing] is on.
(5) Preview
Click this to display the [Line width preview] dialog box. A preview appears to show how the image will look when it is exported for OpenToonz. The [Line width] setting can also be changed while checking the preview.
A [Preview] cannot be shown when [Enable anti-aliasing] is on.
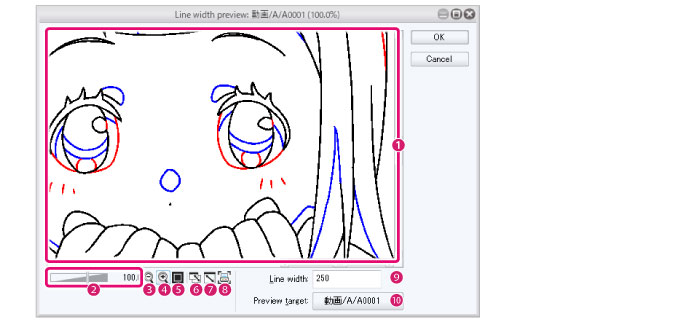
[Line width preview] Dialog Box
|
(1) Preview window |
Shows how the image will look when it is exported for OpenToonz. |
|
(2) Scale up/down slider |
Drag the slider to adjust the scale of the preview window. You can also adjust the size by directly inputting a value. |
|
(3) Zoom out |
Scales down the image in the preview window. |
|
(4) Zoom in |
Scales up the image in the preview window. |
|
(5)100% |
Scales the image in the preview window to 100%. |
|
(6) Fit to navigator |
Fits the preview image to the window size. When the size of the window is adjusted, the image preview will change size accordingly. |
|
(7) Fit to Screen |
Click to display the image in the preview window fit to the size of the current dialog box. When the size of the window is adjusted, the image preview will not change size. |
|
(8) Print size |
Click to display the image in the preview window in the print size. If a display resolution has not been set, a message will appear to prompt you to set the display resolution. Clicking [OK] shows the [Settings of display resolution] dialog, where you can set a display resolution. For details on the [Settings of display resolution] dialog box, see "Display resolution". |
|
(9) Line width |
Set the line width for exporting. Changes to the line width will be shown in the preview window. |
|
(10) Preview target |
Opens a menu where you can select the cel to be displayed in the preview window. |