


New dialog box (Illustration) [PRO/EX]
These are the settings that appear when [Illustration] is selected as the [Use of work].
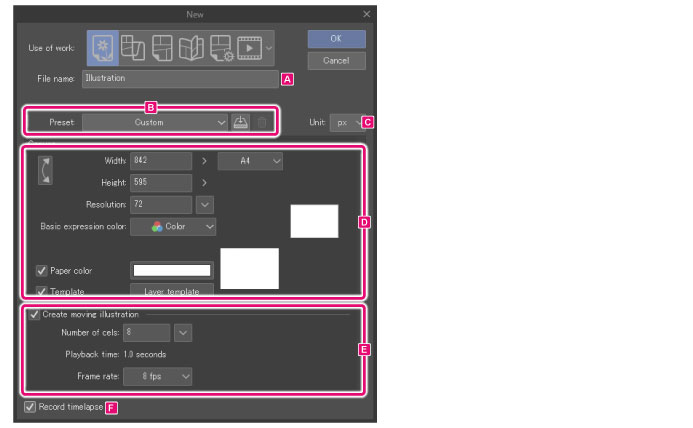
A.File name
Enter a save name for your file.
B.Preset

(1) Preset
You can select a canvas size from the list.
|
|
If you change the settings of a preset, the selected option will automatically change to [Custom]. |
(2) Register to preset
Registers the current settings in the dialog box as [Preset]. Clicking the button opens the [Register to preset] dialog box. In the dialog box, set the preset name and settings to be included in the preset, then click [OK].
|
|
For details on the [Register to preset] dialog box, see "Register to preset Dialog Box". |
(3) Delete preset
You can delete presets selected from the [Preset] list.
|
|
You can only delete presets that you have registered yourself. Default presets cannot be deleted. |
C.Unit
Select a unit for the width and height. You can choose from centimeters, millimeters, inches, pixels, or points.
D.Canvas
Adjust various canvas settings, ncluding size and resolution.
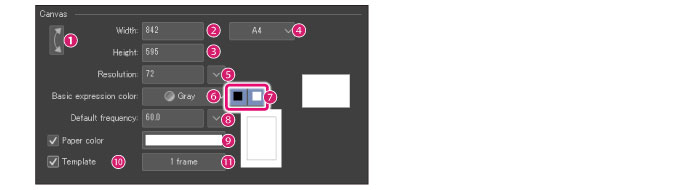
(1) Swap width/height
Swaps the width and height of the canvas.
(2) Width
Sets the width of the canvas.
(3) Height
Sets the height of the canvas.
(4) Default size (Canvas size)
Allows you to select a width and height from default sizes.
(5) Resolution
Sets the resolution of the canvas. Click the drop-down button next to it to select a value.
(6) Basic expression color
Sets the basic expression color. You can choose from [Color], [Gray], or [Monochrome].
|
|
The expression color [Monotone] from Ver.1.2.1 and earlier will be converted into the following [basic expression color] and [drawing color]. ·Basic expression color: Gray ·Drawing color: Only black |
(7) Drawing colors
Set the drawing colors when using [Gray] or [Monochrome] basic expression colors. You can set the drawing colors using the black and white square icons.
Gray
You can set drawing colors in the following ways with the black and white buttons.
|
Only black |
The drawing colors will be grayscale from black to transparency. |
|
Only white |
The drawing colors will be grayscale from white to transparency. |
|
Both black and white |
The drawing colors will be grayscale from black to white. |
Monochrome
You can set drawing colors in the following ways with the black and white buttons.
|
Only black |
The drawing colors will be black and transparency only. |
|
Only white |
The drawing colors will be white and transparency only. |
|
Both black and white |
The drawing colors will be black, white, and transparency only. |
|
|
For details on expression colors and drawing colors, see "Explanation: Expression Color and Drawing Color". |
(8) Default frequency
Specify the number of screentone lines per inch. Larger values result in smaller dots. This appears when the basic expression color is set to [Gray] or [Monochrome].
(9) Paper color
You can set a color for the Paper layer. Click the color indicator to open the [Color settings] dialog box. Specify a color to change the color of the Paper layer.
|
|
·The Paper layer is a single-color layer at the bottom of the layer palette. When the paper layer is hidden, transparent areas of the canvas will be shown in a checkered pattern. ·The Paper layer color can be changed afterwards. You can double-click [Paper Layer] in the [Layer] palette to display the [Color settings] dialog box and change the color of the [Paper Layer]. ·For details on the [New] dialog box in DEBUT, see "Advanced settings of color Dialog Box". |
(10) Template
Allows you to create a page file with an imported template. Select the checkbox and click the button to open the [Template] dialog box. Specify the template to import to the page file in the dialog box.
|
|
If a template has previously been specified, the template title will appear as a button beside the checkbox. Click this button to open the [Template] dialog box. |
(11) Specified template
Clicking this button opens the [Template] dialog box. Specify the template to import to the page file in the dialog box.
|
|
For details on the settings in the [Template] dialog box, see "Template Dialog Box [PRO/EX]". |
E.Create moving illustration
You can create an animated illustration and set the number of animation cels.

(1) Create moving illustration
Turn this on to display the settings for creating an animated illustration.
(2) Number of cels
Allows you to set the number of cels. Sets Up to 24 pages. Click the drop-down icon to select the number of cels by length in seconds.
|
|
·In the [Number of cels] setting, you set the total playback time as well as the number of cels. You can change the number of cels after creating the canvas by adjusting the number of cels in the [Timeline] palette. For details, see "Operating the Timeline Palette". ·You can adjust the number of cels per second with the [Frame rate] setting. |
(3) Playback time
The playback time is shown based on the number of cels and the frame rate.
(4) Frame rate
Sets the number of cels (images) per second. For example, if a frame rate of [8fps] is set, 8 cels will be played in one second.
F.Record timelapse *
When enabled, starts recording a timelapse whenever a new canvas is created. If you save the file in Clip Studio format (extension: .clip), the timelapse will be saved with the file. For more detail on timelapses, see Clip Studio TIPS.