


Print Settings [Windows/macOS]
Check and adjust the print settings to prepare for printing.
[Print Settings] Dialog Box
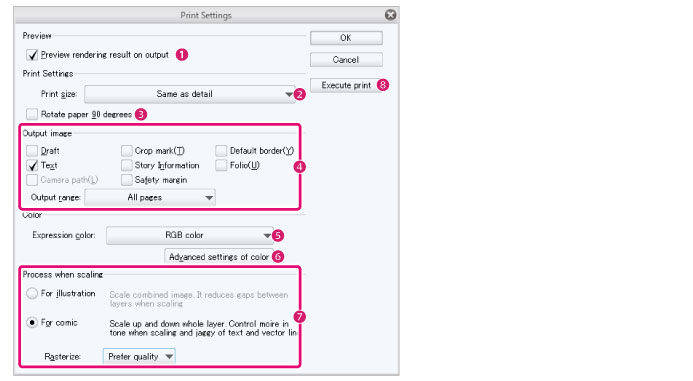
(1) Preview rendering result on output
When turned on, the [Print preview] dialog box will appear for you to check the content before printing.
|
|
In EX, the [Print preview] dialog box will not appear when printing more than one page. |
|
|
For details on the [Print preview] dialog box, see "[Print preview] Dialog Box". |
(2) Print settings
Set the size and orientation for printing.
|
Actual size |
The size for printing is the actual size. |
|
Scale up or down according to paper |
The size for printing is adjusted to fit the paper size. |
|
Pixel size |
The size for printing is adjusted so that the relationship between the image pixel and screen pixel is 1 to 1. |
|
Dual page [EX] |
The page layout for printing is set to dual page. ·Two pages are printed on one sheet of paper. ·The margin on the front side becomes the outer side, as the binding margin will be on the outer side of the paper. |
|
Spread [EX] |
The page layout for printing is set to two-page spread. ·Two pages are printed on one sheet of paper. ·The margin on the front side becomes the inner side, as the binding margin will be on the inner side of the paper. |
(3) Rotate paper 90 degrees
Prints the canvas image in landscape orientation.
(4) Output image [PRO/EX]
You can select whether to include the drafts, crop marks, default border, text, story information, folio, camera paths, and safety margins when printing. The checked items will be printed.
With EX, you can specify the image area to print in [Export range]. You can choose from [Full page], [To offset of crop mark], and [To inside of crop mark].
(5) Expression color
Set the expression color for printing. You can select from [Auto detect appropriate color depth], [Duotone (Threshold)], [Duotone (Toning)], [Gray], and [RGB color].
|
|
·For [Auto detect appropriate color depth], the expression color of each layer will be determined based on the original color depth and output. ·[Duotone (Threshold)] sets a brightness of 50% as the threshold and outputs in binarized form. ·[Duotone (Toning)] outputs with screentones according to the [Default frequency] of the canvas. |
(6) Advanced settings of color [PRO/EX]
Opens the [Advanced settings of color] dialog box. In the dialog box, you can set the color for crop marks, default border, and safety margins, and the frequency of screentones. For details on the [Advanced settings of color] dialog box, refer to "[Advanced settings of color] Dialog Box [PRO/EX]".
(7) Process when scaling [PRO/EX]
Specify the process for enlarging or reducing the image for printing. You can select from [For illustration] and [For comic]. When you select [For comic], you can set the image quality for printing when you print in [Rasterize] mode.
You can select from [Fast] or [Prefer quality]. When you select [For illustration], [Prefer quality] is automatically specified.
|
|
If quality is desired when printing at a reduced scale, turn on [Prefer quality] for [Rasterize]. |
(8) Execute print
Saves the settings and opens the dialog box for printing.
|
|
·The dialog box for printing depends on your OS and printer. ·On macOS, the [Print resolution] dialog box will appear when you select [Execute print] from the [Print] dialog box. Confirm the print resolution and click [OK] to start printing. The [Print resolution] dialog box references the resolution of the printer connected to the computer. However, you can change these settings if necessary. |
[Advanced settings of color] Dialog Box [PRO/EX]
Click [Advanced settings of color] in the [Print Settings] dialog box to open this dialog box. In the dialog box, you can set the color for crop marks, default border, and safety margins, camera, and camera paths. You can also set the frequency for tones and effects.
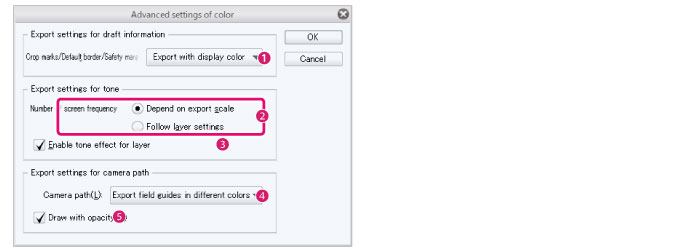
(1) Crop marks/Default border/Safety margins
Set the color for crop marks, default border, and safety margins.
|
Export in displayed colors |
·The color of the crop marks and default border will be as set in [Preferences] > [Ruler/Frame/Unit] (the current display color). ·The color of the safety margin (the color displayed on the canvas) can be set under [Preferences] > [Ruler/Unit] > [Safety margin color]. |
|
Export in cyan |
Crop marks, default border, and safety margins will be exported in cyan. |
|
Export in black |
Crop marks, default border, and safety margins will be exported in black. |
(2) Frequency
You can set the frequency for printing.
|
Depend on export scale |
The frequency varies in accordance with the output size specified in the [Print Settings] dialog box. |
|
Follow layer settings |
The frequency will be as set in the original image. |
(3) Enable tone effect for layer
When turned on, any tone effects added using the [Layer Property] palette will be applied when printing an image.
(4) Camera path
Set the color of the camera path when printing.
|
Export in displayed colors |
The color of the camera or transformed camera paths will be as set in [Preferences] > [Camera path/Camera]. |
|
Export field guides in different colors |
The camera and transformed camera paths are printed in different colors for each frame. The reference color is the [Display color] set under [Preferences] > [Camera path/Camera]. Even if [Display in different colors] is turned off in [Preferences] > [Camera path/Camera], these will be printed in different colors. |
|
Export in black |
The camera or transformed camera paths are printed in black. |
(5) Draw with opacity
Set the opacity of the camera path for printing. When turned on, the camera path is printed at 100% opacity. When turned off, the opacity of the camera path will be as set under [Preferences] > [Camera path/Camera].