


Export (Single Layer)
Exports all layers of the current canvas as a single flattened image.
You can export in the following file formats: BMP, JPEG, PNG, TIFF, Targa, Adobe Photoshop Document (extension: psd) and Adobe Photoshop Big Document (extension: psb).
·You can set whether or not to export draft layers, as well as the size settings and scaling process.
·For TIFF, JPEG, Adobe Photoshop Document (extension: psd), and Adobe Photoshop Big Document (extension: psb) formats, you can set ICC profile embedding.
·In EX, all pages in the work can be exported together by selecting the [Page Manager] window. For information on how to export pages together, see "Batch export".
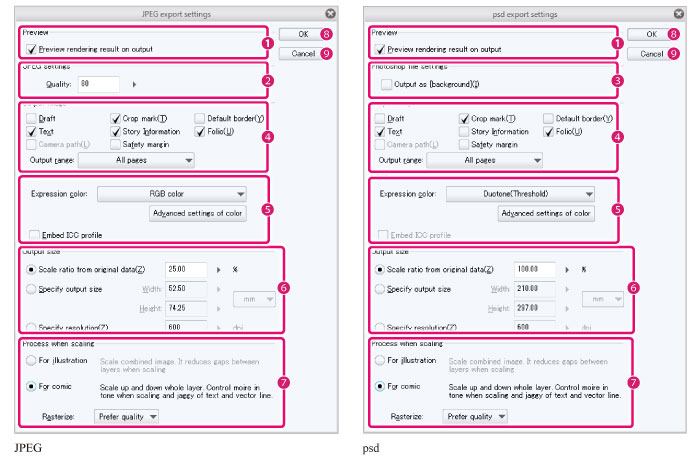
[Export settings] Dialog Box
|
|
[Embed ICC profile] and [Advanced settings of color] are not available in DEBUT. |
(1) Preview rendering result on output
When turned on, the [Export preview] dialog box will when exporting.
|
|
For details on the [Export preview] dialog box, see "[Export preview] Dialog Box". |
(2) Quality
When exporting in JPEG, you can set the image quality. The larger the value, the higher the image quality. This option does not appear for save formats other than JPEG.
(3) Output as [Background]
When the saved format is Adobe Photoshop document (extension: psd) or Adobe Photoshop big document (extension: psb) and this feature is on, the Photoshop background layer can be merged and saved. If the saved format is not psd or psb, this setting is not displayed.
(4) Output image [PRO/EX]
When exporting images, you can select whether to include the drafts, crop marks, default border, text, story information, folio, camera paths, and safety margins. The checked items will be exported.
With EX, you can specify the image area to be exported in [Export range]. The available options are: [Full page], [To offset of crop mark], [To inside of crop mark] and [Selection].
|
|
[Selection] exports a rectangular image with the width and height of the current selection area. |
(5) Expression color
Set the expression color of the image to output. You can select from [Auto detect appropriate color depth], [Duotone (Threshold)], [Duotone (Toning)], [Gray] and [RGB color].
For TIFF, JPEG, Adobe Photoshop Document (extension: psd), and Adobe Photoshop Big Document (extension: psb) formats, you can set ICC profile embedding.
Click [Advanced settings of color] to open the dialog box. In the dialog box, you can set the color for crop marks, default border, and the default frequency of screentones. For details on the [Advanced settings of color] dialog box, refer to "[Advanced settings of color] Dialog Box [PRO/EX]".
|
|
·The [Embed ICC profile] option does not appear when saving in BMP, PNG or Targa. ·[CMYK] is available when exporting an image in TIFF (extension: tif), JPEG (extension: jpg), Adobe Photoshop Document (extension: psd) or Adobe Photoshop Big Document (extension: psb) format. [PRO/EX] |
|
|
·In the [Preferences] dialog box, you can set default values for the color profile, rendering intent, and library for exporting in [RGB] or [CMYK]. For details on these settings, see "Color conversion [PRO/EX]". [PRO/EX] ·In the [View] menu > [Color profile] > [Preview settings], you can set the color profile, and rendering intent for exporting in [RGB] or [CMYK]. For details on these settings, see "Preview Settings". [PRO/EX] ·[Auto detect appropriate color depth] is determined based on the expression color of each layer. ·[Duotone (Threshold)] sets a brightness of 50% as the threshold and outputs in binarized form. ·[Duotone (Toning)] exports in screentones according to the default frequency of the canvas. |
(6) Output size
You can specify the size of the file to output.
|
Scale ratio from original data |
Specify the size of the image to export as a ratio of the original data. |
|
Specify output size |
Specify the size of the image to export with width and height parameters. You can select a unit from centimeters, millimeters, inches, pixels, or points. |
|
Specify resolution |
Specify the size of the image to export by specifying the resolution. The resolution can be specified as a value between 72dpi and 1200dpi. |
(7) Process when scaling [PRO/EX]
Specify the process for enlarging or reducing the image for exporting. You can select from [For illustration] and [For comic].
When you select [For comic], you can set the image quality if you export specifying [Rasterize]. You can select from [Fast] or [Prefer quality]. When [For illustration] is selected, [Prefer quality] is always used for exporting.
|
|
If quality is desired when exporting in a reduced size, we recommend configuring [Prefer quality] for [Rasterize]. |
(8) OK
Applies the settings and opens the [Export preview] dialog box. For details on the [Export preview] dialog box, see "[Export preview] Dialog Box".
(9) Cancel
Cancels the settings and closes the [Export settings] dialog box.
[Export preview] Dialog Box
Click [OK] in the [Export settings] dialog box to display the [Export preview] dialog box. This shows a preview of the exported image. When exporting in JPEG format, you can set the quality of the image while checking the preview.
|
|
The [Export preview] dialog box does not appear if [Preview rendering result on output] is turned off in the [Export settings] dialog box. |
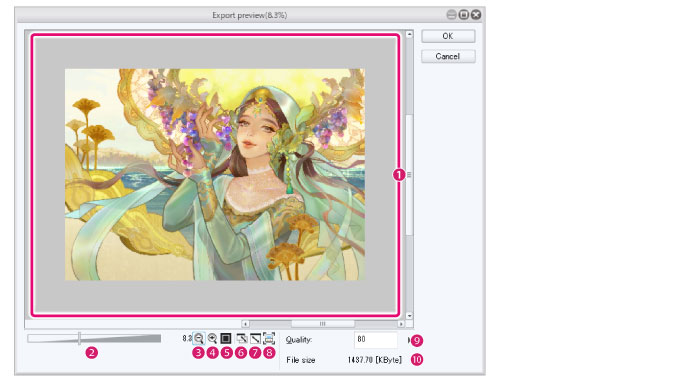
(1) Image preview
This shows a preview of the exported image. You can drag the [Image preview] to adjust the display position of the previewed image.
(2) Scale up/down slider
By dragging the slider, you can adjust the scale of the [Image preview]. Dragging to the right scales up the image while dragging to the left scales down the image. You can also click the numeric value to directly enter the scale.
(3) Zoom out
Click to scale down the image preview.
(4) Zoom in
Click to scale up the image preview.
(5) 100%
Click to display the image preview at 100%.
(6) Fit to navigator
Click to display the image preview to fit to the window size. When the size of the [Image preview] window is adjusted, the image preview will change size accordingly.
(7) Fit to Screen
Click to make the image preview fill the window size. When the size of the [Image preview] window is adjusted, the image preview will not change size.
(8) Print size
Clicking it shows the Print size in the [Image preview].
A message is displayed when executing this command if a display resolution is not set. Clicking [OK] shows the [Settings of display resolution] dialog, where you can set a display resolution. For details on the [Settings of display resolution] dialog box, see "Display resolution."
(9) Quality
When exporting in JPEG, you can set the image quality. The larger the value, the higher the image quality. This option does not appear for save formats other than JPEG.
The [Quality] setting is reflected in the image preview.
(10) File size
When exporting in JPEG, the size of the file to export is displayed. This option does not appear for save formats other than JPEG.
[Advanced settings of color] Dialog Box [PRO/EX]
In the [Export settings] dialog box, click [Advanced settings of color] to open the dialog box. In addition to crop marks, default border, and safety margins, you can also set the color for exporting the camera and transformed camera paths. You can also set the frequency for tones and effects.
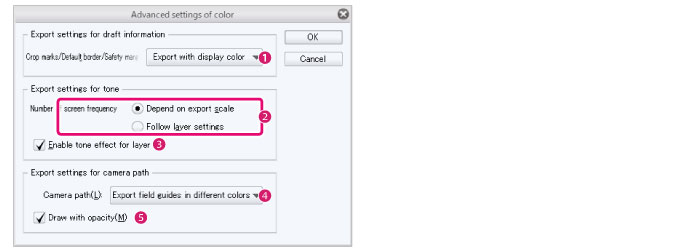
(1) Crop marks/Default border/Safety margins
You can the export color for crop marks, default border, and safety margins.
|
Export in displayed colors |
·The color of crop marks and the default border will be as set in [Preferences] > [Ruler/Unit]. ·The color of the safety margin can be set under [Preferences] > [Ruler/Unit] > [Safety margin color]. |
|
Export in cyan |
Crop marks, default border, and safety margins will be exported in cyan. |
|
Export in black |
Crop marks, default border, and safety margins will be exported in black. |
(2) Frequency
Set the frequency for exporting an image.
|
Depend on export scale |
The frequency adjusts depending on the output size specified in the [Export settings] dialog box. |
|
Follow layer settings |
The frequency will be as set in the original image. |
(3) Enable tone effect for layer
When turned on, the content set in the [Layer Property] palette > [Tone] will be reflected when exporting the image.
(4) Camera path
You can choose the color of the camera path when exporting a file.
|
Export in displayed colors |
The color of the camera or transformed camera paths will be exported according to the settings in [Preferences] > [Camera path/Camera]. |
|
Export field guides in different colors |
The color of the camera or transformed camera paths is set to different colors for each frame. The reference color is the [Display color] set under [Preferences] > [Camera path/Camera]. Even if [Display in different colors] is turned off in [Preferences] > [Camera path/Camera], the colors will be exported in different colors. |
|
Export in black |
The color of the camera or transformed camera paths are set to black. |
(5) Draw with opacity
Set the opacity of the camera path. When turned on, the camera path is exported at 100% opacity. When turned off, the opacity of the camera path will be as set under [Preferences] > [Camera path/Camera].