


Export animation
Export an animation created in Clip Studio Paint as a video or image sequence.
Image sequence
You can export the frames of the current animation as an image sequence. They can be exported as BMP, JPEG, PNG, TIFF or Targa files.
Select this command to open the [Image sequence export settings] dialog box. Animation can be exported as multiple images with consecutive numbers according to the settings in the dialog box.
|
|
·How to specify the save location differs when using an iPad/iPhone. The Files app is displayed after the [Image sequence export settings] dialog box is set. Select the save folder, then tap [Save]. Select the [File] menu > [Open] to display the exported file. ·When using an Android/Chromebook, the [File operation/Share] dialog box will be displayed after the [Image sequence settings] dialog box. To open the exported data, go to the [File operation/Share] dialog box, select [Export], and export the data to the device. For details, see "Exporting files saved in Clip Studio Paint to storage". |
[Image sequence export settings] Dialog Box
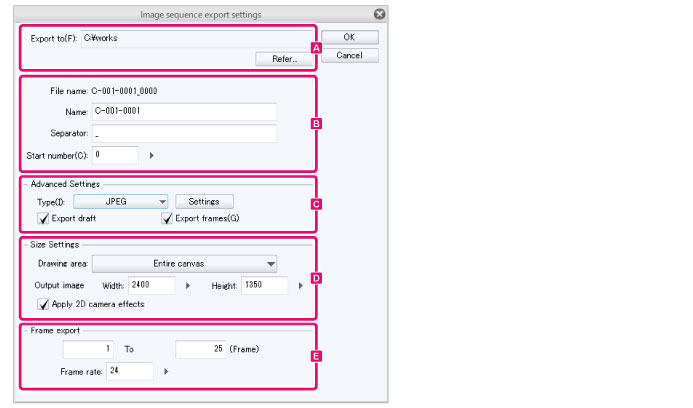
A.Export to [Windows/macOS]
Specify the location to export the image sequence. Click [Browse] to specify the location for exporting the images.
B.Settings of file name
Set the file names for each image sequence.

(1) File name
The information set in [Name], [Separator] and [Start number] is displayed in the preview. The file name corresponding to the start number of the image sequence is displayed.
(2) Name
Enter the file name for the image sequence.
(3) Separator
Enter a character string to be placed after the file names in the image sequence.
(4) Start number
Set the start number for the numbering.
C.Advanced Settings
Set the file format for the image sequence.

(1) Type
Set the file format for the image sequence. You can choose from PNG, BMP, JPEG, or Targa.
(2) Settings
When exporting in JPEG, you can set image quality. The larger the value, the higher the image quality. This option does not appear for save formats other than JPEG.
(3) Export drafts
Turn this on to include draft layers when exporting as an image.
(4) Export frames [PRO/EX]
Turning this on exports the overflow frame, output frame and title-safe area frame as an image.
|
|
·The overflow frame and output frame will exported in black. ·The title-safe area frame will be exported in gray. ·If a canvas has crop marks, default border, or safety margins, these can be exported in the image. |
D.Size Settings
You can set the export image size and drawing area.

|
|
Image quality may be lost if the image output size is larger than the size set for the drawing area. |
(1) Drawing area [PRO/EX]
This allows you specify the area of the images to export. You can select from [Output frame], [Overflow frame], [Entire canvas], or [Selection area].
|
|
[Selection area] exports rectangular images with the width and height of the current selection area. |
(2) Output image
Set the height and width of the exported images.
(3) Apply 2D camera effects
When active, images can be exported with the camera movement settings in the 2D camera folder.
E.Frame export
You can set which part of the timeline to export as an image, and the number of images to use per second.

(1) Frame export
You can designate the Start frame and the End frame for exporting.
This will export an image sequence of the specified frames up to the last frame specified.
|
|
In PRO and EX, the [Export range settings] are entered differently depending on the frame display method selected in [Playback time] in the [New] dialog box or the [New timeline] dialog box. |
(2) Frame rate
You can set the frame rate of animations created in Clip Studio Paint. Specify how many images to export for each second of animation.