


File Menu
The [File] menu is mainly for performing file input/output operations.
New
Select this to display the [New] dialog box. Select the type of work and click [OK] to create a new work.
New dialog box
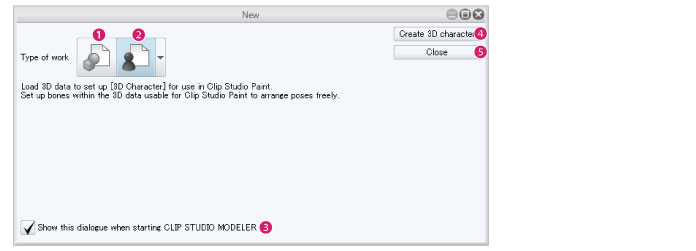
(1) New 3D object
The 3D Object Setup screen can be selected. In 3D object setup, you can load 3D data and set up a 3D object material that can be used in CLIP STUDIO PAINT.
(2) New 3D character
Select a 3D Character Setup screen. In the 3D character setup screen, you can load 3D data and set up a 3D character material that can be used in CLIP STUDIO PAINT.
(3) Display this dialog box when CLIP STUDIO MODELER is started
Turn this on to display the [New] dialog box when CLIP STUDIO MODELER is started.
(4) Create (selected item)
Click this to display a setup screen or editing screen for the item selected in (1) to (2).
(5) Close
Closes the [New] dialog box.
Open
Specify the file you want to open in CLIP STUDIO MODELER from the dialog box.
|
File formats that can be imported |
CLIP STUDIO MODELER character files (extension: csmc) CLIP STUDIO MODELER object files (extension: csmo) CLIP STUDIO MODELER background files (extension: csms) CLIP STUDIO 3D character files (extension: cs3c) CLIP STUDIO 3D object files (extension: cs3o) CLIP STUDIO 3D background files (extension: cs3s) |
Close
Closes the edited file.
Save
Saves the edited file under the same name. The file name and save location are specified only when saving for the first time.
The formats in which the file can be saved differ depending on the displayed screen.
|
3D Object Setup screen |
CLIP STUDIO MODELER object files (extension: csmo) CLIP STUDIO 3D object files (extension: cs3o) |
|
3D Character Setup screen |
CLIP STUDIO MODELER character files (extension: csmc) CLIP STUDIO 3D character files (extension: cs3c) |
|
|
·To use files in CLIP STUDIO MODELER format (extension: csmf) in CLIP STUDIO PAINT, import the saved file in the material setup screen and save it. ·For information on formats that files can be saved in and saving methods that can be used in the material setup screen, see "Saving a 3D Object" and "Saving a 3D Character" . |
Save as
Saves the edited file under a new name, creating a new file.
The formats in which the file can be saved differ depending on the displayed screen.
|
3D Object Setup screen |
CLIP STUDIO MODELER object files (extension: csmo) CLIP STUDIO 3D object files (extension: cs3o) |
|
3D Character Setup screen |
CLIP STUDIO MODELER character files (extension: csmc) CLIP STUDIO 3D character files (extension: cs3c) |
|
|
·To use files in CLIP STUDIO MODELER format (extension: csmf) in CLIP STUDIO PAINT, import the saved file in the material setup screen and save it. ·For information on formats that files can be saved in and saving methods that can be used in the material setup screen, see "Saving a 3D Object" and "Saving a 3D Character" . |
Register as new material
Converts a 3D model created in CLIP STUDIO MODELER into a 3D material that can be used in CLIP STUDIO products.
Select an item in the menu to display the [Material property] dialog. Input material information and click [OK] to register the 3D material to CLIP STUDIO.
The type of material that can be registered depends on the screen that is displayed.
|
3D Object Setup screen |
3D Object Materials |
|
3D Character Setup screen |
3D Character Materials |
|
|
3D shape materials can only be used in CLIP STUDIO MODELER. They cannot be used in CLIP STUDIO PAINT. |
|
|
CLIP STUDIO supports creative activities. |
Material property dialog box
The following describes the [Material property] dialog box.
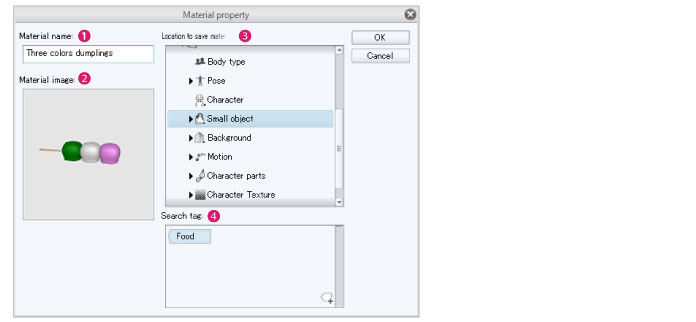
(1) Material name
Input a name for the material. "New document" is displayed if nothing is input. The material name can be changed in this dialog box.
(2) Material image
Displays a thumbnail of the material. The content displayed on the thumbnail differs depending on the material.
·The display of the [Document] window is applied to the Edit 3D Shape screen.
·The content captured in [Capture thumbnail] mode is displayed in the material setup screen.
|
|
For information on capturing thumbnails in the material setup screen, see "Capturing a Thumbnail" . |
(3) Location to save material
Click a folder to specify the location where you want to save the material. The specified location is reflected in the [Tree view] of the [Material] palette.
(4) Search tag
Click the tag list to specify the search tag to be displayed on the [Tag list].
·Clicking the tag with a + sign in the lower right will allow you to create a new tag.
·When a search tag is clicked, it changes color Light blue indicates that the tag is specified as a search tag for the material. White indicates that the tag is not specified as a search tag.
·To delete a tag, move the mouse cursor to the tag. A "×" mark appears on the right side of the tag. Click the "×" mark to delete the tag.
Overwrite and close material
The 3D material edited in the Edit Material mode of CLIP STUDIO MODELER is saved under the same name and CLIP STUDIO MODELER is closed.
Edit Material mode is a mode for editing 3D materials registered in CLIP STUDIO.
Open CLIP STUDIO and select the 3D material you want to edit. Open the information screen of the material and click [Open in MODELER] to open CLIP STUDIO MODELER in Edit Material mode.
|
|
Only materials set up in CLIP STUDIO MODELER and registered to CLIP STUDIO can be saved under the same name. Preinstalled materials and materials downloaded in CLIP STUDIO cannot be saved under the same name. |
|
|
This item is not displayed in the 3D shape editing screen. |
Start CLIP STUDIO [Windows]
Start CLIP STUDIO. CLIP STUDIO supports creative activities.
Quit CLIP STUDIO MODELER [Windows]
Quits CLIP STUDIO MODELER.