


When an angle is selected
The following settings can be configured in the [Object information] palette after selecting an [Angle] in an [Angle folder] when [Angle] is selected in the [Group] of the [Object configuration] palette.
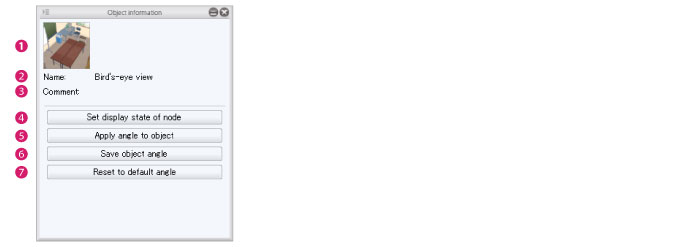
(1) Thumbnail
The thumbnail of the [Angle]. Click the thumbnail to display the [Capture thumbnail] window where a thumbnail can be captured for the angle. For information on how to configure this, see "Capturing a Thumbnail" .
(2) Name
Displays the name of the [Angle] being edited. Click this field to input an [Angle] name. The input name is applied to the [Object configuration] palette.
This angle name is displayed in the screen for configuring 3D object material settings in CLIP STUDIO PAINT.
(3) Comment
A comment about the [Angle] can be set. Click this field to input a comment. Information such as a description of the [Angle] can be entered here.
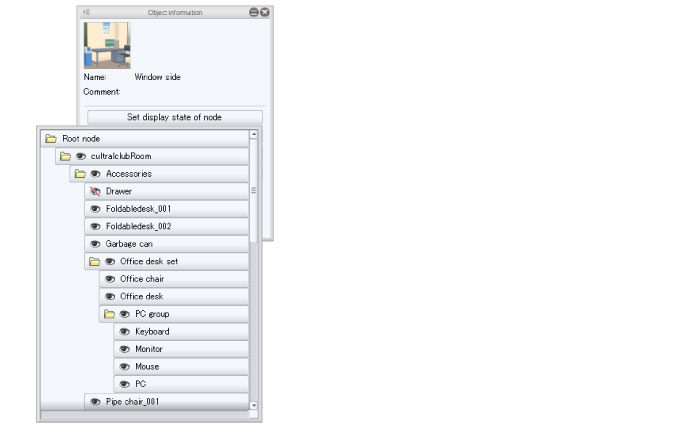
(4) Set display state of node
Click this to display a list of nodes. Set the [Nodes] to be displayed in the [Angle] using the [Visible/Invisible] icons.
|
|
·If the item you want to set is not displayed when [Set display state of node] is opened, check the [List] in the [Node] group of the [Object configuration] palette. ·When a [Node] folder is closed in the [List], [Nodes] below that folder are not displayed in [Set display state of node]. Make sure that the folder containing the [Node] to be configured is open and displayed in the [List]. |
(5) Apply angle
Apply an [Angle] selected from the [Object configuration] palette to an object in the [Document] window.
(6) Save angle
Saves the angle of the object in the [Document] window to the [Angle] selected in the [Object configuration] palette.
(7) Reset to default angle
In case of 3D objects with more than one [Angle], [Angles] selected in the [Object configuration] palette can be set as default [Angles].
When loading 3D object materials into CLIP STUDIO PAINT, the set [Angle] is applied.