


Material property Dialog Box [PRO/EX]
The following describes the [Material property] dialog box.
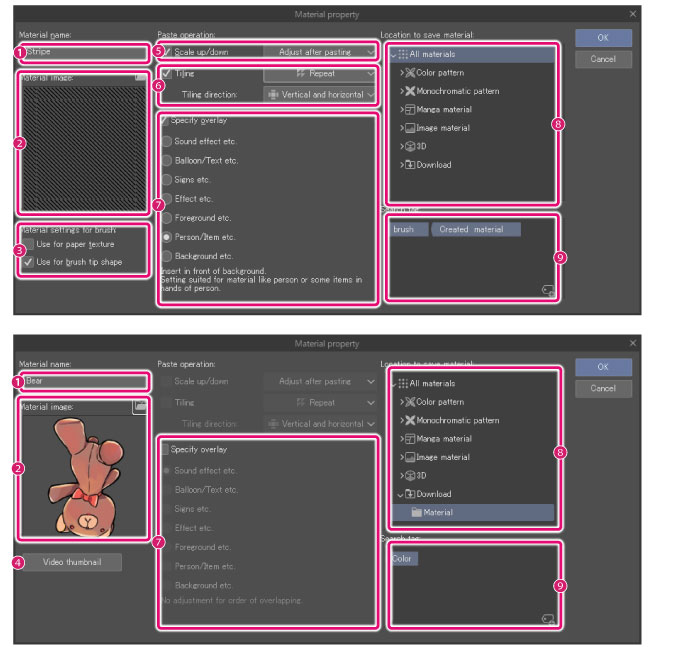
(1) Material name
Enter a name for the material.
|
|
[Material details] and [Scale up/down] can be configured only when registering only one raster layer or image material layer without layer mask and without rulers. |
(2) Material image
This is thumbnail that will be shown in the Material palette. Click [Select file] to open a dialog box where you can select an image file to be used as the thumbnail.
|
|
File formats that can be used for thumbnails are: BMP, JPEG, PNG, TIFF and Targa. |
(3) Material settings for brush
Turn on this item when using the material as material for brush.
You can configure [Use for brush tip shape] and [Use for paper texture].
|
|
·For details on [Brush tip shape], see the “Clip Studio Paint Tool Setting Guide”> Brush shape. ·For [Paper texture], see the “Clip Studio Paint Tool Setting Guide”> “Brush shape” > “Texture.” |
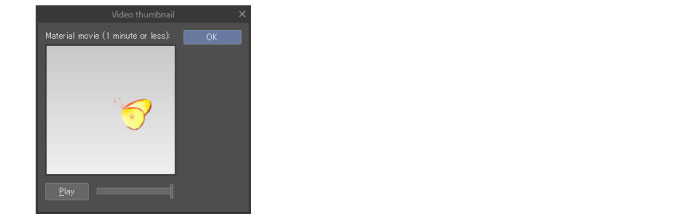
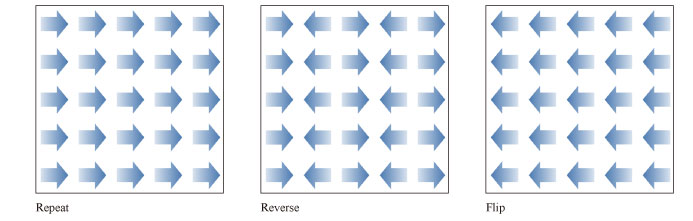
(4) Video thumbnail
Displayed for animation materials. In addition to normal thumbnails, animation materials can be registered as a video thumbnail. Clicking the item displays the [Video thumbnail] dialog, where you can play videos for the material to be registered as a thumbnail.
(5) Scale up/down
Configure the size when the material is pasted.
|
Adjust after pasting |
Displays handles to adjust the size when the material is pasted. |
|
Expand in full |
The material is pasted in such a size as to completely cover the destination. This setting is suitable for backgrounds. |
|
Fit to scale |
The material is pasted in such a size as to fit completely into the destination. This setting is suitable for sound effects and the like which must fit completely. |
|
Adjust according to destination |
The material is enlarged or reduced in accordance with the size of the destination. This setting is suitable for materials such as illustrations, where only a portion of the material is arranged. |
|
Fit to text |
It allows for materials to be enlarged or reduced in accordance with the size of a text present at the position where the material will be pasted. |
|
|
If the destination is a frame border folder, the image is resized in accordance with the size of the frame border for pasting. |
(6) Tiling
When turned on, the material is arranged as a tile when pasted. Specify the repeat type and direction of tiling with the pull down menu.
Tiling
From the pull down menu, specify the repeat type when tiling images.
Tiling direction
From the pull down menu, specify the direction when tiling images.
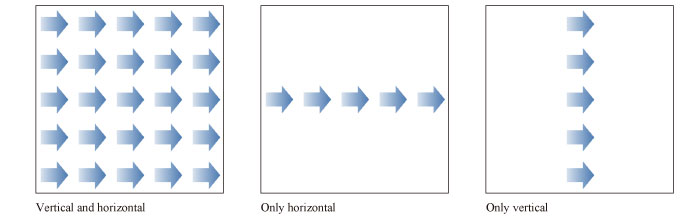
|
Vertical and horizontal |
The image is arranged vertically and horizontally. |
|
Only horizontal |
The image is arranged only in the horizontal direction. |
|
Only vertical |
The image is arranged only in the vertical direction. |
(7) Specify overlay
Specifies where the pasted material will be inserted in the Layer palette.
When turned off, a new layer is created above the currently edited layer, and the material pasted to the new layer.
When turned on, you can specify with a slider the position where to insert the layer with the material.
(8) Location to save material
Click a folder to specify the location to save the material. The specified location is reflected in the tree view of the Material palette.
(9) Search tag
Click the tag list to specify the search tag to be displayed on the [Tag list].
Clicking the tag with a + sign in the lower right will allow you to create a new tag.