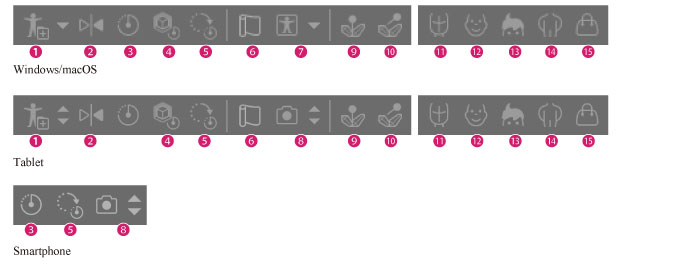
When a 3D Character Material Is Selected
Selecting a 3D character material displays the following additional buttons.
|
|
·Some of the buttons may not display for 3D layers compatible with Ver 1.5. ·Some of the buttons may not display if connected to QUMARION. ·If using the Smartphone version, some settings may be hidden. You can adjust them from the Sub Tool Detail palette. For details, see "Setting Items on the Sub Tool Detail palette". |

(1) Register full body pose as material [Windows/macOS/Tablet] [PRO/EX]
Registers the pose of the 3D character to the Material palette.
Click the downward arrow (▼) to show the [Register right hand pose as material] and [Register left hand pose as material] options. Selecting either will register the hand pose to the Material palette. Registered hand poses can be applied to both right and left hands.
(2) Flip Horizontal [Windows/macOS/Tablet]
Horizontally reverses the pose of the 3D character material.
(3) Initial pose
Resets the pose settings to the initial pose.
(4) Reset scale [Windows/macOS/Tablet]
The scale of 3D characters edited with the Tool Property palette’s [Object scale] or the Root manipulator's [Scale] can be reset to their default scale.
(5) Reset Rotation
The rotation of 3D characters edited with the Movement manipulator or Root manipulator can be reset to their default scale.
(6) Enable/disable physical calculation [Windows/macOS/Tablet]
Enables/disables physical calculation for a 3D character with physical settings imported from Clip Studio Modeler or Clip Studio Coordinate.
If enabled, physical calculations are reflected when the 3D character is moved.
|
|
·For details on Clip Studio Modeler and Clip Studio Coordinate, see clipstudio.net. ·Importing a 3D character material with physical settings may slow Clip Studio Paint. Turning off [Enable/disable physical calculation] may improve the processing speed. |
(7) Pose Scanner (image) (Technology preview)
This reads a photo containing a figure and applies the figure's pose to 3D materials. Importable file formats are: BMP, JPEG, PNG, TIFF and Targa.
Clicking [▼] shows the [Use 3D pose materials]. The [Use 3D pose material] dialog box will be shown, allowing your to apply pose materials to 3D character materials.
|
|
·The Pose Scanner is a technology preview function. Try out these features before their official release. ·When you use the Pose Scanner feature, the image data is uploaded to the server, where the AI interprets the data and estimates the pose. A network connection is necessary to execute this function. For information on the image uploaded to the server and the generated data, see "About AI features". |
(8) Pose Scanner (camera) [Tablet/Smartphone]
The [Pose Scanner (camera)] reads a photo taken with your Tablet/Smartphone and applies the figure’s pose to a 3D character material.
Click the down arrow (▼) to show the following options.
|
Pose Scanner (image) |
This reads a photo containing a figure and applies the figure's pose to 3D materials. Importable file formats are: BMP, JPEG, PNG, TIFF and Targa. |
|
Pose Scanner (photo library) [iPad/iPhone] |
This reads a photo containing a figure from the iPad/iPhone photo library and applies the figure's pose to 3D character materials. |
|
Pose Scanner (Storage) [Android/Chromebook] |
This reads a photo containing a figure from the OS file management screen and applies the figure's pose to 3D character materials. |
|
Use 3D pose materials |
The [Use 3D pose material] dialog box will be shown, allowing your to apply pose materials to 3D character materials. |
|
|
·The Pose Scanner is a technology preview function. Try out these features before their official release! ·When you use this feature, the image data is uploaded to the server, where the AI interprets the data and estimates the pose. A network connection is necessary to execute this function. For information on the image uploaded to the server and the generated data, see "About AI features". |
(9) Fix joint [Windows/macOS/Tablet]
The joint of the selected part will be fixed. If a part where the joint is already fixed is selected, the fixed joint will be released.
(10) Release all fixed joints [Windows/macOS/Tablet]
All fixed joints for the selected 3D character will be released.
(11) Face parts [Windows/macOS/Tablet]
Click to display a list of face parts for the character. Select the desired face part for the selected 3D character material.
(12) Facial expression list [Windows/macOS/Tablet]
Click to display a list of facial expressions for the character. Select the desired facial expression for the selected 3D character material.
(13) Hair [Windows/macOS/Tablet]
Click to display a list of hair styles for the character. Select the desired hair style for the selected 3D character material.
(14) Body [Windows/macOS/Tablet]
Click to display a list of bodies (clothes) for the character. Select the desired body for the selected 3D character material.
(15) Accessories [Windows/macOS/Tablet]
Click to display a list of accessories for the character. Select the desired accessory (accessories) for the selected 3D character material.


