


Transform
Selecting items from [Edit] menu > [Transform] with a layer selected, moves or transforms the selected layer.
Mode types
The Mode types listed under [Edit] menu > [Transform] are as follows.
|
Scale/Rotate |
Scales up/down or rotates the image. For details, see "Scale/Rotate". |
|
Scale |
Scales up/down or rotates the image. For details, see "Scaling Up/Scaling Down". |
|
Rotate |
Rotates the image. For details, see "Rotate". |
|
Free Transform |
Freely transforms the image. For details, see "Free Transform". |
|
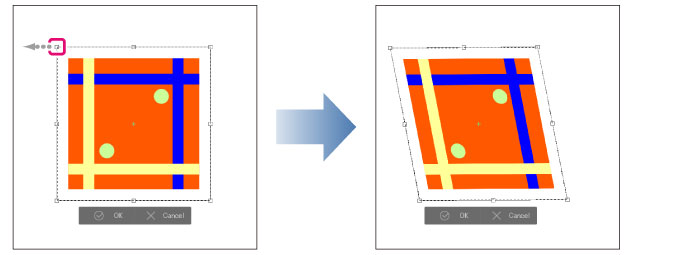
Distort |
Distorts the image. Dragging the corner handles of the bounding box moves the image in the direction of the the guide lines. Dragging the middle point handles of the bouding box, moves that line parallel to the other side of the guide line. For details, see "Distort". |
|
Skew |
Skews the image. Dragging the handles moves the whole side of the image in the direction of the the guide lines. For details, see "Skew". |
|
Perspective |
Skews the image. Dragging any of the corner handles will move the opposite corner handle into the opposite direction. For details, see "Perspective". |
|
Flip Horizontal |
Flips the image horizontally. For details, see "Flip Horizontal". |
|
Flip Vertical |
Flips the image vertically. For details, see "Flip Vertical". |
|
Mesh Transformation [PRO/EX] |
Allows you to create guides and handles by dividing a selected area with a lattice to transform an image by portions by dragging the corresponding lattice point. For details, see "Mesh Transformation [PRO/EX]". |
Transform image
This section describes how to transform images in a variety of ways.
|
|
·For details on how to use [Flip Horizontal], see "Flip Horizontal". ·For details on how to use [Flip Vertical], see "Flip Vertical". ·For details on how to use [Mesh Transformation], see "Mesh Transformation [PRO/EX]". |
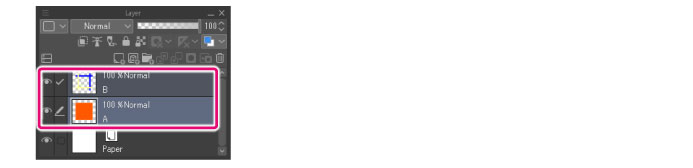
1First select a layer on the [Layer] palette.
|
|
·Selecting multiple layers transforms all of the selected layers. ·To transform layers other than Raster layers, Vector layers, Layer Masks and Selection layers, see "Command". ·To change the Layer Mask only, you must unlink the Layer and the Layer Mask. For details, see "Link Mask to Layer". ·To change the Ruler only, you must unlink the Layer and the Ruler. For details, see "Link Ruler to Layer". |
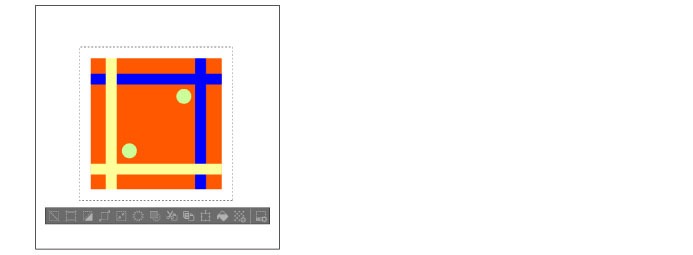
2Using the selection tool, create a selection.
|
|
·If there is no selection area, the entire drawn area of the selected layer will be the target of the transformation. ·Only selections on Raster layers, Vector layers, Layer Masks and Selection layers can be transformed. |
3Select the method of transformation from the [Edit] menu > [Transform]. In this example, [Free Transform] is selected.
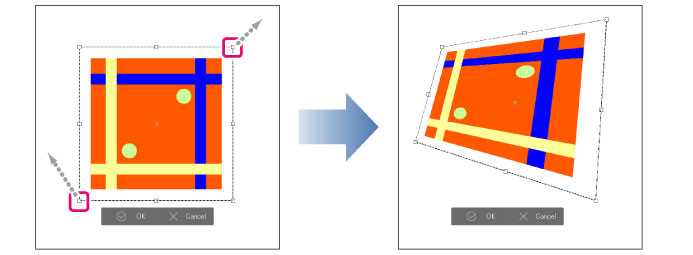
4Drag either the bounding box guide lines or handles to transform the image.
|
|
For details on how to transform an image, see "Using handles and palettes to transform". |
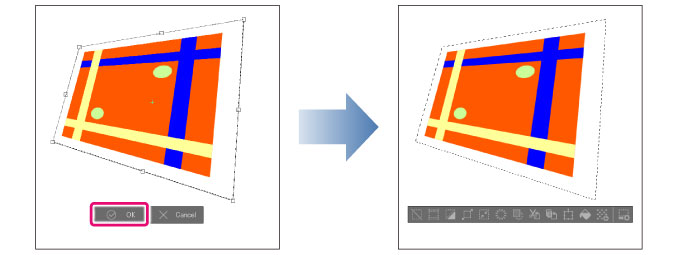
5Click [Confirm] on the launcher below the bounding box to apply the transformation.
|
|
·You can double-click inside the bounding box to confirm the transformation. ·Pressing Enter also applies the transformation. ·Press Esc to cancel the transformation. ·If the [Transform launcher] does not appear, select [View] > [Object Launcher]. |
Using handles and palettes to transform
Selecting items from [Edit] menu > [Transform] shows the handles and guide lines allowing you to adjust them.
You can also adjust transformation values and the transformation mode from the [Tool Property] Palette.
|
|
For details on how to use [Mesh Transformation], see "Mesh Transformation [PRO/EX]". |
Using the handles to transform
Dragging a handle allows you to transform the image. The directions the handles can move depends on the transformation mode. For deatils on how to use, see "Mode types".
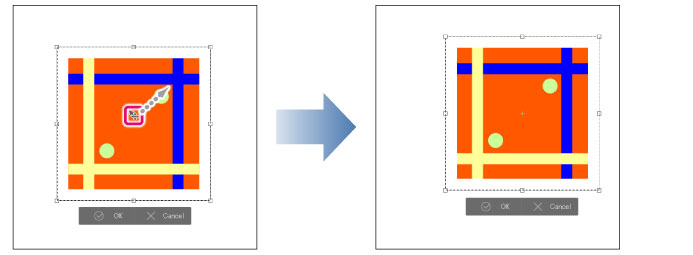
Move image
Click on the inside of the bounding box and drag to move the image.
|
|
Hold down Shift while dragging the drawing area or bounding box to move the image horizontally, vertically, or along a 45-degree diagonal angle. |
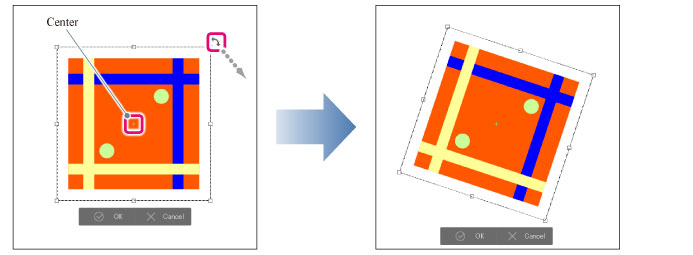
Rotate image
Drag outside the bounding box to rotate the image around the center (+) point.
|
|
·Hold down Shift while dragging to rotate in increments of 45 degrees. ·Dragging the center moves the center of rotation. Change the center point’s position from the [Tool Property] palette’s [Center of rotation]. ·Hold down Shift while dragging the center point to move the center point horizontally, vertically, or along a 45-degree diagonal angle. ·Hold down Alt while clicking the canvas to move the center point to wherever you click. ·You cannot rotate the image while using [Scale] from [Edit] > [Transform]. To rotate an image either select [Rotation angle] from the [Tool Property] Palette or a transformation option from [Mode]. For details on how to change this, see "Changing the Mode". |
Adjusting transformations with the Tool property palette
You can the image scale ratio and angle while transforming from the [Tool Property] Palette.
For items that can be set, see "Tool property palette settings".
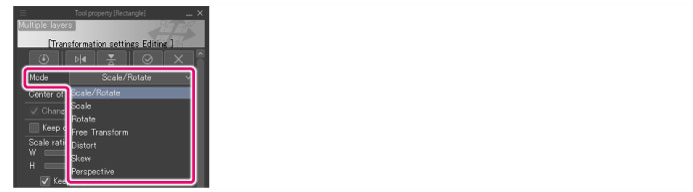
Changing the Mode
[Mode] on the [Tool Property] palette allows you to change the transformation method.
Tool property palette settings
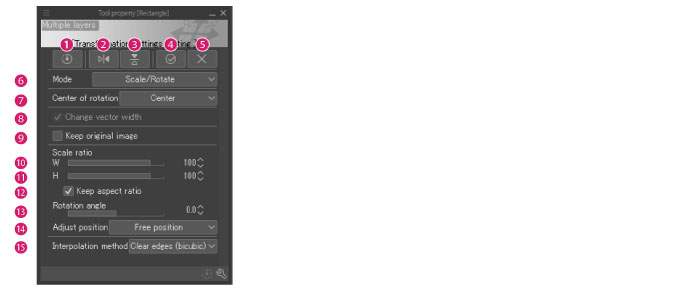
When transforming, the following operations can be performed from the [Tool Property] palette.
|
|
·If the transformation is recorded in an auto action, [Auto action settings] will be shown in the [Tool Property] palette. For details, see “Transformation settings” in the Clip Studio Paint Tool Setting Guide. ·For details on how to use [Mesh Transformation], see "Mesh Transformation [PRO/EX]". |
(1) Reset transformation
Restores the image being edited to its pre-transformation state.
(2) Flip horizontal
Reverses the image horizontally around the center.
(3) Flip vertical
Reverses the image vertically around the center.
(4) OK
Commits the transformation.
(5) Cancel
Cancels the transform.
(6) Mode
This setting changes the transformation mode. You can select from [Scale/Rotate], [Scale], [Rotate], [Free Transform], [Distort], [Skew] or [Perspective].
(7) Center of rotation
Sets the center of rotation for the image.
You can select from [Center], [Top left], [Top right], [Bottom right], [Bottom left], [Top], [Left], [Right], [Bottom] and [Free position].
(8) Change vector width [PRO/EX]
Turning this on allows you to scale the line width of a Vector layer, a Balloon layer or a Frame Border folder.
(9) Keep original image
When turned on, the original image can be kept when moving or transforming.
|
|
Selecting the next layer repeats the transformation on the duplicated layer. The original image is left on another layer. ·Image material layer ·Text layer ·Balloon layer ·Gradient layer ·Stream line layer ·Saturated line layer |
(10) Scale ratio (Horizontal)
Specifies the horizontal width of an imported image as a percentage of the original image (%).
(11) Scale ratio (Vertical)
Specifies the vertical width of an imported image as a percentage of the original image (%).
(12) Keep aspect ratio
When this is on, the image will keep its original aspect ratio (proportions) when scaling up or down. Use the handles to keep aspect ratio of original image when scaling.
(13) Rotation angle
Specifies the image rotation angle with respect to the horizontal position.
(14) Adjust position
Allows you to adjust the size of an image being transformed automatically. The size is specified by the size of the bounding box.
|
Canvas |
The size of image’s bounding box can be adjusted within the size of the Canvas. |
|
Bleed border |
The size of image’s bounding box can be adjusted within the size of the Bleed border. |
|
Cropped border |
The size of image’s bounding box can be adjusted within the size of the Cropped border. |
|
Default border |
The size of image’s bounding box can be adjusted within the size of the Default border. |
|
Free position |
The size of image’s bounding box cannot be adjusted. |
|
|
·For details on the [Bleed border], [Cropped border], [Default border], see "Explanation: What Are the Default Border, Cropped Border and Bleed Border? [PRO/EX]". ·When [Bleed border], [Cropped border], or [Default border] is selected on a canvas on which [Bleed border], [Cropped border], and [Default border] are not set, the size of the [Guide] is adjusted so that it is included in the [Canvas]. |
(15) Interpolation method
You can select the method for interpolating the colors of pixels when transforming images.
|
Smooth edges (bilinear) |
This method blends the colors of neighboring pixels to create smooth outlines (boundaries between colors). However, outlines may become blurred depending on the image. |
|
Hard edges (nearest neighbor) |
When interpolating the image, the pixels in the image are duplicated. Since the colors are not affected by neighboring pixels, outlines (boundaries between colors) remain sharp. However, outlines may become jagged depending on the image. |
|
Clear edges (bicubic) |
This method blends the colors of neighboring pixels to create smooth outlines (boundaries between colors). This method results in stronger outlines compared to the [Smooth outline (bilinear method)] setting. However, white noise may appear around outlines depending on the image. |
|
High accuracy (average colors) |
The average colors of the original pixels are strictly calculated and contained for each pixel after the transformation. Scaling up makes the line sharper and scaling down makes the line smoother. Even detailed lines can be preserved when scaling the image down. However, this method can result in blurred outlines and can take a long time to process depending on the image. |