


Binding process
The [Binding process] submenu includes functions for publishing works created as fanzines.
|
|
The command is not available when [Webtoon] is selected from [New] > [Use of work]. Please select [Story] > [View] > [Page-by-page], and set [Binding point] and [Start page] before running the function. |
Show binding list
Switches the display from the [Page Manager] window to the [Show binding list] window. In the [Show binding list] window, you can confirm and edit the print layout of the cover pages, back cover pages, and body pages of the work, as well as information on each page.
|
|
The [Show binding list] option is not available when the [Page Manager] window is not open. |
|
|
To return to the [Page Manager] window, select the [Story] menu > [Binding process] > [Show binding list] again. |
[Show binding list] window
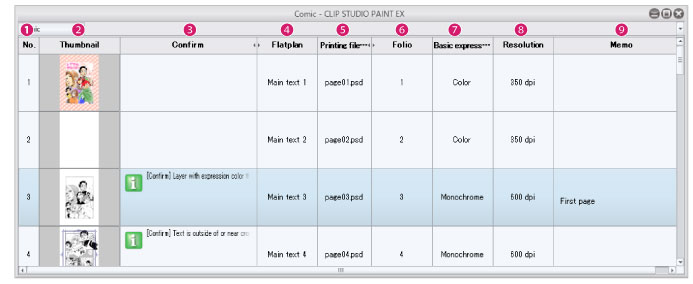
(1) No.
A number indicating the order of the work as a whole.
(2) Thumbnails
These are the thumbnails of each page. Double click a thumbnail to open the page (canvas).
(3) Confirm
Shows a message when confirmation of an item is required, such as when there is an issue with the data.
|
|
For details on resolving issues deatiled in confirmation messages, see "Confirmation message". |
(4) Flatplan
Shows the layout for printing and binding the work, including the cover page, back cover page and main text.
(5) Printing file name
This is each page’s file name when exporting fanzine printing data.
(6) Folio
This is the page numbers of the work. "-" is shown for pages that are set to not use a folio.
(7) Basic expression color
This is the basic expression color of each page. You can choose from [Color], [Gray] or [Monochrome].
(8) Resolution
Each page’s resolution.
(9) Memo
Memo allows you to leave notes such as messages for the printing place or reminders about the manuscript. Double clicking the field allows you to enter a note. In addition to confirming notes in this window, notes can be exported to a text file when exporting the fanzine printing data.
Confirmation message
If a message is shown in the [Confirm] field of the [Binding list] window, the following methods may resolve the issue.
|
Message |
Solution |
|
No setting for cropped border. |
This appears if a binding (finish) size is not set. Open the page, select the [Story] menu > [Change basic page settings], turn on [Manga draft settings] and set the [Binding (finish) size]. For details on these settings, see "Change basic page settings". |
|
Finish size differs from basic size. |
This appears when the [Binding (finish) size] set in the [New] dialog box differs from the [Binding (finish) size] on the page. Open the page, select the [Story] menu > [Change basic page settings], turn on [Manga draft settings] and set the [Binding (finish) size] so that it matches the other pages. For details on these settings, see "Change basic page settings". |
|
Bleed width is not set. |
This appears when a Bleed width is not set for the work. Open the page, select the [Story] menu > [Change basic page settings], turn on [Manga draft settings] and set the [Bleed width]. For details on these settings, see "Change basic page settings". |
|
Bleed width is different from width of basic setting. |
This appears when the [Bleed width] set in the [New] dialog box differs from the Bleed width on the page. Open the page, select the [Story] menu > [Change basic page settings], turn on [Manga draft settings] and set the [Bleed width] so that it matches the other pages. For details on these settings, see "Change basic page settings". |
|
Cover page is set with monochrome, but basic expression colors on canvas aren't set with monochrome. |
This appears when the cover page is set to [Monochrome] but the basic expression color is set to [Color] or [Gray]. Open to the applicable page and change the basic expression color to [Monochrome] in the [Story] menu > [Change basic page settings]. For details on these settings, see "Change basic page settings". |
|
Cover page is set with gray, but basic expression colors on canvas are set with monochrome. |
This appears when the cover page is set to [Color] or [Gray] but the basic expression color is set to [Monochrome]. Open to the applicable page and change the basic expression color to [Color] or [Gray] in the [Story] menu > [Change basic page settings]. For details on these settings, see "Change basic page settings". |
|
Main text is set with monochrome, but basic expression colors on canvas aren't set with monochrome. |
This appears when a body page (main text) set to [Monochrome] has a basic expression color set to [Color] or [Gray]. Open to the applicable page and change the basic expression color to [Monochrome] in the [Story] menu > [Change basic page settings]. For details on these settings, see "Change basic page settings". |
|
Width of spine is set to 0.0mm or narrower. |
This is displayed when the width of the spine (crop mark alignment width) on the cover page is set to 0.0mm. Open the page, turn on [Align crop mark] in the [Story] menu > [Change basic page settings] and set the [Gap] (spine width). For details on these settings, see "Change basic page settings". |
|
Resolution may be set to the value that fanzine printing vendor doesn't accept. |
This appears if the resolution differs from that specified by the printing vendor. The images may be scaled up or down when executing [Export fanzine printing data]. To export the data in its original resolution, use the [File] menu > [Export multiple pages] > [Batch export]. For details, see "Batch export". |
|
Layer with expression color that cannot be reproduced with basic expression colors may be contained. |
This appears when a page contains a layer with a larger number of colors than the basic expression color of the page. For example, if the basic expression color is set to [Monochrome], layers set to [Color] or [Gray] cannot be reproduced. Open the page and change the expression colors or convert the layers to screentones. For details on these settings, see "Layer Property Palette [PRO/EX]". |
|
Folio is outside of cropped border. |
This appears when the folio is outside the cropped border. Open the page and use the [Object] sub tool to move the folio inside the cropped border. |
|
Text is outside of or near cropped border. |
This appears when text such as dialog is outside or near the cropped border. Open the page and use the [Object] sub tool to move the text so that it is at least 5 mm inward from the cropped border. |
|
Main text page is set to export with color. |
This appears when the basic expression color of the body pages is set to [Color] or [Grey]. Open to the applicable page and change the basic expression color to [Monochrome] in the [Story] menu > [Change basic page settings]. For details on these settings, see "Change basic page settings". |
|
Resolution is different from the basic settings of cover page. |
This appears when the cover page resolution set in the [New] dialog box differs from the actual resolution of the cover page. Open to the applicable page and set the cover page resolution in the [Story] menu > [Change basic page settings] so that it matches the basic settings. For details on these settings, see "Change basic page settings". |
|
Resolution is different from the basic settings of main text. |
This appears when the body page (main text) resolution set in the [New] dialog box differs from the actual resolution of the body pages (main text). Open to the applicable page and set the main text resolution in the [Story] menu > [Change basic page settings] so that it matches the basic settings. For details on these settings, see "Change basic page settings". |