


Add page (Detail)
Select this command to open the [Add page (Detail)] dialog box. Configuring the page to create on the dialog box adds a new page file to the next page of the selected page file.
|
|
·When a two-page spread is present after the selected page, page files for two pages are added. ·Adding a page to a single-page file opens the [Create story folder] dialog box. For details on these dialog box settings, see "Batch import [EX]". |
[Add page (detail)] Dialog Box
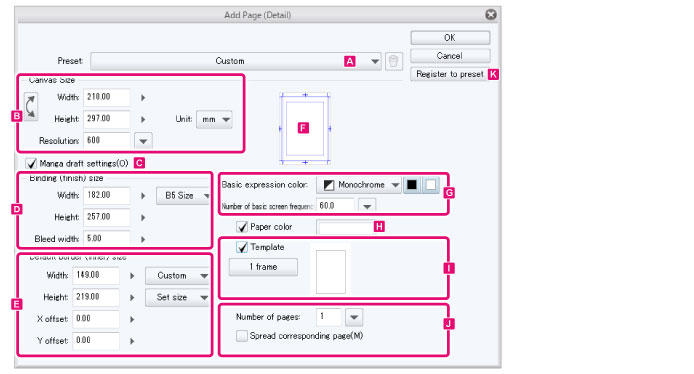
A.Preset
Select the canvas size, final size, and bleed border/default border from a list of options.
When custom settings exist, the icon on the right side allows you to delete a setting.
|
|
·Use [Final size] to set the size when binding a book for print. ·If you change the settings of a preset, the selected option will automatically change to [Custom]. |
B.Canvas size
Sets the canvas size.
|
|
·When [Manga draft settings] is turned off, the canvas size will be the final size. ·When [Manga draft settings] is turned on, the [Binding (finish) size] will be the final size when bound in a book. |

(1) Swap width/height
Swaps the width and height of the canvas.
(2) Width
Set the width of the canvas.
(3) Height
Set the height of the canvas.
(4) Resolution
Enter the resolution of the canvas or Click the drop-down button next to it to select a value.
(5) Default size (Canvas size)
Allows you to select a width and height from default sizes.
|
|
This option appears when [Manga draft settings] is turned off. |
(6) Unit
Select a unit for the width and height. You can choose from centimeters, millimeters, inches, pixels, or points.
C.Manga draft settings
Turn this on to add crop marks, default border (inner), cropped border, bleed border and safety margin to the canvas.
Configuring the sizes of the bleed border, default border, and canvas displays these guides on the canvas.

D.Manga draft settings > Binding (finish) size
This sets the border at which the edge of the pages will be trimmed for binding after printing. Drawings within these dimensions will be printed. You can also add an extra safety margin to deal with misaligned trimming of the printed pages.
|
|
This option appears when [Manga draft settings] is turned on. |
(1) Width
Horizontal length to print.
(2) Height
Vertical length to print.
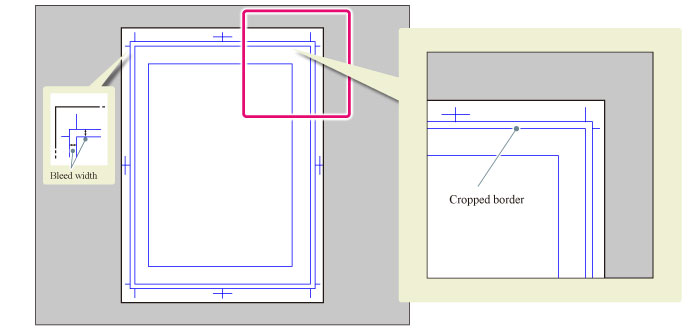
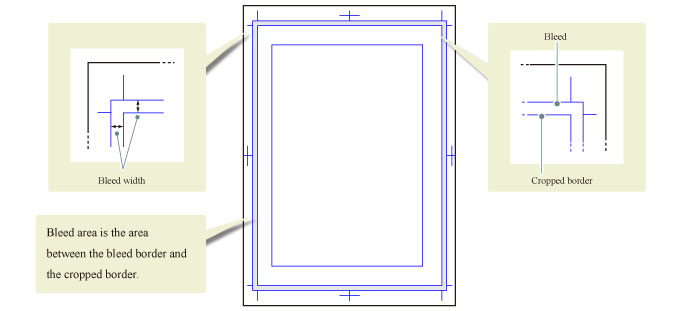
(3) Bleed width
Add an extra margin to compensate for misaligned trimming of the edges of the pages. To print to the edge of the page, draw up to the bleed width area.
The area between the bleed border (the first border from the edge) and the finish border (the second border from the edge) is the bleed area.
(4) Default size (Cropped border)
Allows you to select a width and height for the finish size from default sizes.
E.Manga draft settings > Default border (inner) size
This is a reference border for laying out frames. There are two ways of specifying the default border: by size and position, or by margin.
|
|
This option appears when [Manga draft settings] is turned on. |

(1) Default size (Default border)
Allows you to select a width and height for the default border from default sizes.
(2) How to specify default border
You can choose how to specify the size and position of the default border. The options vary depending on the default border settings.
|
Set size |
Adjust the size and position of the default border. |
|
Set margin |
Adjust the default border based on the distance from the edges of the paper. |
(3) Default border settings
Sets the size and position of the default border. The options vary depending on the method of specifying the border.
Set size
Adjust the size and position of the default border.
|
Width |
Width of the default border. |
|
Height |
Length of the default border. |
|
X offset |
Horizontal position of the default border. |
|
Y offset |
Vertical position of the default border. |
|
|
·When [X offset] is 0, the default border will be located in the center of the finish border horizontally. ·When [Y offset] is 0, the default border will be located in the center of the finish border vertically. |
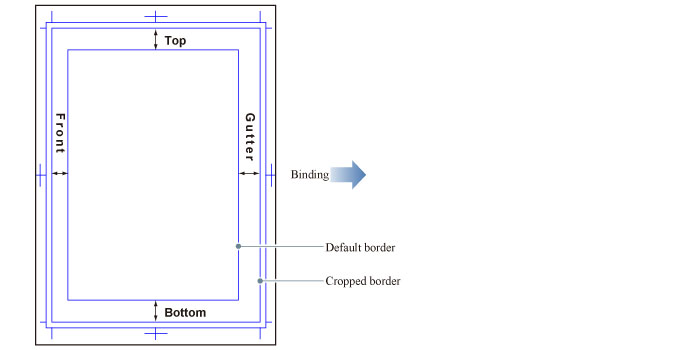
Set margin
Adjust the default border based on the distance from the edges of the cropped border.
|
Top |
Specifies the upper side of the default border as the distance from the top of the cropped border. |
|
Bottom |
Specifies the lower side of the default border as the distance from the bottom of the cropped border. |
|
Inside |
Specifies the right or left side of the default border as the distance from the direction of the binding point. |
|
Outside |
Specifies the right or left side of the default border as the distance from the outer edge of the page (opposite side to the binding point). |
F.Preview
Previews the set [Cropped border], [Bleed border/Default border], and [Paper color].
G.Basic expression color/Default frequency
Allows you to set the basic expression color.

|
|
The expression color [Monotone] from Ver.1.2.1 and earlier will be converted into the following [basic expression color] and [drawing color]. ·Basic expression color: Gray ·Drawing color: Only black |
(1) Basic expression color
Sets the basic expression color. You can choose from [Color], [Gray], or [Monochrome].
(2) Drawing colors
Set the drawing colors when using [Gray] or [Monochrome] basic expression colors. You can set the drawing colors using the black and white square icons.
Gray
You can set drawing colors in the following ways with the black and white buttons.
|
Only black |
The drawing colors will be grayscale from black to transparency. |
|
Only white |
The drawing colors will be grayscale from white to transparency. |
|
Both black and white |
The drawing colors will be grayscale from black to white. |
Monochrome
You can set drawing colors in the following ways with the black and white buttons.
|
Only black |
The drawing colors will be black and transparency only. |
|
Only white |
The drawing colors will be white and transparency only. |
|
Both black and white |
The drawing colors will be black, white, and transparency only. |
|
|
For details on expression colors and drawing colors, see "Explanation: Expression Color and Drawing Color". |
(3) Default frequency
Specify the number of screentone lines per inch. Larger values result in smaller dots.
H.Paper color
You can set a color for the Paper layer. Click the color indicator to open the [Color settings] dialog box. Specify a color to change the color of the Paper layer.
|
|
·The Paper layer is a single-color layer at the bottom of the layer palette. When the paper layer is hidden, transparent areas of the canvas will be shown in a checkered pattern. ·The Paper layer color can be changed afterwards. You can double-click the Paper layer in the [Layer] palette to display the [Color settings] dialog box and change the color of the Paper layer. ·For details on the [Color settings] dialog box, see "Advanced settings of color Dialog Box". |
I.Template
You can create a page file with an imported template.
Select the checkbox and click the button to open the [Template] dialog box. Specify the template to import to the page file in the dialog box.

(1) Template
When turned on, this allows you to specify a template.
(2) Specified template
Clicking this button opens the [Template] dialog box. Specify the template to import to the page file in the dialog box.
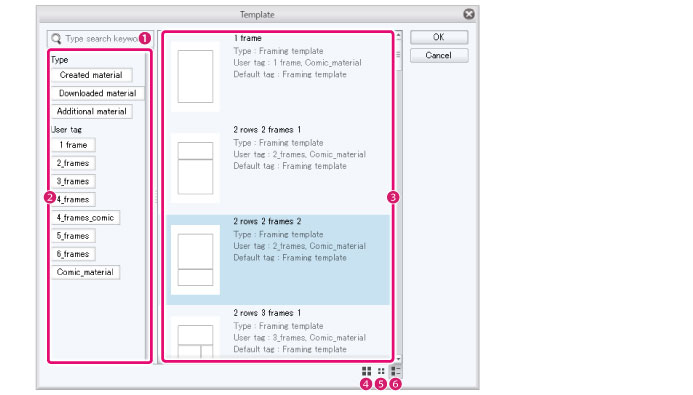
[Template] Dialog Box
|
(1) Search box |
Enter keywords to search for a template. |
|
(2) Tag list |
A list of tags assigned to materials. Click a tag button to display materials from the [Material list]. |
|
(3) Material list |
A list of template materials. Click a template material to load the settings. |
|
(4) Thumbnail [Large] |
Shows the large thumbnails of the materials shown in [Material list]. |
|
(5) Thumbnail [Small] |
Shows the small thumbnails of the materials shown in [Material list]. |
|
(6) Thumbnail [Detail] |
Shows the thumbnails as well as information of the materials shown in [Material list]. |
|
|
Templates can be added from the [Edit] menu > [Register Material] > [Template]. For details, see "Register Layer as Template Material". |
J.Number of pages
Sets the number of pages to add.

(1) Number of pages
Enter the number of pages to create in the input field. Click the rightmost button to select the number of pages from [1], [2], [4], [8], [12], [16], [24], and [32].
(2) Combine into two-page spreads
Turn this on to connect sets of left and right pages as two-page spreads.
K.Register to preset
Registers the current settings in the dialog box as [Preset].
Clicking the button opens the [Register to preset] dialog box. In the dialog box, set the preset name and settings to be included in the preset, then click [OK].
[Register to preset] Dialog Box
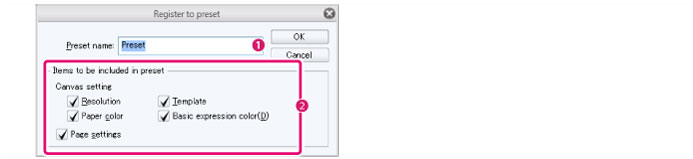
(1) Preset name
Enter a name for the preset.
(2) Items to be included in preset
Select the settings you would like to save in the preset.
|
|
The width, height, unit, and manga draft settings are always saved to the preset. |