


Tool Palette
The [Tool] palette displays when [Window] menu → [Tool] is selected.
Various tools are arranged as buttons. Clicking a button enables the tool for use.

|
|
For details on the functions of each tool, see "Tool List". |
A.Tool Buttons
Various tools are arranged as buttons. Clicking a button enables the tool for use.
Note that a tool button is displayed with the icon of the selected sub tool.
B.Color Icon
Displays the currently selected drawing color along with readily available drawing colors.
In the example below, the readily available colors are (in the order of their availability) "red", "blue" and "transparent". "Red", which is displayed with a border, is the currently selected drawing color. To change the color, click the relevant color indicator.

(1) Main color
Set the primary (most frequently used) color.
Double clicking displays the [Color settings] dialog box where a color can be selected.
|
|
For the [Color settings] dialog box, refer to "Advanced settings of color Dialog Box". |
(2) Sub color
Set the next most frequently used color.
This will be the background color when you specify [Create both line and fill] with the [Figure] tool, or you create a balloon.
Double clicking displays the [Color settings] dialog box where a color can be selected.
|
|
For the [Color settings] dialog box, refer to "Advanced settings of color Dialog Box". |
(3) Transparent color
Select to use transparent color.
Tool Palette Menu
The following describes the functions included in the menu that displays when you click [Palette menu] on the upper left corner of the [Tool] palette.

Tool settings
Displays the [Tool settings] dialog box where you can set a name for the tool.

Delete tool
Deletes the selected tool and all sub tools included in the tool.
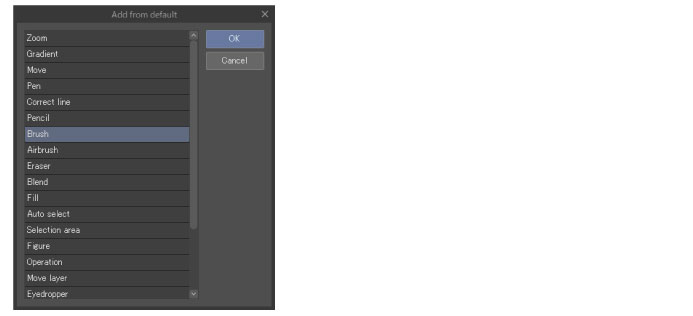
Add from default
This opens the [Add from default] dialog box, where you can add tools to the initial settings. If you delete a tool from the initial settings, you can add it back here.
Select a sub-tool to from [Add from default] dialog box and click [OK] to add the selected tool to the [Tool] palette.
Migrate tool preferences > From IllustStudio [Windows] [PRO/EX]
Allows you to add all IllustStudio tools to the [Tool] palette in one go. [Brush shape] and [Texture] used in the tool are added to the [Material] palette.
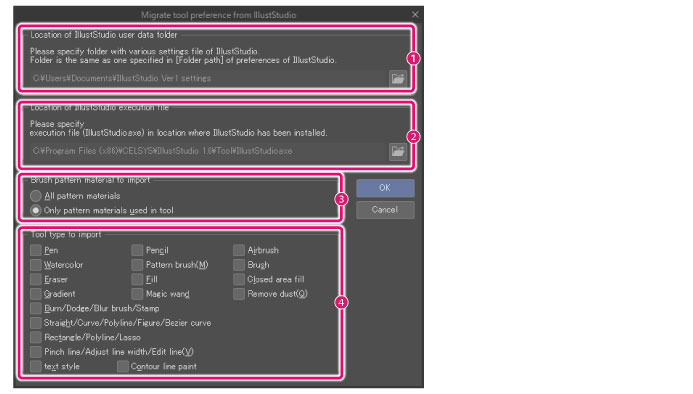
[Migrate tool preference from IllustStudio] Dialog Box
|
(1) Location of IllustStudio user data folder |
Displays the location of the IllustStudio user data folder. If the user data folder has been moved using the IllustStudio preferences, click [refer] to specify the user data folder on the [Browse folder] dialog box. |
|
(2)Location of IllustStudio execution file |
Displays the location of the IllustStudio executable file. If the installation folder of the application has been moved at the time of installing IllustStudio, click [refer] to specify [IllustStudio.exe] on the [Please select [IllustStudio].] dialog box. |
|
(3)Brush pattern material to import |
Settings to import [Brush shape] from IllustStudio. You can select either [All pattern materials] or [Only pattern materials used in tool]. Selecting [Only pattern materials used in tool] will exclude [Brush shape] not used in the IllustStudio tool set. |
|
(4)Tool type to import |
Select the tool(s) to import from IllustStudio. To select, check the boxes next to the tool name. You can select multiple tools. |
Migrate tool preferences → From ComicStudio 4.0 [Windows/macOS] [PRO/EX]
Allows you to add all ComicStudio 4.0 tools to the [Tool] palette in one go. [Brush shape] used in the tool are added to the [Material] palette.When using Macs with Apple M1 chips, this will not be displayed.
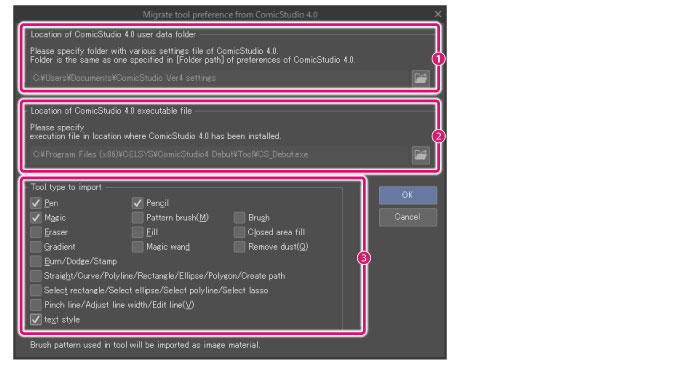
[Migrate tool preference from ComicStudio 4.0] Dialog Box
|
(1) Location of Comic Studio 4.0 user data folder |
Displays the location of the ComicStudio 4.0 user data folder. If the user data folder has been moved using the ComicStudio 4.0 preferences, click [refer] to specify the user data folder on the [Browse folder] dialog box. |
|
(2) Location of ComicStudio 4.0 execution file |
Displays the location of the ComicStudio 4.0 executable file. If the installation folder of the application has been moved at the time of installing ComicStudio 4.0, click [refer] to specify either of the files below on the [Please select [ComicStudio 4.0].] dialog box. Windows users ·Users of ComicStudio EX 4.0: CS_EX.exe ·Users of ComicStudio Pro 4.0: CS_Pro.exe ·Users of ComicStudio Debut 4.0: CS_Debut.exe For macOS ·Users of ComicStudioEX4.0: ComicStudio EX.app ·Users of ComicStudioPro4.0: ComicStudio Pro.app ·Users of ComicStudioDebut4.0: ComicStudio Debut.app |
|
(3) Tool type to import |
Select the tool(s) to import from ComicStudio 4.0. To select, check the boxes next to the tool name. You can select multiple tools. |
Show color icon
When turned on, the color icons are displayed on the [Tool] palette.

Change Order
The order method can be selected in [Tool] on the [Tool] palette.
|
Drag |
The tool layout on the palette can be changed by dragging a tool. |
|
Ctrl + drag |
The tool layout on the palette can be changed by dragging a tool while holding down Ctrl. |
Hide tool palette
Hides the [Tool] palette.
|
|
To show the Tool palette again, select the palette from the [Window] menu. If you are using a Smartphone, tap the icon on the palette bar. |
Customizing the Tool Palette
You can change the order in which [Tools] are arranged. Furthermore, you can drag and drop [Sub Tool] and [Tool Group] from the [Sub tool] palette to have them registered in the [Tool] palette.
|
|
If Ctrl + Drag is selected for [Show Menu] > [Change order] on the [Tool] palette, the tool order can be changed by dragging a tool while holding [Ctrl]. |
Changing the Tool Layout
The [Tool] layout on the palette can be changed by dragging the buttons.
|
|
Dragging and dropping to the tool group separator displays separator lines above and below the moved tool. |
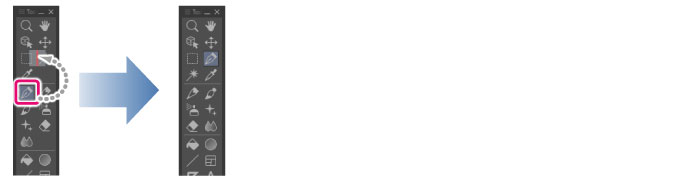
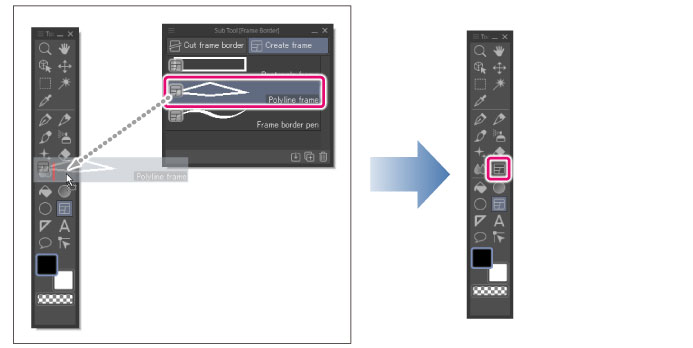
Adding a Sub Tool to the Tool Palette
Dragging and dropping a [Sub Tool] between the tool icons on the [Tool] palette adds the [Sub Tool] to the [Tool] palette.
|
|
·If Ctrl + Drag is selected for [Show Menu] > [Change order] on the [Sub Tool] palette, a sub tool can be added to the [Tool] palette by dragging it while holding Ctrl. ·If you are using a Smartphone, you can add a sub tool to the [Tool] palette by displaying the [Tool] palette and [Sub tool] palette at the same time. For details on how to display a palette, see "Palette Bar Settings". ·If you are using a Smartphone, you can also add a sub tool to the [Tool] palette using the [Select sub tool] dialog box. Swipe the sub tool horizontally and drag and drop it on the icon of the tool you want to move it to. |
Adding a Tool Group to the Tool Palette
Dragging and dropping a [Tool group] icon between the tool icons on the [Tool] palette adds [Tool group] to the [Tool] palette.

|
|
·If Ctrl + Drag is selected for [Show Menu] > [Change order] on the [Sub Tool] palette, a tool group icon can be added to the [Tool] palette by dragging it while holding down the Ctrl. ·If you are using a Smartphone, you can add a tool group to the [Tool] palette by displaying the [Tool] palette and [Sub tool] palette at the same time. For details on how to display a palette, see "Palette Bar Settings". ·If you are using a Smartphone, you can also add a tool group to the [Tool] palette using the [Select sub tool] dialog box. Swipe the sub tool horizontally and drag and drop it on the icon of the tool you want to move it to. |