


Keyframe settings
Keyframes can be added to each track of the Timeline palette.
|
|
To add a keyframe, turn on [Enable keyframes on this layer]. |
2D camera folder track
Using 2D camera folders, you can add camera movement to your animation without transforming the images in the animation folders or layers.
|
|
·With 2D camera folders, you can show the path of keyframe movement and use the camera frame for camera directions when animating. For information on how to always show the camera paths, see "Show camera path". ·The track label of the 2D camera folder track can add camera instructions to your animation from the list. You can output camera instructions for a Toei Animation Digital Exposure Sheet. For details on additional camera instructions, see "Track labels of 2D camera folder tracks". For details on outputting Toei Animation Digital Exposure Sheets, see "Apply Toei Animation Digital Exposure Sheet information to current exposure sheet [EX] [Windows/iPad]". |
When adding a keyframe to a 2D camera folder track, you can register the following settings.
·Transform (Position, Scale ratio, Rotate, Center of rotation)
·Opacity
·Keyframe interpolation
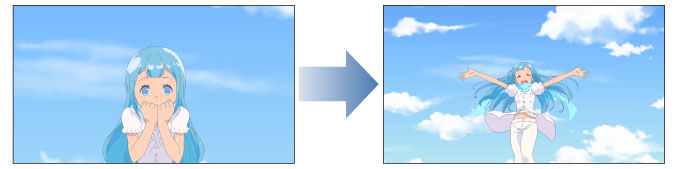
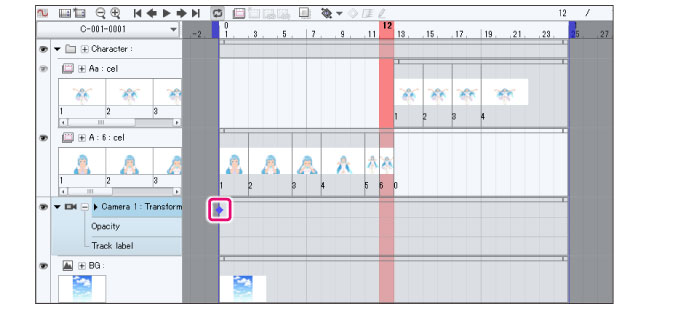
In the example below, a 2D camera folder has been created and a keyframe has been added to a layer. The following will explain how to get the background to move along with the character.
1 Select the command
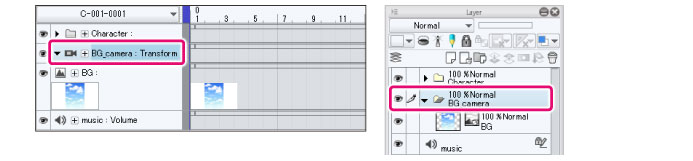
Select [Animation] menu > [New animation layer] > [2D Camera Folder].
A 2D camera folder will be created in the Layer palette and in the Timeline palette.
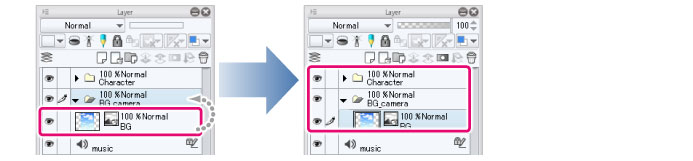
2Storing in a Layer Folder
Camera movement that you add to animation folders or layers will be stored on the Layer palette in the 2D camera folder.
|
|
Animation folders and layers can be stored in 2D camera folders, even on the Timeline palette. 2D camera folders cannot be created inside an existing animation folder. |
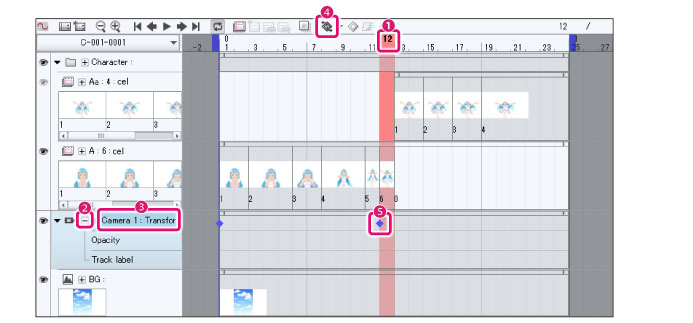
3Select the tool
On the Tool palette, select the [Operation] tool.
4Select the sub tool
Open the Sub Tool palette and select [Object].
5Select the frame
Add camera movement to a selected frame in the Timeline palette.

6Keyframe interpolation settings
Select an interpolation method from [Keyframe interpolation] on the Timeline palette.

|
|
·For details on [Keyframe interpolation] options, see "Graph Editor". ·To change the keyframe interpolation after adding a keyframe, see "Changing the keyframe interpolation". |
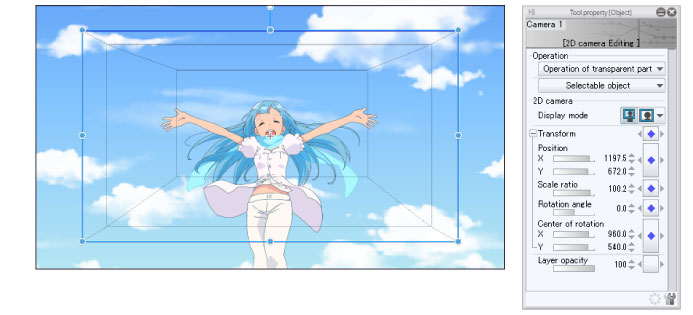
7Add camera movement
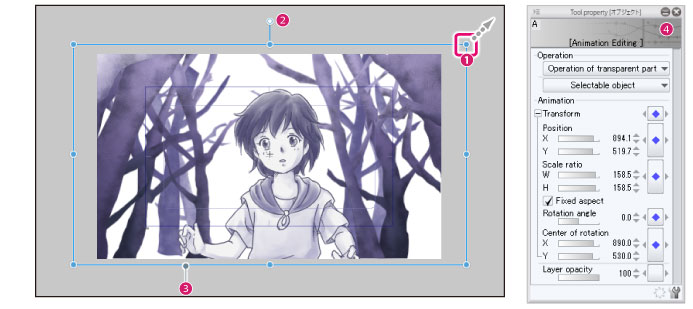
If you select the 2D camera folder track with the [Object] tool, a rectangle frame will appear over the canvas.
You can set up camera movement with the Tool Property palette.
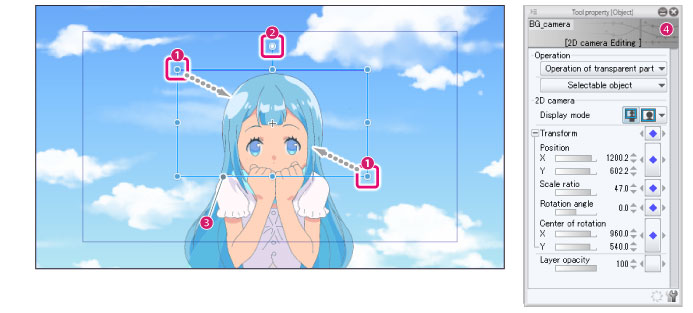
(1) Dragging a handle allows you to scale up/down the image.
(2) Dragging the rotation handle allows you to rotate the entire drawing.
(3) Dragging the rectangle frame allows you to adjust the image position.
(4) In the Tool Property palette, you can enter numerical values for precise adjustments. The other settings configure the opacity of the layer.
|
|
·The rectangle frame corresponds to the camera's viewfinder. When you export an animation, the rectangle frame becomes the output range. For example, if you move the rectangle frame to the right, in the exported animation, the image will move to the left. ·When the Tool Property palette's [Display mode] is set to [Show camera's field of view], the 2D camera will enter rendering mode, and the rectangle frame will not be shown. When you want to edit using the rectangle frame, turn the [Display mode] to [Show field guides]. ·When an animation frame is displayed in PRO/EX, a transformation box will display over the output frame. ·For details on the Tool Property palette, see the “Clip Studio Paint Tool Setting Guide.” |
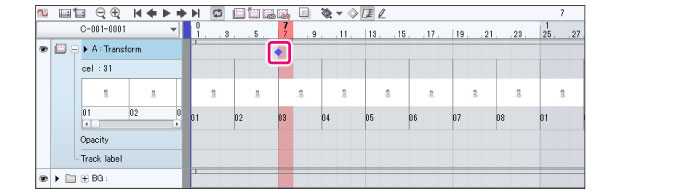
8Adding a keyframe
If you change the settings for the 2D camera folder track, a keyframe will be added to the Timeline palette to register the settings.
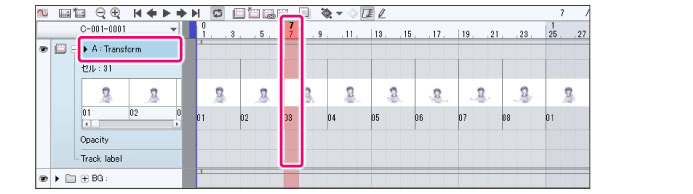
9Add keyframe
To add movement to the background, add the next keyframe.
(1) Add movement to a selected frame.
(2) Click [Detail] on the 2D camera folder track.
(3) Select the transformation area of the 2D camera folder track.
(4) Click [Add keyframe].
(5) A keyframe will be added to the Transformation area.
|
|
·Click the icon to the left of the track name to display detailed settings. You can select a specific setting to add keyframes only for that setting. For example, if you click [Position], only [Position] will display the [♦] mark. For [Transform], only some of the settings will display the [◊] mark. ·If you set a keyframe to only one specific setting but then set a different setting on the canvas, all of the items will then have keyframes added to them. For example, for a keyframe with only the [Position] marked with [♦], if you rotate the camera frame, [Rotate] will then also have a [♦] mark and a keyframe added to it. |
10Add camera movement
Confirm that the keyframe made in step 9 is selected.
To create camera movement, use the Tool Property palette or manipulate the handles on the camera frame.
Camera movement will be recorded to the selected keyframe.

Then, keyframes are created, and the camera movement is added.

|
|
·For how to edit keyframes, see "Edit keyframes". ·If you want 2D camera settings to be reflected when you play the animation, turn on [Render 2D camera] in [Animation]Menu > [Playback settings]. |
Animation folder/Layer
When adding a keyframe to the animation frame or a normal layer, you can register the following settings.
·Transform (Position, Scale ratio, Rotate, Center of rotation)
·Opacity
·Keyframe interpolation
This section describes how to add a keyframe from the Timeline palette.
|
|
You can also change the values on tracks with a layer mask. For details on how to change this, see "Layer mask". |
1Select the tool
On the Tool palette, select the [Operation] tool.
2Select the sub tool
Open the Sub Tool palette and select [Object].
3Select a frame
Select the frame you wish to set as a keyframe from the Timeline palette.
4Keyframe interpolation settings
Select an interpolation method from [Keyframe interpolation] on the Timeline palette.

|
|
·For details on [Keyframe interpolation] options, see "Graph Editor". ·To change the keyframe interpolation after adding a keyframe, see "Changing the keyframe interpolation". |
5Configuring the Opacity and Transformation of an Image
A frame for transformation will display over the canvas. You can transform the image with the Tool Property palette.
(1) Dragging a handle allows you to scale up/down the image.
(2) Dragging the rotation handle allows you to rotate the entire drawing.
(3) Dragging the rectangle frame allows you to adjust the image position.
(4) In the Tool Property palette, you can enter numerical values for precise adjustments. The other settings configure the opacity of the layer.
|
|
·When an animation frame is displayed in PRO/EX, a transformation box will display over the output frame. ·You can adjust the layer opacity in the Layer palette. ·For details on the Tool Property palette, see the “Clip Studio Paint Tool Setting Guide.” |
6Adding a keyframe
Like when adjusting image settings, when a keyframe is added from the Timeline palette, its settings will be registered.
Layer mask
When a track with a layer mask is set, only the layer mask can be transformed. When adding a mask to a keyframe, you can register the following settings.
·Transform mask (Position, Scale ratio, Rotate)
·Keyframe interpolation
The following explains the steps before setting up a layer mask to a keyframe.
1Select the tool
On the Tool palette, select the [Operation] tool.
2Select the sub tool
Open the Sub Tool palette and select [Object].
3Show Mask settings
Click [Detail] on the Timeline palette.

4Select a Mask
When the track name expands, click [Mask].

With this, you can add masks to keyframes. Procedures hereafter are the same as here: "Animation folder/Layer".
Audio track
For audio tracks, you can register volume and keyframe interpolation settings to keyframes.
This section describes how to add audio tracks to keyframes.
1Select the tool
On the Tool palette, select the [Operation] tool.
2Select the sub tool
Open the Sub Tool palette and select [Object].
3Select a frame
Select the frame you wish to set as a keyframe from the Timeline palette.

4Keyframe interpolation settings
Select an interpolation method from [Keyframe interpolation] on the Timeline palette.

|
|
·For details on [Keyframe interpolation] options, see "Graph Editor". ·To change the keyframe interpolation after adding a keyframe, see "Changing the keyframe interpolation". |
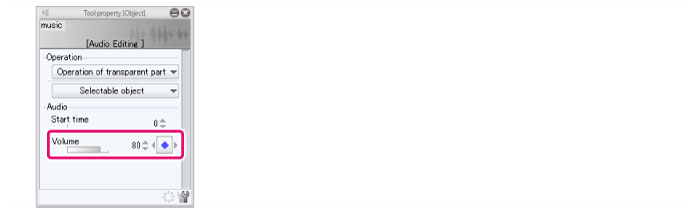
5Adjust volume
You can adjust the [Volume] setting from the Tool Property palette.
|
|
If you want to set the time an audio file begins, adjust the [Start time] settings in the Tool Property palette. This is useful when you want to start playing part-way through an audio clip. When changing the [Start time], it will apply to the whole audio clip selected. The keyframe will not be added to the Timeline palette. |
6Adding a keyframe
Along with the settings, the keyframe will be added to the Timeline palette.
