


New dialog box (Animation) [PRO/EX]
These are the settings that appear when [Animation] is selected as the [Use of work].
|
|
You can also change some settings after creating the file. To learn more, see "Change basic page settings" and "Change basic work settings". |
A.File name
Enter a save name for your file.
|
|
When [Set file name automatically] is turned on, the file names will be created automatically based on the option chosen in the drop-down box. |
B.Save to
Specifies the location where the management folder will be created. Click [Browse] to specify the location. This option appears when [Manage files using folders] is turned on.
|
|
When using a folder, the project files will be saved in a management folder as the management file (.cmc) and separate Clip Studio format files for each page. For details, see "Regarding Management File and Page Files". |
C.Preset

(1) Preset
Select the finish size and resolution from a list of options.
|
|
If you change the settings of a preset, the selected option will automatically change to [Custom]. |
(2) Register to preset
Registers the current settings in the dialog box as [Preset]. Clicking the button opens the [Register to preset] dialog box. In the dialog box, set the preset name and settings to be included in the preset, then click [OK].
|
|
For details on the [Register to preset] dialog box, see "Register to preset Dialog Box". |
(3) Delete preset
You can delete presets selected from the [Preset] list.
|
|
You can only delete presets that you have registered yourself. Default presets cannot be deleted. |
D.Unit
Select a unit for the width and height. You can choose from centimeters, millimeters, inches, pixels, or points.
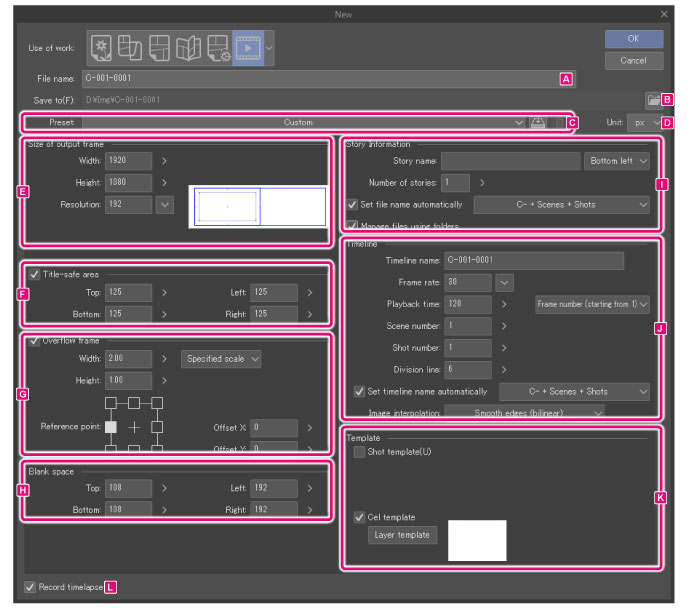
E.Size of output frame
Set the size and resolution of the output frame on the canvas.
|
|
For details on the output frame, see "Explanation: Animation cels terminology [PRO/EX]". |
(1) Width
Sets the width of the output frame.
(2) Height
Sets the height of the output frame.
(3) Resolution
Sets the resolution of the canvas. Click the drop-down button next to it to select a value.
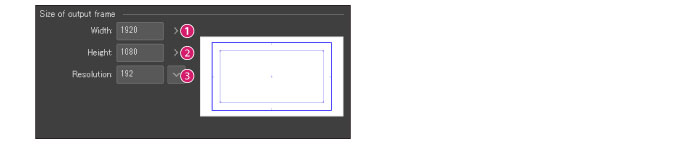
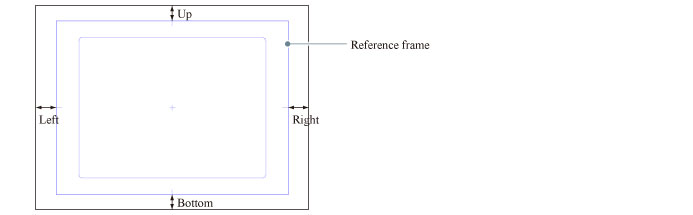
F.Title-safe area
Turn this on to set a title-safe area on the canvas. Set the distance of the title-safe area from the top, bottom, left and right edges of the output frame (margin).
|
|
For details on title-safe areas, see "Explanation: Animation cels terminology [PRO/EX]". |
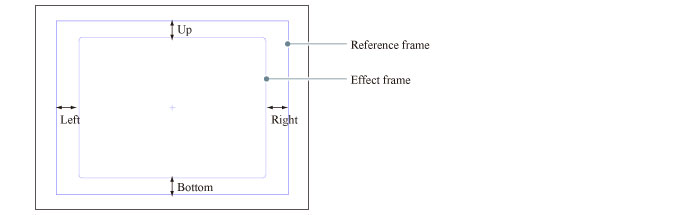
G.Overflow frame
Turn this on to set a overflow frame on the canvas. Overflow frames are useful for creating cuts that move horizontally or vertically across the canvas.
|
|
For details on overflow frames, see "Explanation: Animation cels terminology [PRO/EX]". |
(1) How to add an overflow frame
Set how to specify the overflow frame. The width and height are specified differently depending on this setting.
|
Specified scale |
Specify a scale based on the size of the output frame. |
|
Specified size |
Specify measurements for the width and height. |
(2) Width
Sets the width of the overflow frame.
(3) Height
Sets the height of the overflow frame.
(4) Reference point
Specifys the position of the reference point (output frame) in relation to the overflow frame.
(5) Offset X
When the overflow frame is larger than the output frame, moves the output frame horizontally.
(6) Offset Y
When the overflow frame is larger than the output frame, moves the output frame vertically.
H.Blank space
Sets the blank space around the overflow frame. If there is no overflow frame, the blank space will be added around the output frame.
Enter values in [Up], [Down], [Left], and [Right] to add blank space.
I.Story information [EX]
Enter information such as the story name, number of stories, and file name.

(1) Story name
Enter a name for the story. The pull down menu shows options for where to place the story name. This information is displayed in the blank space.
(2) Number of stories
Enter the number of stories.
(3) Set file name automatically
Turn this on to create file names automatically. Files will be named according to the option selected from the drop-down menu.
(4) Manage files using folders
Turn this on to manage multiple files in folders.
J.Timeline
Configure settings such as the timeline name and frame rate.
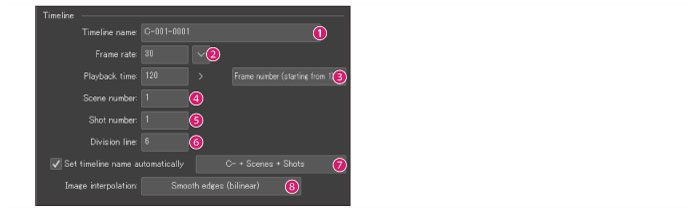
(1) Timeline name
Enter a name for the timeline.
|
|
The timeline name can be changed after creating the canvas. For details on how to change the name, see "Manage timeline". |
(2) Frame rate
Enter a frame rate for the timeline.
|
|
The frame rate (fps) is the maximum number of images that can be displayed in one second to run the animation. For example, if a frame rate of 30 is set, up to 30 images (cels) can be shown each second. Typical frame rates for TV animation are 24fps or 30fps. |
(3) Playback time
Enter the playback time. You can use the drop-down menu to select how to display frames on the Timeline. The box for inputting the playback time will change depending on the selected option.
|
Frame number (starting from 1), Frame number (starting from 0) |
Set the number of frames for the entire timeline. For example, if the frame rate is 30 fps and you would like to make a 4-second animation, enter "120" (30 frames x 4 seconds). The difference between [Frame number (starting from 1)] and [Frame number starting from 0)] is the start number of the frames. |
|
Seconds + frame |
Set the playback time in seconds. To add frames after the specified number of seconds, enter the number of frames to be added. |
|
Time code |
Set the playback time in minutes and seconds. To add frames after the set number of seconds, enter the number of frames to be added. |
(4) Scene number
Enter the scene number.
(5) Cut number
Enter the cut number.
(6) Division line
Set up the lines that divide the Timeline. Division lines will be shown at the specified frame interval (for example, after every five frames).
(7) Set timeline name automatically
When active, the [Timeline name] is set automatically. It will be named according to the option selected from the drop-down menu.
(8) Image interpolation
You can select the method for interpolating the colors of pixels when transforming a cel or image material using keyframes.
|
Smooth edges (bilinear) |
This method blends the colors of neighboring pixels to create smooth outlines (boundaries between colors). However, outlines may become blurred depending on the image. |
|
Hard edges (nearest neighbor) |
When interpolating the image, the pixels in the image are duplicated. Since the colors are not affected by neighboring pixels, outlines (boundaries between colors) remain sharp. However, outlines may become jagged depending on the image. |
|
Clear edges (bicubic) |
This method blends the colors of neighboring pixels to create smooth outlines (boundaries between colors). This method results in stronger outlines compared to the [Smooth outline (bilinear method)] setting. However, white noise may appear around outlines depending on the image. |
|
High accuracy (average colors) |
The average colors of the original pixels are strictly calculated and contained for each pixel after the transformation. Scaling up makes the line sharper and scaling down makes the line smoother. Even detailed lines can be preserved when scaling the image down. However, this method can result in blurred outlines and can take a long time to process depending on the image. |
K.Template
Turn this on to display the [Template] dialog, which allows you to select a template (layer configuration) for cuts and cels.
Cut templates are applied after confirming the settings in the [New] dialog box. Cel templates are applied when cel is created by selecting [Animation] > [New animation cel].
L.Record timelapse *
When enabled, starts recording a timelapse whenever a new canvas is created. If you save the file in Clip Studio format (extension: .clip), the timelapse will be saved with the file. For more detail on timelapses, see Clip Studio TIPS.