Animation Cels Palette Menu
The following describes the functions included in the menu that appears when you click [Palette menu] on the upper left corner of the Animation Cels palette.
New animation cel
Click this to create a new cel. The [Edited cel] changes to the created cel.
As with [Animation] menu > [New animation cel], the cel is specified in the Timeline palette, allowing you to draw and edit the cel.
Select previous cel
The operation for this item differs depending on the cel or layer that is selected.
|
Edited cel |
If the timeline is enabled, the display switches to the cel before the [Edited cel] according to the display order of the timeline. |
|
Light table layer |
The displayed light table is changed according to the display order on the Layer palette. Clicking this displays the layer below. It also changes the light table layers linked to the edited cel. |
Select next cel
The operation for this item differs depending on the cel or layer that is selected.
|
Edited cel |
If the timeline is enabled, the display switches to the cel after the [Edited cel] according to the display order of the timeline. |
|
Light table layer |
The displayed light table is changed according to the display order on the Layer palette. Clicking this displays the layer above. It also changes the light table layers linked to the edited cel. |
New Raster Layer
Creates a new raster layer above the selected layer.
For details, see "New Raster Layer".
New Layer
Creates a new layer above the selected layer.
For details, see "New Layer".
New Correction Layer [PRO/EX]
Creates a correction layer above the selected layer. This layer allows you to adjust the brightness, hue, saturation, luminosity, gradient and the like of the layers below.
For details, see "New Correction Layer [PRO/EX]".
New Layer Folder
Creates a new layer folder.
For details, see "New Layer Folder".
Create folder and insert layer
Creates a new layer folder and places the layer selected on the Search Layer palette in the folder.
Ungroup Layer Folder
Deletes the selected layer folder. When a layer folder is deleted the layers inside the folder will remain.
For details, see "Ungroup Layer Folder".
Duplicate Layer
Makes a copy of the selected layer or layer folder.
For details, see "Duplicate Layer".
Delete Layer
Deletes the selected layer or layer folder.
|
|
When a layer folder is selected, also the layers stored in the folder are deleted. |
Layer mask
Creates a mask for the selected layer or layer folder. Masks can be deleted as well as configured.
For details, see "Layer Mask".
Ruler/Frame [PRO/EX]
Allows you to delete and display rulers, create perspective rulers, and so on. It also allows you to configure whether to move the ruler along with the drawing area of the layer being edited, or separately.
For details, see "Ruler/Frame [PRO/EX]".
File object [PRO/EX]
Allows you to perform operations related to file object layers. File object layers are layers used to load files such as videos and images into Clip Studio Paint.
For details, see "File object".
Layer settings
Allows you to configure settings related to layers such as reference layer, clipping, layer lock, transparent pixel lock, and so on.
For details, see "Layer settings".
Selection from Layer
Allows you to create a selection from a drawing on the currently edited layer. You can also add or delete a selection to/from an already selected area. Furthermore, you can create a selection from the area overlapping an already selected area.
For details, see "Selection from Layer".
Rasterize
Converts the content of a layer other than [Raster] layer into [Raster] layer.
Convert layer [PRO/EX]
Converts the type of the layer selected on the Layer palette. You can change the type and expression color of a layer, as well as convert a drawing inside a selected area into an image material layer.
For details, see "Convert layer [PRO/EX]".
LT conversion of layer
Allows you to separate a selected layer into outlines (line drawings) and tones and convert each of them into different layers.
For details, see "LT conversion of layer [EX]".
Transfer To Lower Layer
Transfers the image on a selected layer to the layer immediately below.
For details, see "Transfer To Lower Layer".
Merge with layer below
Combines a selected layer with that immediately below to make one.
For details, see "Merge with layer below".
Merge selected layers
Combines selected layers to make one. This is used to join images drawn separately, for example.
For details, see "Merge selected layers".
Thumbnail size
Allows you to select the size of the thumbnails to be displayed on the Search Layer palette from [None], [Smallest], [Small], [Medium], [Large] and [Largest].

Thumbnail display settings
Allows you to select the area to be displayed in the thumbnail on the Animation Cels palette.
|
Show whole canvas |
Display the entire canvas in the thumbnail. |
|
Show only layer area |
Display only the drawn area of the layer in the thumbnail. |
|
Display transparent area |
Displays the transparent area of the layer in the thumbnail. |
Show property bar
When turned on, displays the property bar of the Animation Cels palette.

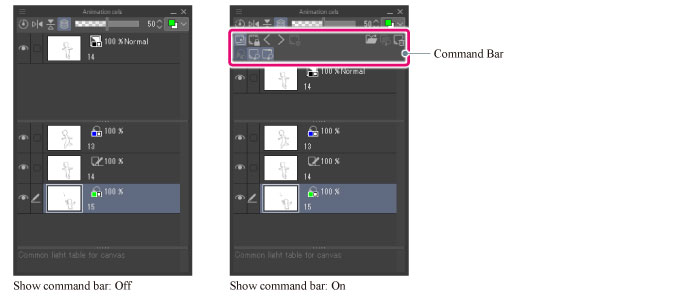
Show command bar
When turned on, displays the command bar of the Animation Cels palette.

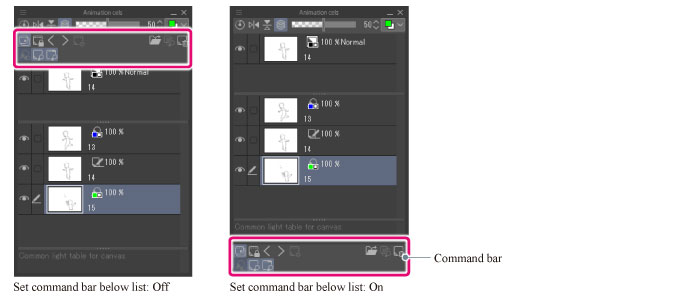
Set command bar below list
When turned on, displays the command bar of the Animation Cels palette below the [Common light table for canvas].
When turned off, displays the command bar of the Animation Cels palette above the [Edited cel].

Hide animation cel palette
Hides the Animation Cels palette.
|
|
To show the Animation Cels palette again, select the palette from the [Window] menu. If you are using a Smartphone, tap the icon on the palette bar. |


