


Clip Studio Paint screen layout
This section describes the default screen structure of Clip Studio Paint for smartphone.
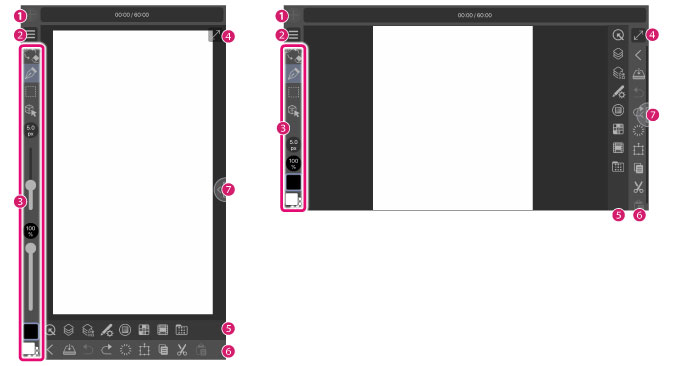
(1) Timer Bar
This shows at the top of a Clip Studio Paint when a canvas is opened. All functions of Clip Studio Paint are available for one hour per day. The Timer Bar does not show after you have purchased the EX or PRO versions.
(2) Menu
Tapping this shows the menu. For details on how to use Menus, see "Using Menus".
(3) Edit Bar
You can select your drawing tool and set its brush size and opacity from here. For details on the functions of the Edit Bar, see"Edit Bar".
|
|
Items displayed on the Edit Bar can be set in the [App Settings] menu > [Edit Bar Settings]. For details, see "Edit Bar Settings". |
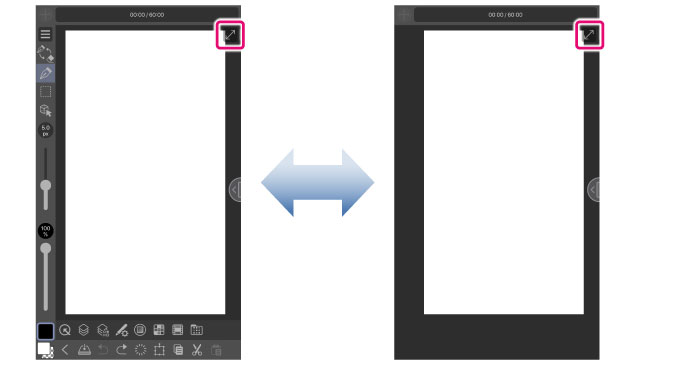
(4) Canvas View
Tapping this hides everything but the canvas view button and the canvas. Tap it again to return to the previous display. This is useful when you want unobstructed access to the canvas.
(5) Palette Bar
Each button on the palette bar corresponds to a different palette. Tapping one shows its palette. A palette allows you to configure a variety of settings. The palette bar can store multiple palettes. For details on the functions of each button on the Palette Bar, see "Palette Bar".
|
|
Items displayed on the Palette Bar can be set in the [App Settings] menu > [Palette Bar Settings]. For details, see "Palette Bar Settings". |
(6) Command Bar
Tapping each button allows you to execute a variety of functions. You can customize the icon view by displaying the icon of frequently used functions, for example. For details on the functions of each button on the Command Bar, see "Command Bar".
|
|
Items displayed on the Command Bar can be set in the [App Settings] menu > [Command Bar Settings]. For details, see "Command Bar Settings". |
(7) Edge Keyboard Toggle
Tap this to show and hide the edge keyboard.
For information on using the edge keyboard, see"Operation using the edge keyboard".
|
|
·Drag the Edge Keyboard Toggle to move it up, down, left, or right on the screen. The Edge Keyboard Toggle can be placed anywhere on the right, left, or bottom edge of the screen. However, the Edge Keyboard itself can only display on the left or right edge of the screen. When the Edge Keyboard Toggle is placed at the bottom of the screen, placing it towards the left will open the Edge Keyboard on the left side of the screen and placing it towards the right will open the Edge Keyboard on the right side of the screen. ·The Edge Keyboard Toggle can be hidden in the [Preferences] under [App Settings]. For details, see "Interface". If the Edge Keyboard Toggle is hidden, the edge keyboard cannot be used. |
Edit Bar
This section describes each of the functions on the Edit Bar from top to bottom.
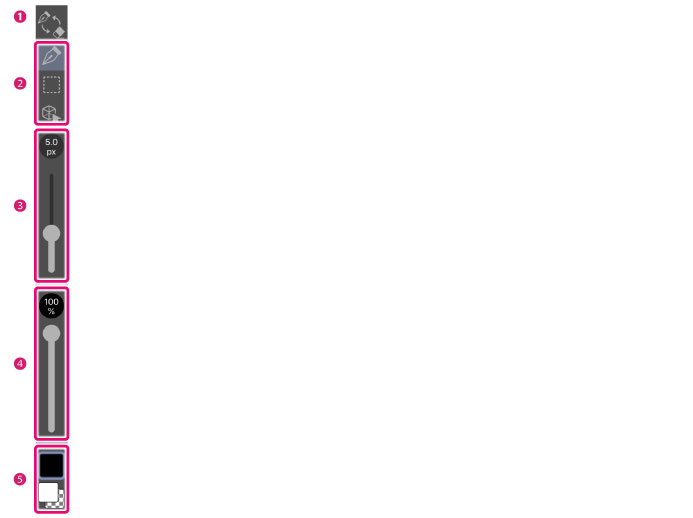
(1) Tool Switch
This switches between the currently used tool and the eraser.
|
|
The [Eraser] tool is set by default, but you can change the tool you want to switch to via the [Tool switch icon] option under [Common settings] on the [Modifier Key Settings] screen. For details, see "Modifier Key Settings". |
(2) Sub Tools
These are drawing tools. The [Tappered], [Rectangle], and [Object] are shown when you first start up the app. Tapping a sub tool once selects it. Tapping it again opens the sub tool bar where you can change it to a new tool.
Tap the new tool you wish to use from the sub tool bar to select it and tap the icon a second time to go back to the canvas.
For details on how to select a tool, see "Selecting a tool".
|
|
You can change the number of tools shown on the Edit Bar. For details, see "Edit Bar Settings". |
(3) Brush Size
Use this slider to set the brush size of drawing tools.
If you don't see the slider, tapping the pixel circle will show it along with a spin button.
If you do see a slider, taping the pixel circle shows the spin button only.
(4) Opacity
Use this slider to set the opacity of drawing tools.
If you don't see the slider, tapping the percent circle will show it along with a spin button.
If you do see a slider, taping the percent circle shows the spin button only.
(5) Color Icons
These icons display the main, sub, and transparent colors. Tap an icon to select its color.
·Tapping the single color icon, shows the [Color Settings] screen where you can change its color.
·Tapping the compound color icon, shows a pop up with the two other single color icons. Tap the first single icon to show the [Color Settings] screen where you can change its color. Tapping the transparent color icon will not show the [Color Settings] screen.
|
Main color |
This is the color you will use most often. |
|
Sub color |
This is the color you will use often after the main color. If a tool has [Sub color] or [Blend with sub color] in its settings, this color will be used. For example, if you specify [Line/Fill] under [Edit tool properties] for the [Figure] tool, the main color will be used for the figure’s outline, and the sub color will be used for its filling. |
|
Transparent color |
Select this icon to use transparent color. |
|
|
You can change the way the color icons are displayed. For details, see "Edit Bar Settings". |
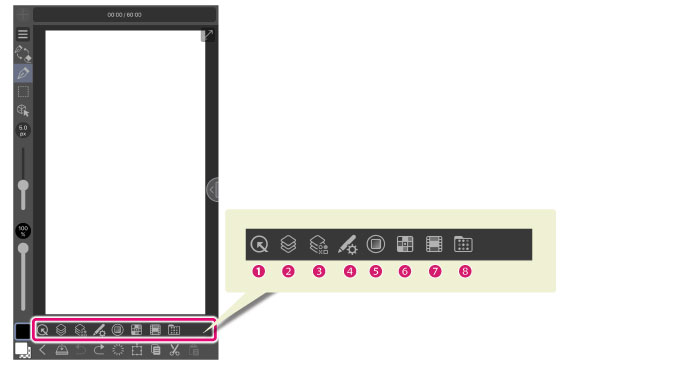
Palette Bar
This section describes each of the functions on the Palette Bar from left to right.
|
|
·For details on palettes , see "Palette". ·Items displayed on the Palette Bar can be set in the [App Settings] menu > [Palette Bar Settings]. For details, see "Palette Bar Settings". ·For details on how to use palettes, see "Using Palettes". |
(1) Quick Access
Tapping this shows the [Quick Access] palette. The [Quick Access] palette can register frequently used tools, menu commands, auto actions, and drawing colors. Registered functions can be used from the [Quick Access] palette. For details, see "Quick Access Palette [PRO/EX]".
(2) Layer
Tapping this shows the [Layer] palette. The [Layer] palette allows you to manage layers such as changing their stacking order, blending mode, opacity, etc. For details, see "Layer Palette".
(3) Layer Property
Tapping this shows the [Layer Property] palette. The [Layer Property] palette allows you to set a variety of effects and a layer’s expression color. For details, see "Layer Property Palette [PRO/EX]".
(4) Tool Property
Tapping this shows the [Tool Property] palette. The [Tool Property] palette allows you to adjust a Sub tool’s settings. For details, see "Tool Palette".
(5) Color Wheel
Tapping this shows the [Color Wheel] palette. The [Color Wheel] palette allows you to select a color from the color wheel. For details, see "Color Wheel Palette".
(6) Color Set
Tapping this shows the [Color Set] palette. The [Color Set] palette allows you to select a color from a list of colors. For details, see "Color Set Palette".
(7) Color History
Tapping this shows the [Color History] palette. The [Color History] palette shows a history of your drawing colors. For details, see "Color History Palette [PRO/EX]".
(8) Material
Tapping this shows the [Material] palette. The [Material] palette manages various materials used to create comics and illustrations. For details, see "Material Palettes".
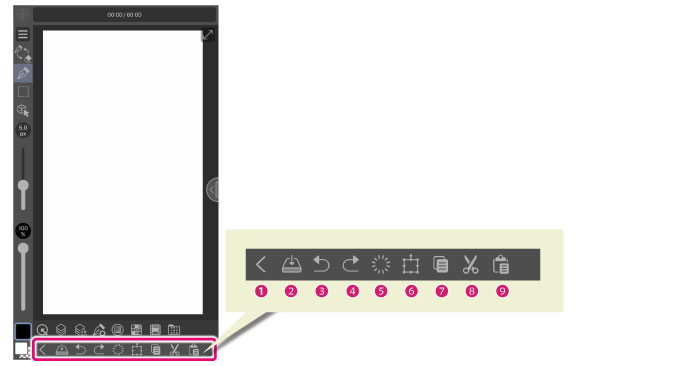
Command Bar
This section describes the function of each button on the command bar from left to right.
|
|
Items displayed on the Command Bar can be set in the [App Settings] menu > [Command Bar Settings]. For details, see "Command Bar Settings". |
(1) Close
Closes the current canvas being edited. If you have not yet saved the canvas, a screen asking you if you want to save it will show.
If the page list is showing or you are in the story editor, close them.
(2) Save
Saves the current canvas being edited.
(3) Undo
Undoes the previous operation.
(4) Redo
Redoes the undone operation.
(5) Delete
Deletes everything drawn on a layer. If there is a selected area, it erases everything in the selection.
(6) Scale/Rotate
Scales up/down, rotates, and transforms. If there is a selected area, scales up/down, rotates and transforms the content of the selection.
(7) Copy
Copies the selected area of a layer to the clipboard. If an object is selected with the [Object] tool, it will be copied to the clipboard. If there is no selection at all, the entire layer is copied to the clipboard.
(8) Cut
Cuts the selected area of the layer and copies it to the clipboard, deleting the image from the canvas. If you select an object with the [Object] tool, the object will be cut and copied to the clipboard. If there is no selection, the entire layer is copied to the clipboard.
(9) Paste
Adds a layer to the [Layer] palette, and pastes the image to the canvas from the clipboard.
If a Object was copied to the clipboard with the [Object] tool, it will be pasted onto the current layer.