


Functions of Timeline Palette
This section describes the functions of the Timeline palette. The next editing screens are located in the Timeline palette.
·"Timeline palette functions (Default)"
|
|
When importing timelines edited in Clip Studio ACTION, the following cannot be edited in Clip Studio Paint. ·Subtitle tracks ·Paper layers with opacity Clip Studio Paint files from Ver.1.8.4 and later cannot be loaded in Clip Studio ACTION. |
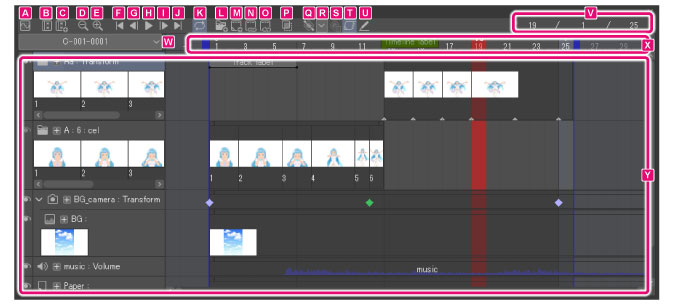
Timeline palette functions (Default)
This section describes the functions of the Timeline palette.
|
|
When using the Smartphone version, some of the buttons at the top of the Timeline palette are hidden. Swipe to the left and right of the buttons to display the hidden buttons. |
A.Graph Editor
This switches from the Timeline palette to the Graph Editor. For details on the Graph Editor, see "Graph Editor".
B.Edit timeline
This button selects the [Edit timeline] tool. Frames in the timeline can be moved using the mouse on the canvas.
For details on the [Edit timeline] tool, see "Operating the timeline editing tools".
C.New timeline
This button displays the [New timeline] dialog box. It can be used to create a new timeline on the canvas.
For details on the [New timeline] dialog box, see "New timeline".
D.Zoom out
This button allows frames to be displayed in the Timeline palette in a smaller size.
|
|
·When using a touch display with Windows 8 or later, frames can be displayed in the Timeline palette in a smaller size by pinching. ·Dragging to the left on the timeline while holding Ctrl + Space enables you to scale down the frame in the Timeline palette. |
E.Zoom in
This button allows frames to be displayed in the Timeline palette in a larger size.
|
|
·When using a touch display with Windows 8 or later, frames can be displayed in the Timeline palette in a larger size by pinching. ·Dragging to the right on the timeline while holding Ctrl + Space enables you to scale up the frame in the Timeline palette. |
F.Go to start
This button selects the first frame in the Timeline palette.
G.Go to previous frame
This button selects the previous frame of the current frame in the Timeline palette.
H.Play/Stop
This button plays or stops animation on the canvas.
|
|
·Animation playback can also be stopped by pressing the Esc key or clicking a palette other than the Timeline palette during playback. ·When an animation is played, played frames will be cached. This allows the animation to buffer more quickly the next time it is played. However, the previous playback cache is discarded when the canvas or Timeline palette is edited. |
I.Go to next frame
This button selects the next frame of the current frame in the Timeline palette.
J.Go to end
This button selects the last frame in the Timeline palette.
K.Loop play
This button enables loop play. When playing animation, playback will return to the first frame after reaching the last frame.
L.New animation folder
This button creates a new animation folder (track) above the selected track.
|
|
Animation folders are folders for storing cels (layers). For details, see "Explanation: Animation folders and cels". |
M.New animation cel
This button designates a new animation cel to the selected frame on the Timeline palette. At the same time, the new cel will be added to the animation folder on the Layer palette.
|
|
For details on animation folders and cels (layers), see "Explanation: Animation folders and cels". |
N.Specifying cels
This button designates cels to frames by displaying the [Select layer] dialog of the current frame when clicked.
For details on the [Select layer] dialog, see "Specify cels".
O.Delete cel designation
Cel specification can be deleted by selecting a specified cel and clicking [Delete cel specification].
|
|
Deleting specified cels from the Timeline will not affect cels in the Layer palette. |
P.Enable onion skin
Onion skin is a function in which specified cels surrounding the selected cel are displayed on the canvas in addition to the selected cel.
This button turns the onion skin on and off. Click it again to disable the onion skin display.
|
|
The onion skin display color and number of cels to be displayed can be set in the [Onion skin settings] dialog box. For details, see "Onion skin settings". |
Q.Add keyframe
This button adds a keyframe to the frame selected in the Timeline palette.
|
|
·For details on adding keyframes, see "Keyframe settings". ·For details on how to use keyframes, see "Key frame operation". |
R.Keyframe interpolation
This button sets the keyframe interpolation method of new keyframes.
|
Hold |
When Hold is selected, keyframe values are maintained from one keyframe to the next. The values are replaced when the next keyframe begins. |
|
Linear |
The settings of the selected keyframe will be carried to the following keyframe at a fixed speed. |
|
Smooth |
The speed will gradually increase after the selected keyframe and then slow down just before the next keyframe. |
|
|
To change the keyframe interpolation after adding a keyframe, see "Changing the keyframe interpolation". |
S.Delete keyframe
Deletes the selected keyframe from the Timeline palette.
|
|
·For details on adding keyframes, see "Keyframe settings". ·For details on how to use keyframes, see "Key frame operation". |
T.Enable keyframes on this layer
This button enables/disables keyframe editing of the selected track.
|
|
For details on how to use keyframes, see "Key frame operation". |
U.Edit layers with active keyframes
You can temporarily draw or make edits with a brush or pen on a track that has [Enable keyframes on this layer] turned on.
When on, the selected layer’s transformations will be disabled, leaving only the selected layer and paper layer. All other layers will be displayed as semi-transparent.
Selecting a different layer cancels the setting automatically and restores the layer display.
V.Current frame/Start frame/End frame
Display the positions of the currently selected frame, the start frame and the end frame.
|
|
·In PRO and EX, the frames are displayed differently depending on the frame display method selected in [Playback time] in the [New] dialog box or the [New timeline] dialog box. ·The frame display method can be changed in [How to show frames] in the [Canvas Properties] dialog box. For details, see "Canvas Properties [PRO/EX]". |
W.Timeline list
The name of the timeline being edited is displayed.
When using files with multiple timelines, clicking a timeline from the displayed menu will switch the current editing target.
X.Number of frames
This displays frame information. In PRO and EX, the frames are displayed differently depending on the frame display method selected in [Playback time] in the [New] dialog box.
|
|
·For details on [Playback time], see "New dialog box (Animation) [PRO/EX]". ·The frame display method can be changed in [How to show frames] in the [Canvas Properties] dialog box. For details, see "Canvas Properties [PRO/EX]". ·Drag horizontally while holding down the space bar to scroll horizontally through the timeline. ·Drag horizontally while holding down the Ctrl + Space keys to extend or shrink the frame in the Timeline palette. |
Y.Tracks and Timelines
The track area displays the layer names and the animation timeline. Cels can be specified and clips can be edited in the timeline of each track. The background color of the timeline changes every second.
|
|
Dragging within the timeline while holding down the space bar enables you to scroll through the timeline. |
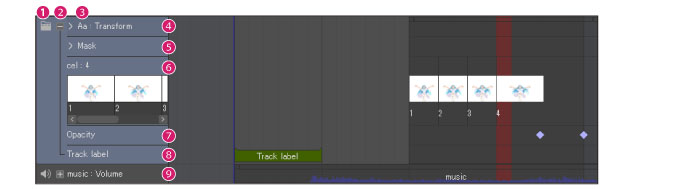
(1) Show/Hide Track
This button displays/hides a track.
(2) Track details
This shows an area for editing the specified cels, keyframes, and track labels. Displayed settings will differ according to the track (layer) type and settings.
Tracks are linked to the layer structure in the Layer palette. Tracks will be created for layer folders, layers, audio layers, and camera work.
|
(1) Track Icon |
This icon indicates the layer type. If it is a layer folder, you can open and close the folder and show the layer types by clicking to the left of the track icon. |
|
(2) Details |
Click this icon to display the track label area. Turning on [Enable keyframes on this layer] adds a keyframe editing area to the track. |
|
(3) Track name |
This area displays the track name. The settings you can edit change according to the track layer type and settings. |
|
(4) Transform area |
This area displays the keyframes of layer transformations. Turning on [Enable keyframes on this layer] switches to the transformation area. An arrow icon is added to the left of the track name. You can open the drop-down arrow to show the keyframes for the position, scale ratio, rotation, and center of rotation. |
|
(5) Mask area |
This area displays the keyframes of a mask’s transformation. Clicking [Detail] on layers set with a layer mask or animation folders will display it. Turning on [Enable keyframes on this layer] switches the track name area with the transformation area. An arrow icon is added to the left of the track name to show transformations of the layer mask. You can open the drop-down arrow to show the keyframes for the position, scale ratio, rotation, and center of rotation. If [Enable keyframes on this layer] is turned off, it will not be displayed. |
|
(6) Cel specification area |
This is an area to specify cels. If [Enable keyframes on this layer] is turned off, the track name area will be the cel specification area. It will also be displayed in the animation folder. |
|
(7) Opacity area |
This area displays the keyframes of a layer’s opacity. Click on [Detail] on a track that has [Enable keyframes on this layer] turned on to display it. |
|
(8) Track label area |
This area displays track labels. Here you can edit and view track labels of a frame. For details on how to create and edit a label, see "Label operations". |
|
(9) Volume Area |
This area displays the keyframes of an audio file’s volume. The keyframes will be displayed on the audio track. |
|
|
Track names on the Timeline palette have the same structure as on the Layer palette, except that cels in animation folders are not displayed. These cels can be displayed specifying the cels in the timeline of each track. |
(3) Thumbnail list
These are the thumbnail images of a cell or layer. Thumbnails for all of the cells are displayed for the animation folder. Clicking the thumbnail, selects the frame that the cell specifies, other that the clicked cel.
|
|
·You can set whether to show or hide the timeline thumbnails by selecting [Show Menu] > [Thumbnail Size] in the Timeline palette. From [Thumbnail size] it is possible to set whether to show or hide thumbnails, or change the thumbnail size. Changed thumbnail display settings will be applied to the thumbnails of each clip. ·To select multiple cels, click the thumbnails while holding down Ctrl or Shift. ·Double clicking the cel name below the thumbnail allows you to change the cel name. ·When a [Palette color] is set in the Layer palette, the palette color is displayed as the cel name. ·Turning on [Layer] menu > [Layer Settings] > [Display palette colors on canvas] enables the [Palette color] to be reflected in the thumbnails. ·Dragging horizontally while holding down the space bar enables you to scroll through the thumbnail list for each track. |
(4) Starting frame
This lets you set the first frame for animation playback.
Dragging the blue square allows you to adjust the [Start frame] position.

|
|
The [Start frame] position cannot be moved to a frame earlier than 0 in DEBUT or PRO. |
(5) Current frame
The position of the currently selected frame is indicated by red lines.
Click the frame number to select the corresponding frame and change the frame position.
|
|
Click inside the timeline to select a frame, as well as its cel specification, clip and keyframe. |
(6) End frame
This lets you set the end frame for animation playback.
Dragging the blue square allows you to adjust the [End frame] position.

|
|
The [End frame] position cannot be moved to a frame later than 24 in DEBUT or PRO. |
(7) Clip
Clips are units used when editing animated sequences.
For details on how to edit clips, see "Clip operations".
For details on how to specify and edit cels, see "Cel specification operations".
For details on how to specify and edit keyframes, see "Key frame operation".
(8) Clip Thumbnails
These are thumbnails of cels specified for clips.
|
|
You can set whether to show or hide the clip thumbnails by selecting [Show Menu] > [Thumbnail Size] in the Timeline palette. From [Thumbnail size] it is possible to set whether to show or hide thumbnails, and change the thumbnail size. When the thumbnail display settings are changed, the new settings are also applied to thumbnails in the thumbnail list. |
(9) Specify cel
Indicates the position in which to display cels in an animation folder. When a cel display position is specified, the cel name is displayed in the timeline.
(10) Timeline label
This is the label in which instructions, etc. can be written for a specific frame in the timeline.
For details on how to create and edit labels, see "Label".
(11) Track label
This is the label in which instructions, etc. can be written for a specific track.
For details on how to create and edit a label, see "Label operations".
(12) Keyframe
Keyframes record the following settings of each track on the Timeline palette.
·Layer folder/layer transformation and opacity
·Audio layer volume
·Keyframe interpolation
A keyframe’s color varies depending on its [Keyframe interpolation] settings.

(13) Grip [Tablet/Smartphone]
This is used when changing the order of tracks on the Tablet/Smartphone.
Move a finger or pen over the grip and drag up and down to change the track stacking order. When multiple tracks are selected, all selected tracks are subject to changes of the stacking order.