


Timeline palette menu
This section describes the functions included in the menu that is displayed when you click the [Palette menu] on the upper left corner of the Timeline palette.
Show split view
Splits the Timeline palette into two views.
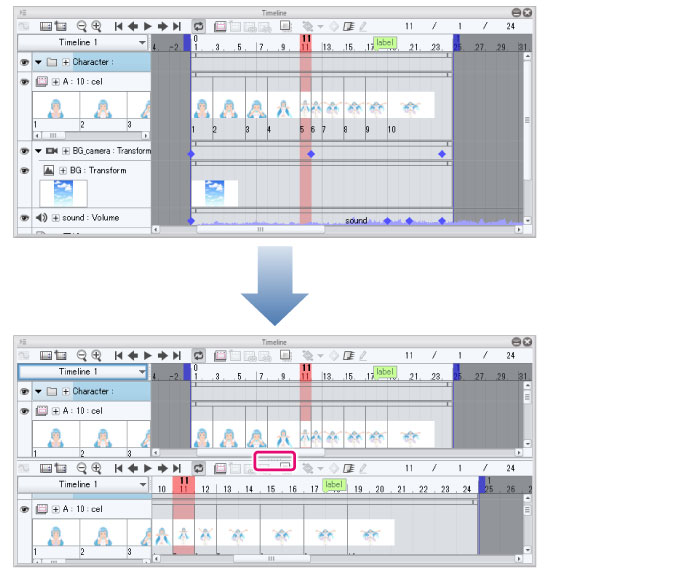
For canvases with multiple timelines, a different timeline can be displayed in each view.
Thumbnail display settings can also be changed for each view.
New animation layer
This creates a new animation related layer or folder.
|
Animation folder |
Creates a new animation folder on the Layer and Timeline palettes. Animation folders are folders for storing animation cels (layers). Layers and layer folders created in an animation folder can be used as cels. |
|
2D camera folder |
This creates a 2D camera folder on the Layer palette and the Timeline palette. Using a 2D camera folder, camera movement can be added to an animation without transforming the animation folder or the layers’ images. |
|
Audio |
Creates a new audio layer (audio track) on the Layer palette and the Timeline palette. An audio layer is a layer for editing an audio file on the Timeline palette. |
New animation cel
Creates a new cel in an animation folder.
If a cel is created while the Timeline palette is enabled, the cel will be specified to the current frame.
To execute this item, select an animation folder on the Layer palette or Timeline palette.
Edit track
Operations related to specifying cels, clips, and keyframes are performed from the Timeline palette.
|
Delete |
This deletes the specified cel, clip, or keyframe currently selected in the Timeline palette. |
|
Cut |
Cut and store a selected cel specification, clip or keyframe from the Timeline palette on the clipboard. |
|
Copy |
Store a selected cel specification, clip or keyframe from the Timeline palette on the clipboard. The cel will remain on the Timeline palette. |
|
Paste |
Pastes the selected cel specification, clip or keyframe stored on the clipboard onto the Timeline palette For details, see "Paste". |
|
Enable keyframes on this layer |
Enables/disables editing with keyframes on the selected layer or track. For details, see "Enable keyframe editing". |
|
Add keyframe |
This adds a keyframe to the selected frame on the Timeline palette. |
|
Switch keyframe to hold interpolation |
This changes the interpolation method of the selected keyframe to [Hold]. |
|
Switch keyframe to linear interpolation |
This changes the interpolation method of the selected keyframe to [Linear]. |
|
Switch keyframe to smooth interpolation |
This changes the interpolation method of the selected keyframe to [Smooth]. |
|
Edit layers with active keyframes |
This allows you to temporarily draw or make edits with a brush or pen on a layer (track) that has [Enable keyframes on this layer] turned on. |
|
Delete all keyframes |
This deletes all keyframes from the selected track in the Timeline palette. |
|
Specify cels |
This specifies a cel for the frame selected in the Timeline palette. For details, see "Specify cels". |
|
Batch specify cels |
This allows you to batch specify cels in the Timeline palette from the selected frame onward. For details, see "Batch specify cels". |
|
Create all supported cels |
This allows cels that are specified in the Timeline palette but have not been created in the Layer palette to be created together. They are created in all animation folders included in the timeline. |
|
Rename in timeline order |
This renumbers the names of the cels in the selected animation folder in the order displayed on the Timeline palette. For details, see "Rename in timeline order". |
|
Rename in layer order |
This renumbers the names of the cels in the selected animation folder according to the stacking order in the Layer palette. For details, see "Rename in layer order". |
|
Select previous cel |
If the timeline is enabled, this selects the cel before the frame currently selected in the Timeline palette. The operation for this item differs depending on the canvas specification or the cel or layer that is selected. For details, see "Select previous cel". |
|
Select next cel |
If the timeline is enabled, this selects the cel after the frame currently selected in the Timeline palette. Operation for this item differs depending on canvas specification or the cel or layer that is selected. For details, see "Select next cel". |
|
Combine clips |
This allows you to select multiple consecutive clips in the same track on the Timeline palette and join them together. |
|
Divide clip |
This splits the clip at the frame selected on the Timeline palette. |
|
Set as first displayed frame |
This allows the start position of a clip to be set according to the frames on the Timeline palette. |
|
Set as last displayed frame |
The end position of a clip can be set according to the frames on the Timeline palette. |
Graph Editor
This switches from the Timeline palette to the Graph Editor.
Play/Stop
Plays or stops animation on the canvas.
Playback settings
Set the playback method for playing animation.
|
Play in real time |
This plays the animation according to the frame rate. |
|
Play all frames |
This plays all frames when playing the animation. |
|
Loop play |
This button enables loop play. When playing animation, playback will return to the first frame after reaching the last frame. |
|
Render 2D camera |
When active, the camera movement set in the 2D camera folder track is reflected when the animation is played. |
|
Render before starting playback |
Turn this on to render the playback range of the animation before playing the animation. This avoids issues where playback is delayed due to the time taken to load the animation. However, rendering before playing the animation means that it may be a while before playback starts. |
|
Prefer speed |
When the canvas has a high resolution, the resolution is automatically reduced when playing the animation to improve the playback speed. A cache is created with images at a size near the scale of the canvas when playing the animation. When the scale is changed during playback, the cache is discarded according to the scale. |
|
Prefer quality |
When the canvas has a high resolution, the resolution is automatically reduced when playing the animation to improve the playback speed. A cache is created with images at a size near the scale of the canvas when playing the animation. The cache is not discarded when the scale is changed during playback. |
Move frame
Operate the frames in the Timeline palette using commands.
|
Go to start |
Go to start selects the first frame in the Timeline palette. |
|
Go to end |
Go to end selects the last frame in the Timeline palette. |
|
Go to previous frame |
Got to previous frame selects the frame before a selected frame in the Timeline palette. |
|
Go to next frame |
This button selects the next frame of the current frame in the Timeline palette. |
|
Previous keyframe |
Selects the keyframe before the currently selected frame on the [Timeline]. |
|
Next keyframe |
Selects the keyframe after the currently selected frame on the [Timeline]. |
|
Go to specified frame |
Go to specified frame selects the frame corresponding to the specified number in the Timeline palette. Selecting this command displays the [Go to specified frame] dialog box. Enter the frame to be selected in [Frame number] and click [OK]. The frame entered in [Frame number] is selected in the Timeline palette. |
|
Go to timeline label |
Specify the name of a timeline label and go to the frame containing that timeline label. For details, see "Go to timeline label". |
Label
Set labels on the Timeline palette. Created labels can be used as markers when editing.
|
Create timeline label |
This creates a timeline label in the specified frame on the Timeline palette. For details, see "Create timeline label". |
|
Delete timeline label |
This deletes a timeline label from the Timeline palette. For details, see "Delete timeline label". |
|
Create track label |
Creates a track label in a frame in the specified track on the Timeline palette. For details, see "Create track label". |
|
Delete track label |
This deletes a track label from the Timeline palette. Inbetween track labels and reverse sheet track labels can be deleted in addition to standard track labels. For details, see "Delete track label". |
|
Create inbetween track label |
This adds a track label specifying an inbetween point on a frame in the specified track on the Timeline palette. |
|
Create reverse sheet track label |
This adds a track label specifying a reverse sheet in between point in a frame in the specified track on the Timeline palette. |
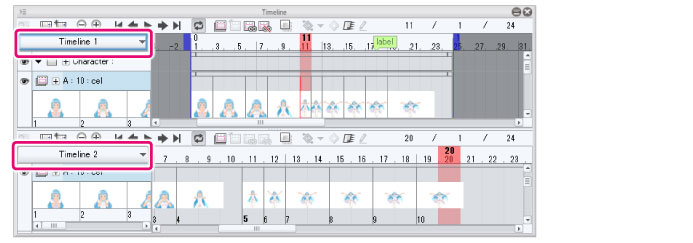
Timeline
Multiple timelines can be created and managed for one canvas. You can perform timeline management operations such as creating additional timelines and switching timelines.
|
Enable timeline |
Enables or disables the timeline for the canvas. For details, see "Enable timeline". |
|
New timeline |
New timeline displays the [New timeline] dialog box. It can be used to create a new timeline on the canvas. For details, see "New timeline". |
|
Go to previous timeline |
Switches the editing target to the previous timeline if there are multiple timelines. |
|
Go to next timeline |
Switches the editing target to the next timeline if there are multiple timelines. |
|
Change settings |
This changes various settings for the timeline being edited. For details, see "Change settings". |
|
Change frame rate |
Change frame rate allows you to change the frame rate (number of frames per second) set when creating the canvas. |
|
Manage timeline |
This allows you to manage timelines in the file. For details, see "Manage timeline". |
|
Insert frame |
You can also insert frames using the Timeline palette. For details, see "Insert frame". |
|
Delete frame |
Deletes the selected frame from the Timeline palette. For details, see "Delete frame". |
|
Apply Toei Animation Digital Exposure Sheet information to current exposure sheet [EX] [Windows/iPad] |
You can open the Toei Animation Digital Exposure Sheet and use the vertical exposure sheet to edit the contents of the [Timeline] palette. For details, see "Apply Toei Animation Digital Exposure Sheet information to current exposure sheet [EX] [Windows/iPad]". |
|
Load changes to Toei Animation Digital Exposure Sheet [EX] [Windows/iPad] |
Load the changes made to the Toei Animation Digital Exposure Sheet to Clip Studio Paint. For details, see "Load changes to Toei Animation Digital Exposure Sheet [EX] [Windows]". |
|
Toei Animation Digital Exposure Sheet settings [EX] [Windows] |
You can set up the installation path for the Toei Animation Digital Exposure Sheet. For details, see "Toei Animation Digital Exposure Sheet settings [EX] [Windows]". |
|
Toei Animation Digital Exposure Sheet Path [EX][iPad] |
It is possible to link Toei Animation Digital Exposure Sheet settings with Clip Studio Paint. For details, see "Toei Animation Digital Exposure Sheet Path [EX][iPad]". |
Show animation cels
Configure settings for displaying animation cels.
|
Show edited cel only |
Turn this on to display only the cel selected for editing from the animation folder. |
|
Enable onion skin |
Onion skin is a function in which previous and consecutive cels are layered over the current cel. Turn this on to display the onion skin on the canvas. For details, see "Enable onion skin". |
|
Onion skin settings |
Selecting this item displays the [Onion skin settings] dialog. This allows you to configure onion skin settings such as the number of displayed cels and the display color. For details, see "Onion skin settings". |
|
Check cel motion by key input |
Allows you to check cel motion with key operations. For details, see "Check cel motion by key input". |
|
Check surrounding cels by key input |
Allows you to check cel motion with key operations. For details, see "Check cel motion by key input". |
Light table
Light table allows you to configure the settings of the Animation Cels palette and light table layers registered to the Animation Cels palette.
|
|
For details on the Animation Cels palette and light table layers, see "About the Animation Cels Palette" and "Functions of Animation Cels Palette". |
|
Enable light table |
Turn this on to display the light table layers on the canvas. Turn it off to hide the light table layers. |
|
Fix current animation cel as editing target |
This fixes a registered cel as the [Edited cel]. When this is set, the [Edited cel] does not change when another cel is selected on the Layer palette or Timeline palette. |
|
Register selected layer |
Register a layer selected on the Layer palette as a light table layer on the Animation Cels palette. |
|
Select and register file |
Register other image files to the light table on the Animation Cels palette. For details, see "Select and register file". |
|
Register layer copied from another canvas |
This pastes a layer copied from another canvas to the light table on the Animation Cels palette. If the selected layer is a light table layer from a [Light table specific to cel], it is registered to the [Light table specific to cel]. Otherwise, it is registered to the [Common light table for canvas]. |
|
Register onion skin images |
If onion skin is enabled, the surrounding cels displayed as onion skin are registered to the [Light table specific to cel] on the Animation Cels palette. The onion skin layer color of the registered cels (light table layers) is kept, but the opacity is not. |
|
Deregister selected image from light table |
This deregisters the selected light table layer from the Animation Cels palette. |
|
Deregister all images from light table |
This deregisters all light table layers shown on the Animation Cels palette. |
|
Move canvas to center |
Selecting this item displays the [Move canvas to center] dialog. Drag the slider to adjust the position and angle of the canvas based on the light table layers displayed on the canvas. For details, see "Move canvas to center". |
Show 2D camera frames
When active, a camera frame for the 2D camera folder set in the frame selected in the Timeline palette is displayed. For details, see "Show 2D camera frames".
Show camera path
When active, the field guides of the 2D camera folder or the currently selected layer are displayed. For details, see "Show camera path".
Show all field guides
When active, all guides for layers and tracks with keyframes on the canvas are displayed. Turning it off displays only the layer and track guides. For details, see "Show camera path".
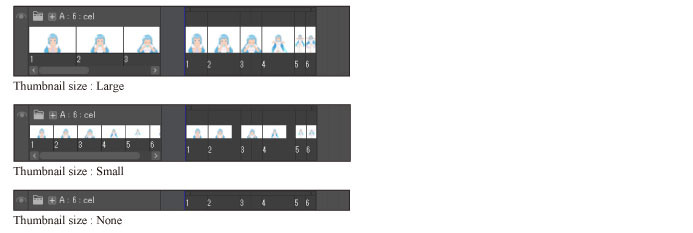
Thumbnail size
It is possible to select the display size for thumbnails in the [Thumbnail List] and [Clip Thumbnails] on the Timeline palette from [None], [Smallest], [Small], [Medium], [Large] and [Largest].
Thumbnail display settings
This allows you to set how thumbnails are shown on the Timeline palette.
|
Show only animation folder |
This allows you to display thumbnails in the animation folder only. |
|
Display transparent area |
It is possible to display the transparent area of the layer or cel in the thumbnail. |
Hide timeline palette
This hides the Timeline palette.
|
|
To show the Timeline palette again, select the palette from the [Window] menu. If you are using a Smartphone, tap the icon on the palette bar. |